Showing posts with label Team Resource. Show all posts

Thursday, May 16, 2019

ECC PTA

a flier with the text: AAC & ME?! with information for the ECC PTA on this topic

Join us for our May ECC PTA on Tuesday, May 21! This month our topic is learning all about augmentative and alternative communication better known as AAC for students with multiple impairments and blindness. This is another free meeting for our parents, related servers and teachers. We are very happy to have Breana Cannon as our special guest presenter. Breana is a speech language pathologist and also serves on our augmentative communication team. She has a fantastic understanding of  students with multiple impairments. Read this post late? No worries! You didn't miss out. You can still access the recorded webinar by registering:  https://docs.google.com/forms/d/e/1FAIpQLSdMdsZtaqYrpVrGtpHxt7uNKSo6aWBIUqw9ozkyR1Z4wkX_dQ/viewform?usp=sf_link

Friday, April 19, 2019

Join the ONH Discussion Group!


Join us for the ONH Discussion Group! The ONH Discussion Group is a free resource group to learn about optic nerve hypoplasia (ONH). We increasingly see more students with ONH. ONH is another spectrum vision impairment. Many of us in the vision impairment education community struggle to understand the educational implications from ONH. 
That is why I created the ONH Discussion Group! Come and learn in our free Zoom meetings about resources, strategies and information about ONH. Each month we have a different topic related to ONH. Parents, teachers and related servers are all invited to join and contribute to the group. 
Join the distribution group email: https://docs.google.com/forms/d/e/1FAIpQLSe6MGUdqsFd8ho59kCqd-Kb5SfWF3f6iUBWJ2KTZe4nX7-AZw/viewform?usp=sf_link . The distribution group email will send updates and meeting information for monthly Zoom meetings. We also have an ONH Google Drive resource folder.  
Join us!

Friday, March 29, 2019

Flipgrid + ECC =Success!


Image graphic that says Teach the ECC using Flipgrid

Have you heard of Flipgrid? Before I can tell you why it's so awesome, let me explain what it is.
From the website: Flipgrid is the leading video discussion platform for millions of PreK to PhD educators, students, and families in 180+ countries. Teachers set up "grids" which are topics. Teachers post questions or topics and students comment on them individually with their own video. General education loves using Flipgrid. I'm always thankful for our education technology specialist who keeps me in the loop of these things. We tested it with our AT specialist and realized that Flipgrid is very accessible (especially on Apple products with VoiceOver). Now that I understood what Flipgrid was, I knew I could use it teach the Expanded Core! The first thing I do is head to my ECC assessment tools and start making a list of EVALS skills. This helps me infuse skills into lesson plans. I always write lesson plans so I can focus on what my objective, procedure, ECC skills and instruction cues will be.

How can you use Flipgrid to teach the Expanded Core? 
This is an awesome idea for itinerant teachers. It allows me to do a lot of teaching remotely. I can post topics/questions/assignments and then students can respond to them. I use it in a variety of ways. Flipgrid is very helpful because it allows me to teach students who live close and students far. I currently have students that live 2 to 4 hours away from me. Important: you can't teach everything from the ECC on Flipgrid. But you can teach a lot of things! In fact, simply using Flipgrid is an ECC lesson because it alone has ECC skills. I love when I hear my students using VO when starting their videos. 

 I've included some screenshots. Below you will see my homepage with 3 of my most current "grids" (or topics). I use them in a variety of my classes. Currently I have 3 live grids: Study Abroad Canada, Accessible Arts Academy and Expanded Core.

Screen shot of Flipgrid screen with 3 grids on it.

Screenshot of the topic details page in Flipgrid

I post a variety of topics each class. This allows you to encourage students to "field trips". I assign students to do certain tasks and then video their responses. Don't just limit it to you (as the teacher) posting assignments. For my Study Abroad Class, I have a few students who are leading the discussions and posting topics. As the teacher, you can grade, provide feedback, etc. to students. I even invite guest teachers to join me and help teach. 

Screenshot of videos list posted by students.
It's hard to coordinate your schedule and student's schedules but Flipgrid allows you to (almost) have an authentic conversation on your own time. I post my topic/assignment/lecture thought and then I give a deadline for my students to reply. I also love that Flipgrid connects students. They don't have to be in the same place to interact with each other. They can reply directly to other's videos. It's a great way for students to get to know others. I also have my mentors join me as guest teachers (or called "co-pilots" on Flipgrid). 


Another feature that I like is that this mainstream general education. My students are using the same educational technology that their peers in their own school are using. They learn to upload videos, links, etc. and develop their tech skills. You can also use Flipgrid for PLCs!

Screenshot of a video Flipgrid page with a teacher making a funny face.
I've used Flipgrid for discussions, assignments, quizzes and even field trips! Sometimes I take my students on a "field trip" somewhere and video where I am or I have them take me on a field trip to show me how they would access a location. There is a time limit for a maximum of 5 minutes per video. I like that because it allows me to give direct feedback on a particular skill. They may have multiple videos that go with that skill and they can upload as many as they want for the assignment. I can give direct feedback to each video. 
We have a lot of fun taking the "selfie" for each video. We always end our videos and take pictures with a funny face. It's a fun tradition that we have in our Flipgrid discussions. I love how effective I can be utilizing this tool. There are so many ideas floating around on how general education teachers are using Flipgrid. I check out YouTube and other EdTEch sites to get ideas because I want to align how I use it with general ed. It allows me to teach my students to use Flipgrid like their sighted peers. 
Here's a tutorial on using Flipgrid:
My last idea for using Flipgrid: use it with your parents! As teachers, we have a special responsibility to teach our parents about the Expanded Core. Use Flipgrid to connect to your parents. You can take videos of their children doing lessons with you or to share bits about the ECC. It's vey easy for parents to learn, too! I'd love to hear how you use it for your ECC lessons.  I'll keep posting my ideas, too!

Friday, March 22, 2019

ECC Assessments


Hello friends!
Did you think I quit writing here on The Bee? I didn't!! I've just been busy on my social media accounts, 9MoreThanCore and developing SO many new programs. It's been busy and I have felt awful that I have neglected The Bee. Have no fear, I am here!!

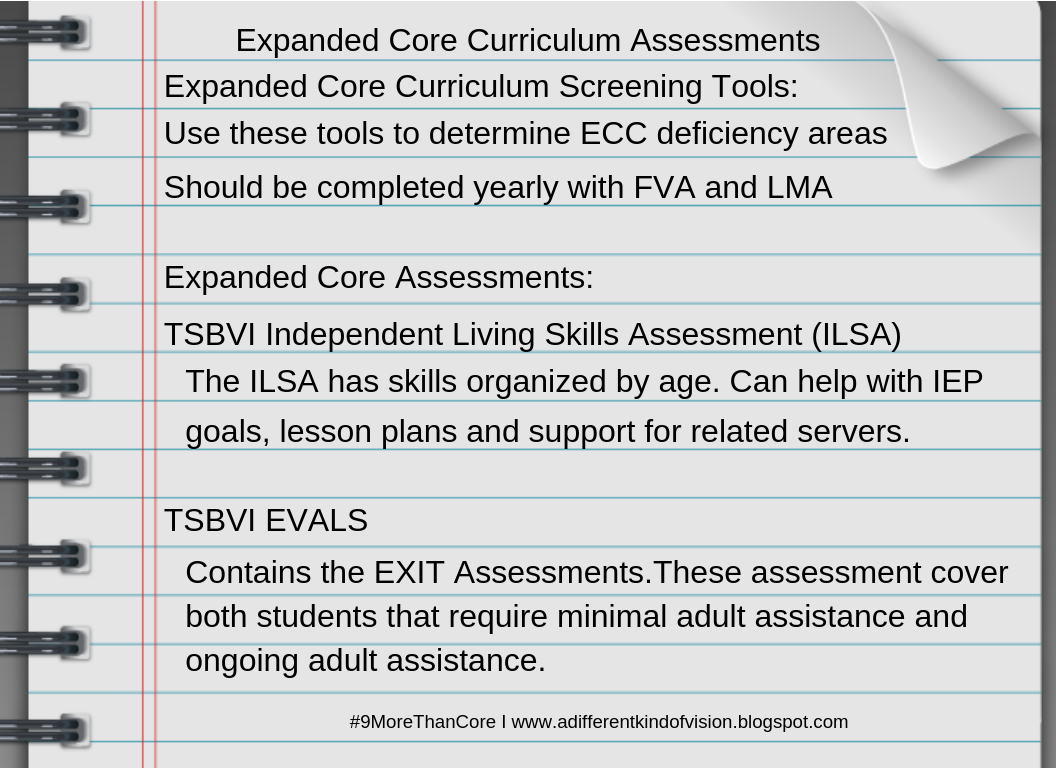
I find that many teachers are unsure about using ECC assessments. I whipped up a little image to help you see what assessments you should be using for the Expanded Core.

First, you need a screening tool. There are a handful of awesome ones that I love.
Here's a few links to some great screening tools:
The first one comes from the site EA Rubrics under the supervision of Dr. Karen Blankenship. Save this link because it has a ton of great resources for teachers of students with vision impairments: http://earubric-001-site1.mysitepanel.net/ecc-needs-assessment/
The other site is another treasure of items. It's Teaching the Visually Impaired by Carmen Willing. She has a really nice organized ECC Screening Tool: https://www.teachingvisuallyimpaired.com/ecc.html. I recommended becoming a member of her site. She has a lot of great resources.

Dr. Karen Blankenship advises all teachers of students with vision impairments to complete all three--FVA, LMA and ECC Screening Tool on a yearly basis. Many teachers are unaware of the resources that we have for ECC Assessments.  Our resources cover birth-21 and include students with additional disabilities. There truly is something for everyone! I encourage all my teachers, both itinerant and classroom to make sure they have access to EVALS. The EVALS kit includes the Independent Living Skills Assessment, Basic Skills Infused Skills Assessment, EXIT Assessment and  the EVALS ECC areas such as pre-Braille.  It can be purchased from TSBVI: https://www.tsbvi.edu/curriculum-a-publications/3/1030-evals-evaluating-visually-impaired-students.

Make sure you are completing the appropriate ECC assessment for your students and utilizing these awesome tools!
Happy ECC-ing!


Saturday, January 20, 2018

Parent Mobility Resource


I am so excited to share a really great resource with you! Two of our super amazing orientation & mobility instructors have started a website all about OM skills. It has videos and lots of good tips for cane travel. The best part: it's all written for parents! The language and instruction is very parent friendly. 
This is definitely a resource you want to save and use over and over. 
I love the O&M skills tab where they break down O&M skills by grades. It lets parents know according to grade level what skills are appropriate. 
The other thing that I love is that both mobility instructors, Bethany & Linda, are not just instructors but have personal ties to the field. They bring their understanding of the vision impairment community to add to the resources. 

Thursday, December 7, 2017

Braille Cheater Beater

Hi friends, I am so excited to share this post because this is from my hot husband, Todd, who is an itinerant TVI. He has a handful of low vision students who are learning Braille. He kept finding that they always wanted to cheat and peek with their eyes. That's not uncommon. Lots of our kids who are learning Braille and have usable vision try to cheat while doing Braille lessons. My husband wanted to find a way to work bust the cheating and still have a little fun with instruction. 
[The picture below is a picture of the Braille cheater beater which is a black screen the blocks a student from being able to see the Braille. They have to use their fingers to read it only. On the black screen there are Braille cards with contractions on them]
He also made some Braille contraction cards to help with memorization. A lot of his students still like to look at items to learn so he has visual Braille cards. He puts the contractions that he is teaching on the screen to remind the students of the them. (He also made a Braille contraction Go Fish game with cards like this). 

[Side view of the Braille cheater beater screen. You can see how a Braille book fits and the screen blocks the Braille.]
The original version of this has the long legs (as seen in the picture). He later cut the legs shorter so it wasn't so long. He used black felt and CPVC. We just sewed it up on the side to slide over the PVC. It was cheap and easy to make and has worked pretty well with his students. 

 Below are the directions and the materials used to make one. It's worked like a charm to bust the cheating with Braille.


Saturday, January 21, 2017

Transition Activity Calendar


Transition is a big topic for our youths with vision impairments. There are a lot of great new resources for education teams to work on transition. I want to share this awesome resource from the National Technical Assistance Center (NTAC) on Blindness and Vision Impairment. They have an amazing activity calendar that starts at middle school age. They have a link for an overview on the Expanded Core Curriculum (I love that!).  The activity calendar comes with a download version for Word and helpful information links throughout the calendar. Everything on the calendar is reader friendly so it is all easy to understand and use. 


I highly recommend this transition activity calendar to all families and education teams. There are so many great activities to help prepare for transition. Remember that transition does not mean employment only. Transition is about helping our youths move from education world to adulthood. I love that the transition activity calendar starts at middle school. It's a great place to start because waiting until 16 years old can be too late. There are so many experiences and skills that our youths need to have (and refine) to become successful, independent adults. 

Here's the link (bookmark it, share it, use it!):

Saturday, January 4, 2014

Expanded Core Curriculum Resources

Hi friends,
This is one of those posts that I want you to check out and bookmark on your favorites page. I've been reading up on my ECC resources and could not believe that I have not shared some of these gems that are out there for the ECC!

First, have you checked out Pathways to Literacy? It's a known resource for teachers but I am just wondering if parents know about it, too. They also have a great page dedicated to the ECC. Here's the link: http://www.pathstoliteracy.org

Next, read this article from TSBVI: http://www.tsbvi.edu/school/1211-the-core-curriculum-for-blind-and-visually-impaired-students-including-those-with-additional-disabilities. I really like this article. I recently read it again as I have been putting together some new ECC presentations. 

Last, go over to FamilyConnect.org and get to the ECC page: http://www.familyconnect.org/parentsite.aspx?SectionID=72&TopicID=382. This link takes you to a page with each area of the ECC in detail with commentary from the best of the best in our field. There's an audio link and transcript. Easy to read and very family friendly. Plus, it's a great quick reference for education teams that need a little ECC schooling. 

What are you still doing on my blog? Click on these links and get reading! You have some ECC schooling to get to. 

Thursday, August 29, 2013

Back To School Blitz: Day Three!

Today's post comes from our good friend, Jessica Eichfeld, COMS Instructor. I asked her to share some back to school tips for mobility. Thanks Jessica!

 Back to School O&M Style 
by Jessica Eichfeld, COMS Instructor 

1. Go through your schedule before the first day! Get in contact with your O&M instructor and see if they can take you over to the school, if not find a friend or ask your parents. It is so much easier to find your class locations when the hallways are clear, then you can identify landmarks that will be useful when the hallways are crazy busy. If there are classrooms that are difficult to locate and you are a visual traveler, ask the teacher to put a colorful sign outside their classroom door and tell them that if they change it to let you know beforehand. Most teachers are more than willing to help in any way. 

2. Identify different routes to your classes. Your friends may use one route that is okay when you are walking with them, but may not be the best way for when you are alone. Stay after school and wonder the hallways, get to know the layout like the back of your hand.

 3. Ask for an end locker and bring in your own accessible lock. It is embarrassing to always go to the wrong locker and then not be able to use the combination locks. So our low vision pals, please swallow your pride and ask; nobody but the teacher will know that you needed the end locker and most students are not even going to notice your lock is different. If you have gym make sure to bring an extra lock for the locker room. 

4. Have a bus plan! How are you going to locate your bus after school? Do they park in the same spot? Do you have any friends that are on your bus and can help you out? For our Low Vision friends that can see color, would it be helpful for your bus to put a red (or another color) sign in the window? Also practice the route to and from the bus stop at home!!! Are there any street crossings involved? Get your O&M instructor involved and PRACTICE PRACTICE PRACTICE! 

5. The cafeteria can be very overwhelming! So it is important to have a plan. Find out what friends are in your lunch beforehand and ask them to either sit around the same area they did in the previous years and/or look for you. Disposable trays are common in school cafeterias, they are flimsy and typically difficult to carry with a cane; so ask for rigid tray they usually will have a few. And most importantly make friends with the lunch ladies; they will always hook you up!

6. Very important tip that you should ALWAYS remember, do not over use your friends for help! Friends are a great resource and you are encouraged to be open and honest with your friends about your vision and what you may need help with. But do not always rely on the SAME friend every day, they will get burnt out and they may begin to avoid you. Learn how to do daily tasks on your own, so that you do not need assistance. And network, let a few people know how to help you and only ask for help when you REALLY need it. You may be surprised at how many truly helpful people there really are!

Tuesday, August 27, 2013

Back to School Blitz: Day Two

Today's post comes from Dennis Gallant, Rehabilitation Technologist, about important tips for technology. He shared with me his "top tech tips" for returning back to school. Thanks Dennis!

Tech tips for going back to school

For those of you who have any electronic equipment, for use at home or school, be sure to turn on all your devices to make sure they all work properly before school starts

For those of you who have electronic notetaker’s, don’t forget to clear out old files from last year and create new folders for this year’s classes

Be sure you know where the power cords are for all your electronic devices and have all your equipment fully charged for your first day of school

Review how to use any important functions of all your equipment, which you may have forgotten about over the summer, so you are ready to go when school begins

Gather together any tech support phone numbers that you might need to assist you if you have trouble with any electronic equipment at the beginning of school

Be prepared to discuss with teachers and students the capabilities of any devices you are using, and if asked, you may wish to demonstrate how you use the device in class to help you meet your educational goals.

Gather together any helpful items such as 20/20 pens, handheld magnifiers, work lights, or extra dark lined paper that you have found useful in the past and might need again this year.

Have your classroom schedule in a form, Braille, large print, or audio that you can easily read to be as independent as possible.

Monday, August 26, 2013

Back to School Blitz: Day One

Hi Friends,
I am going to be blogging for the next 5 days as a jump start to back to school. I've been milling around looking for good new resources and hitting up my talented teacher friends for ideas and tips. I want to start day one with a board I am following on Pinterest. It's called "VI Stuff" by Amanda Ham. It is a nice little resource. I find it best for classroom teachers and TVIs. She's worth your follow on Pinterest. My Pinterest board, "This Works for Blind Kids too!" is more of a collection of everyday things that also work for our kids. Amanda's board has very specific pins for children with vision impairments. I think it has some great ideas especially for back to school. She has videos, too!!

Here's the link to her board (just in case you can't find it on your own): http://pinterest.com/aham27/vi-stuff/

Happy back to school!!

Tuesday, June 11, 2013

Adorable Blind Kid Syndrome

Hi friends, I get so excited when I have guests blog for me and I am smiling brightly about our latest guest blogger, Dave Ferland. Dave is a Certified Orientation & Mobility Instructor who is dynamite. I often pick his brain for ideas and thoughts as I am putting together programs or ideas. He has been telling me about this "syndrome" he has observed and its implications on mobility. I highly advise parents, paraprofessionals and teachers to read this and bookmark it.

Adorable Blind Kid Syndrome
by David Ferland, COMS

As an orientation and mobility instructor, I’m often asked a question like, “What is keeping Johnny from being more independent in school?” Let’s go through the list: Is he using his cane properly? Techniques can always be taught and refined, especially with good support in the school. Is the paraprofessional allowing the student to make mistakes? This usually requires some work since the paraprofessional wants the student to be safe and look good. But a good paraprofessional usually comes around and gives the space and opportunity for Johnny to solve mobility problems. Is he using his landmarks, clues, and routes? Working on routes and staying oriented can be an ongoing process as kids get older and there are more travel expectations in the school. But, in my experience, there is another less concrete factor affecting the mobility of younger school-age students.
For K-4 students, one of the largest obstacles to independent travel in school is the “Adorable Blind Kid Syndrome” (ABS). Here is a typical ABS scenario: Children are entering the school, streaming in as the buses arrive. Staff members are at the doors and in the halls, moving things along, greeting some of the kids. Business as usual. But wait! Here comes Johnny with his white cane! Isn’t he adorable! And so brave! Did you know, his hearing is superhuman! I’m going to go right up to him as he’s walking, suddenly get right there in his face and ask him to guess my name. Then I’m going to look at his paraprofessional and tell her how cute he is while all the other kids are drifting past observing and listening to the whole thing. Johnny’s a bit startled by this adult’s sudden approach and the adult’s voice mixed with the clamor at the start of the school day isn’t helpful at all. But Johnny knows this game. He’s good-natured and knows how cute and adorable he is because he’s told this every single day. One thing he does not know is that it doesn’t happen to any other child entering the school. But the other students notice and the message is constantly reinforced: Johnny is special, different, and separate. And Johnny learns that someone will always bail him out. If uneasy or disoriented, he can just stop moving, wait, and someone will always help, solving his mobility problems for him. Because he’s special and adorable. These helpers may even give the paraprofessional a dirty look for allowing an Adorable Blind Kid to become confused or lost. Or they may tell him and his paraprofessional how amazing he is, how difficult it must be. Even though he just got lost in a school he’s attended for three years!

There is a teensy bit of exaggeration in the above scenario but I think all of us working with blind students will recognize some truth in there. Rule of thumb: look around. If other kids are not being fawned over, then blind students should not be fawned over either. When he’s walking, he’s working, especially in school. When he becomes disoriented, give information and ask questions. “That’s the rug near the gym.” “Someone’s walking up the stairs.” “Do you hear Mrs. Smith talking to her class?” Encourage other students to let Johnny know when he is about to barge into them so he can make his own adjustment. Of course Johnny’s cute. All kids are cute and special (mostly). But mobility expectations should not be lowered because of cuteness. And they definitely should not be lowered because of blindness. Give that Adorable Blind Kid some space and watch him thrive like just another kid.


Tuesday, January 15, 2013

CVI Look Profile


My fave CVI guru, Gigi, created this super awesome "Look Profile" for one of her CVI kiddos. I happened to be wandering by her desk as she was sharing this snazzy profile with a colleague. Of course I begged her to let me share this on the blog! There is a lot of information to fit on to a standard 8 1/2 x 11 paper but with a simple enlargement on the copier (8 1/2 x 11 to 11 1/2 x 17--it's usually an auto setting), you can have a nice large map of this Look Profile. Just fold the large paper in half and it will become an 8 1/2 x 11 that folds out. 

Are you not sure what you are looking at? This Look Profile allows the team to see "at a glance" the CVI issues for the student. It's beautifully organized into all the important categories of CVI (i.e. latency, movement, complexity, etc.). This is a handy resource for your team (especially classroom teachers) to get an idea of what your child with CVI sees and needs.  Parents should also know how to use and read this. When parents know how to read this, they can help share information with the team as well. 

I am experimenting with how I can upload documents to share (and then you can do an easy download). The link to the publicly shared Google Docs  CVI Look Profile is here:
https://docs.google.com/file/d/0B3qOj9emFfL1S3NTWHRtQlR4YmM/edit

In the event that the link doesn't work (although I have tested it before publishing), email me and I will send you the slide. You can email me at robbin.keating@gmail.com. This is great to use in annual education reports. Just the perfect CVI accessory for IEP season. 

Tuesday, January 1, 2013

Correct Cane Techniques Handout

Happy 2013 friends! How about starting out this new year with a new post from our dear mobility friend, Jessica? She made a handout for one of her teams so that they would know how to all work together to help their student with correct cane technique. I was helping her take pictures for her mobility handout and knew I smelled a win win post idea so with her permission, here it is! It's three easy lessons (with pictures!) and it is perfect for getting everyone up to speed with mobility needs.

Correct Cane Technique 101
by Jessica Eichfeld, COMS

Lesson 1: Index Finger Grasp and Arm Position
Index Finger Grasp: with cane in desired hand, student places index finger along the flat side with the other fingers and thumb wrapped around the grip. Should be holding cane towards the middle of the grip.

Arm Position: Arm should be extended at mid-line about waist height. Good checking point is the belly button.


Lesson 2: Cane Arc
Cane arc: The reason behind holding the cane midline is so the individual will cover both sides of the body equally. The width of the cane arc is 2” beyond widest part of the body which is typically the shoulders. When walking behind your student you should be able to see the cane moving from side to side, if you can not see the cane while walking behind then they do not have a wide enough arc. 

*It is a wrist movement not an arm movement. Unless wrist movement is limited.

Lesson 3: In-rhythm and In-step
In-rhythm: The cane moves ‘in-rhythm’ with the student’s feet. “Every time you take a step you move the cane to the right and left.” Tip: using two-point touch (tapping the cane side to side) helps create a rhythm they can hear.

In-Step: In order to stay in-step the student must first be in-rhythm. In-step means that the cane moves with the opposite foot. For example when the student steps forward with their right foot the cane moves to the left. This allows for more space between the foot and the cane, giving them more time to react to drop-offs and obstacles.
 

Wednesday, October 3, 2012

A few thoughts on the power of "play"

I recently presented at our annual birth to three in-service. I spent a lot of time researching effective play strategies for our kiddos. Play is the natural course of learning for children. For children with vision impairments, experience is the natural course of learning. How do we create meaningful play? 
image from juniorblind.org
I want to share some of my presentation to help our teams and families create meaningful play time. Our kids need to play but it can be a challenge to have fun, effective play time. 


Here are some of my favorite tips and resources for getting
 playtime off the ground!
  • Allow time for pre-teaching. Our students should be allowed to come to group early and check out the centers/stations, toys, schedule, etc. to help them anticipate the activities
  • Incorporate familiar transitions for our students where possible. You may need to do this 1:1 for students in case there is a group. Make sure you make that transition connection for our kids so that they can anticipate.
  • Incorporate vision modifications to make activities more accessible. For example: contrast, preferential seating, placement of activities, clear pathways, peer buddy helper, etc.
  • Select activities or groups with predictable routines that are familiar. For example, using the clean up song to clean up or jingle bells for transitioning. 
  • Select sites that aren’t over stimulating. Look for visual and/or auditory clutter at stations, carpet and background
  • Encourage parents to get their child involved in lifelong sports:
    • Examples: Swimming, track and field, wrestling, martial arts, crew, skiing, yoga. Music and theater are great alternatives to sports.
  • Possible disadvantages of popular team sports:
    • Difficulty with keeping up visually
    • Social loss & Anxiety
image from nfb.org
For those mommy & me groups or just for when the family is hittin' up a playdate at the park:
Moms, dads, caregivers, create a playdate go bag! A playdate go bag is a portable travel kit that has vision modifications that you can use in a pinch to help your little one out at play dates. I suggest you keep this in your trunk. I used to keep spare clothes, diapers and a blanket for my toddlers in case they needed a quick change due to a diaper explosion in my trunk. This is the same thought process. Sometimes you go to a playdate and it is totally not accessible for our kiddos. This can be a stressful and frustrating feeling. We can eliminate some of that if parents come prepared!
Use a small bag for your playdate go bag. Don't overwhelm yourself! You still need to bring diapers, wipes, toys, etc. so don't get in over your head. Pack items such as: 
-a big black blanket or heavy fabric. Black fabric will help by acting as a place your child can sit on and play. You can also use it to cover up items that may be visually over stimulating. 
-a finished box (or all done box). You know how I feel about finished boxes (they work--use them!!). Remember a 'finished box' doesn't have to be a box. It has to be a place that is meaningful and useful as finished. Can be bag or fold up box. 
-yellow or red painters tape. Sometimes you can use this to quickly highlight something and then remove it when you are done. 
-transition bells or a timer. Use something you can use to help with time management.
-Braille or LP book. Keep 1 or 2 books handy just in case all the kids are sitting down for stories. This way your little one can read too!
-Preferred toy(s). Keep some favorite type of toys handy. Preferably ones that promote turn taking or exchange so your little one can have some social interaction. 
image from extension.unh.edu
Resources that ROCK:

I hope this helps with creating more meaningful playtime for our birth to three population. Hopefully you can hear my full presentation and I can share more ideas on playtime!!

Thursday, September 27, 2012

Resource for Early Childhood

Hey friends,
This week I am presenting a new presentation on "play" for early childhood at our agency. I love new topics because it gives me a new direction to research. I spent some time reading a lot of articles and found some nice little gems that I knew I had to share! 
This is the first one of many more to come in the next week: http://www.tsbvi.edu/program-and-administrative-resources/3270-general-considerations-in-working-with-young-children-with-visual-impairments.

The article is General Considerations in Working With Young Children with Vision Impairments. I love this article because it does a great job of teaching about concept development for our kiddos and its broken down into topics and strategies (that you can do, no degree required!). 

I love this article! Not only is it super reader friendly (parent friendly too!!), its got some great tips in an easy to understand layout. Save this one and share it with your team. Better yet, create a new folder of favorites because I am going to be posting some great reads that you will want to save and add to your vision bag of tricks. This is a great resource for vision professionals to share with colleagues, teams and families but it's also great for parents to keep in their vision bag of tricks to share with teams as well. Don't forget your related therapists like OTs and PTs!!

Tuesday, April 3, 2012

Hand Under Hand Instruction Resources

I came across these instruction videos while I was scouring the web for really good hand under hand instruction (HUH) videos. Teaching hand under hand is so crucial and mastering this technique is a little tricky. I found these for my March RT for the OT presentation that I do yearly for OT/PTs. There are also other videos and really good resources on the site but I love the HUH ones.


The videos are from the Washington Sensory Disability Services.
 Here's a link directly to the videos:  http://www.wsdsonline.org/deafblind/huh/huh-overview.html. Sometimes the hotlink doesn't always work so you can also go to their webpage, www.wsdsonline.org and hit the tab "videos". These are some sweet videos so save this to your favorites tool bar! They have all the right instruction pieces built right in. 


I've also included a link to another helpful article about HUH from FamilyConnect.org. The family friendly article is: http://www.familyconnect.org/parentsite.asp?SectionID=75&TopicID=351&DocumentID=3822

A lot of people may think that HUH is just for children who MIVI or DB. But I use HUH with almost all of my Braille reading students including those who are MIVI, DB and ASDVI. It's just the best way for them to "see" what's going on. In fact, that's my prompt language when I am going to do HUH. I ask my students if they want to "watch me do it". They just pick their hands up and I slide right under them. 
A small side tidbit about HUH that has come up a lot when I have been working with OTs: how do you do HUH with preschool? Their little hands are just so small (and cute!!). Here are a few ideas: hook up under their pinkies and let their hands follow with you prompting from the pinky. I will sit facing them instead of behind them so that their little hands can see what my fingers are doing. Or  I will prompt at their wrists and guide that way. As I write this, I realize that it is a tad tricky to understand if you don't get it. I will do my best to find a preschooler who I can take some pictures with and post them. Until then, watch the videos (again and again). HUH is my ultimate tool when teaching so many of my students. It takes time and practice to get the finesse of it down. Good luck!

Tuesday, March 13, 2012

CVI Video Resources

Hi friends,
I received this email from one of my talented colleagues....

She shares these videos about CVI characteristics and how to apply them. They are webcasts from Perkins and they do a fantastic job of explaining everything we try to say, but in a clear and simplistic way. (I know my understanding process sometimes shows CVI characteristics, needing simplicity and one item to truly understand- haha) :) This video does just that for CVI so I thought I’d share it with those who may not have stumbled upon it yet…. Definitely worth watching when you have some time :) (Chapters 1,2,3,4)

http://support.perkins.org/site/PageServer?pagename=Webcasts_Cortical_Vision_Impairment

TSBVI also has some video clips- She likes the last ones best on Task Analysis for Phase 1, 2 and 3 that show specific things to do…
http://www.tsbvi.edu/ta/p1c1 

Has anyone else come across good video resources? Email me!

Tuesday, November 15, 2011

Holiday decorations--their other purpose...


Hi friends,
     Are you wondering what is the purpose behind these random pictures from Target? They are holiday decorations from the dollar bins at Target and they double agents! What? How? Huh? Still wondering what I am talking about....? Holiday decorations have another awesome purpose besides making everything cheery and bright. They are are AWESOME tools for kids with vision impairments especially CVI!! Oh yes, I love this time of year for this special secret purpose. Slinkys, bright shiny ornaments and wrapping paper (always in the color RED) and other fun ribbons (with lots of textures and contrast colors) are everywhere and I go nuts! This is my super stock up time. 
     I thought I would blog about this to give you a heads up. Buy now and buy a lot! I like to hit up the Dollar Tree stores, JoAnns & Michael's dollar bins and Target (my mothership). They have awesome finds there. I know some of you are thinking that it would be better to wait until after the holidays to purchase these items. As a professional retail therapist (aka shopping queen slash vision ninja teacher), I will tell you that the left over clearance items are not what we are looking for usually. We need the shiny ornaments, red glossy wrapping paper (always to be found at dollar stores) and jingle bells, ribbon, etc. Those things can get pretty trashed by the end of the season so I like to go and get first dibs on them the first week of December. This is your time to build your CVI kits.
     Here's what I am going to do for the next few weeks: I am going to cruise my fave hot spots and blog about what I am finding, where, price and how to use it. And of course, just like last year I will snap shots of any projects that are awesome for our students. I am doing my annual Holiday Skills Day (twice this year!!) the first and second weeks of December. I will be sure to share what we are doing. I've also been surfing some craft blogs looking for inspiration. I am going to share a few activities and recipes that I have found. 
     Have you found something awesome? Have a request for a certain activity for this time of the year? Know a great activity or recipe? Please share with me! Email me :)
     Also, start thinking experience books (I've blogged about this, check the literacy label for more info). This is another great time of the year where students who have multiple impairments including deafblindness can really make a lot of  purposeful books to help them further participate. 
    Always remember in your shopping blitz for supplies to be mindful of visual clutter. Buy a lot, but show a little when it comes to presenting things to your student.

Friday, October 21, 2011

Preschool ECC Resource

Our preschool unit created this list recently and I loved it! They all got together and thought about how the ECC relates to preschool. They went section by section of the ECC and brainstormed. Save this list as it is a handy, easy to read resource of ECC topics. Teams can easily get an idea of how to incorporate ECC topics from this handout. Thanks preschool TVIs for letting me share!!
photo from joyfulheartspreschool.com

ECC Considerations as they Pertain to Preschool Children:
A Collaboration of Ideas by CT BESB Preschool Unit TVIs
Orientation & Mobility
Body parts
Spatial relations
Learning to crawl and walk
Navigating around different environments: home, preschool settings, playscapes
Learn to orient themselves in space
Begin to learn about where they are
Parents and teachers need to describe and explain things to the kids about the environments that they are in and moving about in
Gain knowledge of time, distance, positional concepts
Independent Living Skills
Learn self-help skills: eating, dressing, toileting, tooth brushing, bathing, wash hands, etc.
Learn routines of the preschool classroom and at home for taking care of own belongings
Clean up routines of the classroom
Chores at home and school
Teachers and Parents develop Task Analysis of each of these activities to be taught to the child
Develop backward chains for teaching these skills
Recreation and Leisure
Music-listen to and/or play an instrument
Learn to sing, whistle
IPads & Apps, Computers
TV, Movies-listen to and watch; pick out favorite shows or titles
Read and Listen to Books, Story boxes
Learn co-active Games; Play with favorite Toys
Switch Activated Toys; Cause and Effect Toys
Outdoor fun: swings, ball play, running, jumping
Learning to be fit: exercise, yoga, and dance class
Being a part of an organized sports team
Participate in an individual sport like swimming, gymnastics, etc.
Learn turn taking
Interacting with peers and siblings
Go on field trips and real life experience trips with family and friends and classmates-going to the zoo, a baseball game, etc.
Horseback Riding Therapy
Swimming Lessons
Preschool “Nature Day” Activities
Career Education
Learning about how to do Chores at home and at school
Learning about how to work/play on your own
Learning about self responsibility of your own possessions
Cleaning up routines around home or school for toys, clothes, food, dishes, etc.
Learning about the world that they live in
Learning about their community and neighborhoods
Taking family outings out in the community to area parks, the grocery store, the Post Office, the pet store, etc.
Learn about the types of jobs that people do for a living
Be a part of “take your child to work day”
Learn about money and how you get it and what it is used for
Self Determination
Figuring out about themselves and how they relate to their environment
Learning about their likes and dislikes
Develop a method of communication with others: spoken language, pictures, signs, etc.
Interpretation of their means of communication by parents and teachers and peers
Use of Schedule Boxes and Calendar Systems
Use of Hand under Hand Technique
Learn how to speak up for yourself and be your own self advocate