Showing posts with label CVI. Show all posts

Saturday, December 19, 2020

Teach the Expanded Core Curriculum by Writing Letters to North Pole Friends

a graphic that has a big envelope that says Teach the ECC by writing to North Pole friends
Writing letters to Santa Claus is a very popular activity for this time of year. However, you can include a lot more kids and A LOT more Expanded Core skills if you put a twist on this popular activity and write letters to North Pole friends. 
This twist give you a handful more opportunities for skills. Here are some ideas:
Learn about the post office and writing letters free matter for the blind
Addressing envelopes (almost a lost art at this time)
Learn how to write a letter with a greeting and a closing. 
Developing and practicing a signature. 
Make choices about the friend you want to write to (I gave my students Santa, Rudolf or Frosty) and what you want to say or write to that person
Teach about weather (what type of weather do you think the North Pole has?)
Writing to North Pole friends as opposed to just Santa means you can do letter correspondence into January (feel free to pick other North Pole friends).
Give different writing prompts (It doesn't just have to be about what you want for a holiday present--you can write about different things).
Literacy, literacy, literacy! Lots of of opportunities for literacy in a project like this.

an image of a big red mailbox that says letters to the North Pole
I found these super cute mailboxes at Target (there's even a light in the outside). We set up the North Pole mailbox in the office with our secretary because that's where the mail is delivered at our school. However, if you are doing this virtual or just at home as a parent you can use your own mailbox. 
I provided students with three choices for their letters. Santa, Rudolf or Frosty. I whipped up these images on Canva. Notice that I used strong contrast for the pictures to make them friendly for low vision and CVI students. My amazing para took the next leg and put the tactile items on it. We LOVE the APH Carousel of Textures kit but you can also hit up a Joanns or Michaels for some tactile paper. She didn't do the whole picture tactile rather just the critical features of each to highlight them. 

a green background with a simple Santa graphic where his beard is made from cotton balls

an image of a black background with a reindeer cartoon smiling with antlers and nose made tactile

A green background with a while snowman wearing a hat and scarf with tactile on those parts
Our students could write in any writing mode that worked for them (and then received a letter in return in that mode). We received letters in Braille, large print and pictures. Now this is the cool part, we had our high school students write the Braille replies. So if you are a teacher with older students, this could be a fun project that your high school students do for younger students on your caseload! 

4 pages spread on a table each with a simple sentence and a picture from a student to Santa
I wanted to include pictures of how we did the picture letters because sometimes that is tricky for folks to know how to do. The above picture is the letter from a student that uses pictures. There are Braille labels over the large print with large clear pictures. We returned his letter in the same format and signed it from Santa with the same Santa picture (plus tactile beard) as the signature. 

4 pages spread on a table each with a simple sentence and a picture as a reply from Santa. the santa picture has cotton balls on the beard.
Now we started this by writing letters to North Pole friends (again, I meant for this to be inclusive for students who do not celebrate Christmas) but can you see where you can keep this going in the new year? You can continue to use actual letters or you can keep practicing and learn how to transfer this to digital communication such as an email or have a lot of fun and move to Twitter!
Teachers, you can make this as a kit and send it to families and then work together virtually. Parents, you can do this in your home. It's an accessible activity that practically every child can participate in. Happy holidays! 


Tuesday, February 12, 2013

Love is in the air...

Hello my friends! I am back from my wedding fun and back to blogging! Well to be honest, I am buried in the snow! CT was one of the lucky recipients of Snow Storm Nemo.  Valentine's Day is just around the corner so I thought I would do some searches around Pinterest, Blogger, FamilyFun, etc. to look for some blind friendly crafts and treats. 

A few easy modifications for the classroom V-Day fun:
*Ask teachers to have the kids in their classrooms put their V-Day mailboxes in the same location at their desks. Usually mailboxes are made up of paper bags or boxes. Tape them to the same place at each desk (i.e. on the right side of each desk).
*Remind teachers to tone down the visual chaos! Sometimes V-Day gets a little visually overstimulating---hearts, candy, ribbons everywhere are just a visual nightmare. This can be especially true when crafting or baking. How do you know if it is overwhelming? Pay attention to your kiddo!! Look for them showing signs (verbally and non-verbally) that they are overwhelmed by things. 
*Put forth the effort to add some Braille to your cards. Get some Braille labels or just put them in the good ol'Perkins and put each classmate's name in Braille. You could even use some Braille to make a V-Day riddle! Have the sighted peers 'decode' and figure out the Braille on the card. 
*As with every holiday or event in the classroom, PRE-TEACH! Give our kids a heads up on what the special events are so that our kids can anticipate what's going to happen. 
*When crafting for V-Day, you may need to think about some contrast. As with most things for our kids, put a dark placemat (or play tray) underneath to provide some contrast. Dycem can also help, too. 

Are you a parent or a classroom teacher that's not sure what are some good activities for children with vision impairments? The activities and treats I found cover just about all of our kids. I think almost every one of these can be done for early childhood up to teens including kids who are MIVI (which includes DB and ASD/VI).
Here's some fun activities and recipes that I have found:
*Valentine Heart Button Craft. Here's the link: http://handsonaswegrow.com/sorted-button-valentine-heart/
Valentine Heart Button Craft for Kids
This particular craft is geared towards younger children. I also thought you could vary the size of the hearts, put the paper on chipboards or foam boards (more sturdy). Good for early childhood up through primary grades in school age, MIVI kids too (as long as they don't swallow buttons). You could make this a 3-step sequence: first, paper--next glue--last buttons. The white glue on a dark red paper also creates a nice layer of contrast to follow the glue line. Make sure you put buttons in easy to access storage. The blog suggest cookie tins. 

*Egg Carton heart. Link: http://www.ivillage.com/kids-valentines-day-crafts/6-b-142009#142016
Egg-cellent Heart Art
You can trend this up (like the picture) for older kids (teens) or it's also something that younger kids can do too. I think our MIVI kids can do it too with a little support from a teacher/parent.

*XO wreath. This was available on Etsy for purchase but I also thought it would be a good craft for us to make as well.
XOXO Decor - Berry Wreath - Kisses and Hugs - XO - Holiday Wreath - Valentine's Day Decor
Another one that is doable for our range of kids. You could also add some fragrance to the mix to wake up the sensory input as well. The "O" may be a little tricky. I think you could go to the store and buy the "O".


*Valentine Chex Mix. Link: http://www.bettycrocker.com/recipes/valentine-chex-mix-12-recipe/f6d4a741-f15c-4c78-8f40-94ab312a2e46
Valentine Chex® Mix (1/2 Recipe)
Another fantastic cooking project that is simple and easy. It's also another good one that can be made into a 3 step sequence: First: candies, Next: Chex Mix, Last: Sprinkles (or your last step could be the baggie that you can package them). You could also add another 3 step after you "prepare the food" (the steps I just wrote). The next round of 3 steps could be the 'vocational sequence': First: food, Next: package, Last: label. In case I was confusing:
'Cooking Sequence': First: candies, Next: Chex Mix, Last: Sprinkles. You combine all ingredients into a bag and shake (most kids love this step).
'Vocational Sequence': First: food, Next: package, Last: label
For kids with kitchen and cooking skills you can have them prepare the peanut butter mixture. You may have to substitute the PB mixture. You might need to try something like almond butter.

*Valentine's Pop Box Treats. Link: http://lilluna.com/valentines-pop-box-treats/
 
I thought the Pop Box was a great idea for teenagers or tweens. 

You guys know I blog about doing peppermint bark at Christmas but I never thought about doing it at V-Day! What a great idea!! This is awesome for any ability or age!

Sunday, October 28, 2012

AT Resource Find

This may be one of several posts since I am off work tomorrow due to the hurricane. I've got lots to catch up on with you--missed you! I was stopped the other day by one of my fab TVI colleagues and she was raving about this AT workshop she attended. She told me that I would have loved the presentation as the  woman was a hoot and had the best little ideas. I want to create a league of us creative ones and come up with our own "Avengers". Wouldn't that be so fun? A resource pool of all of us. Just a side note....

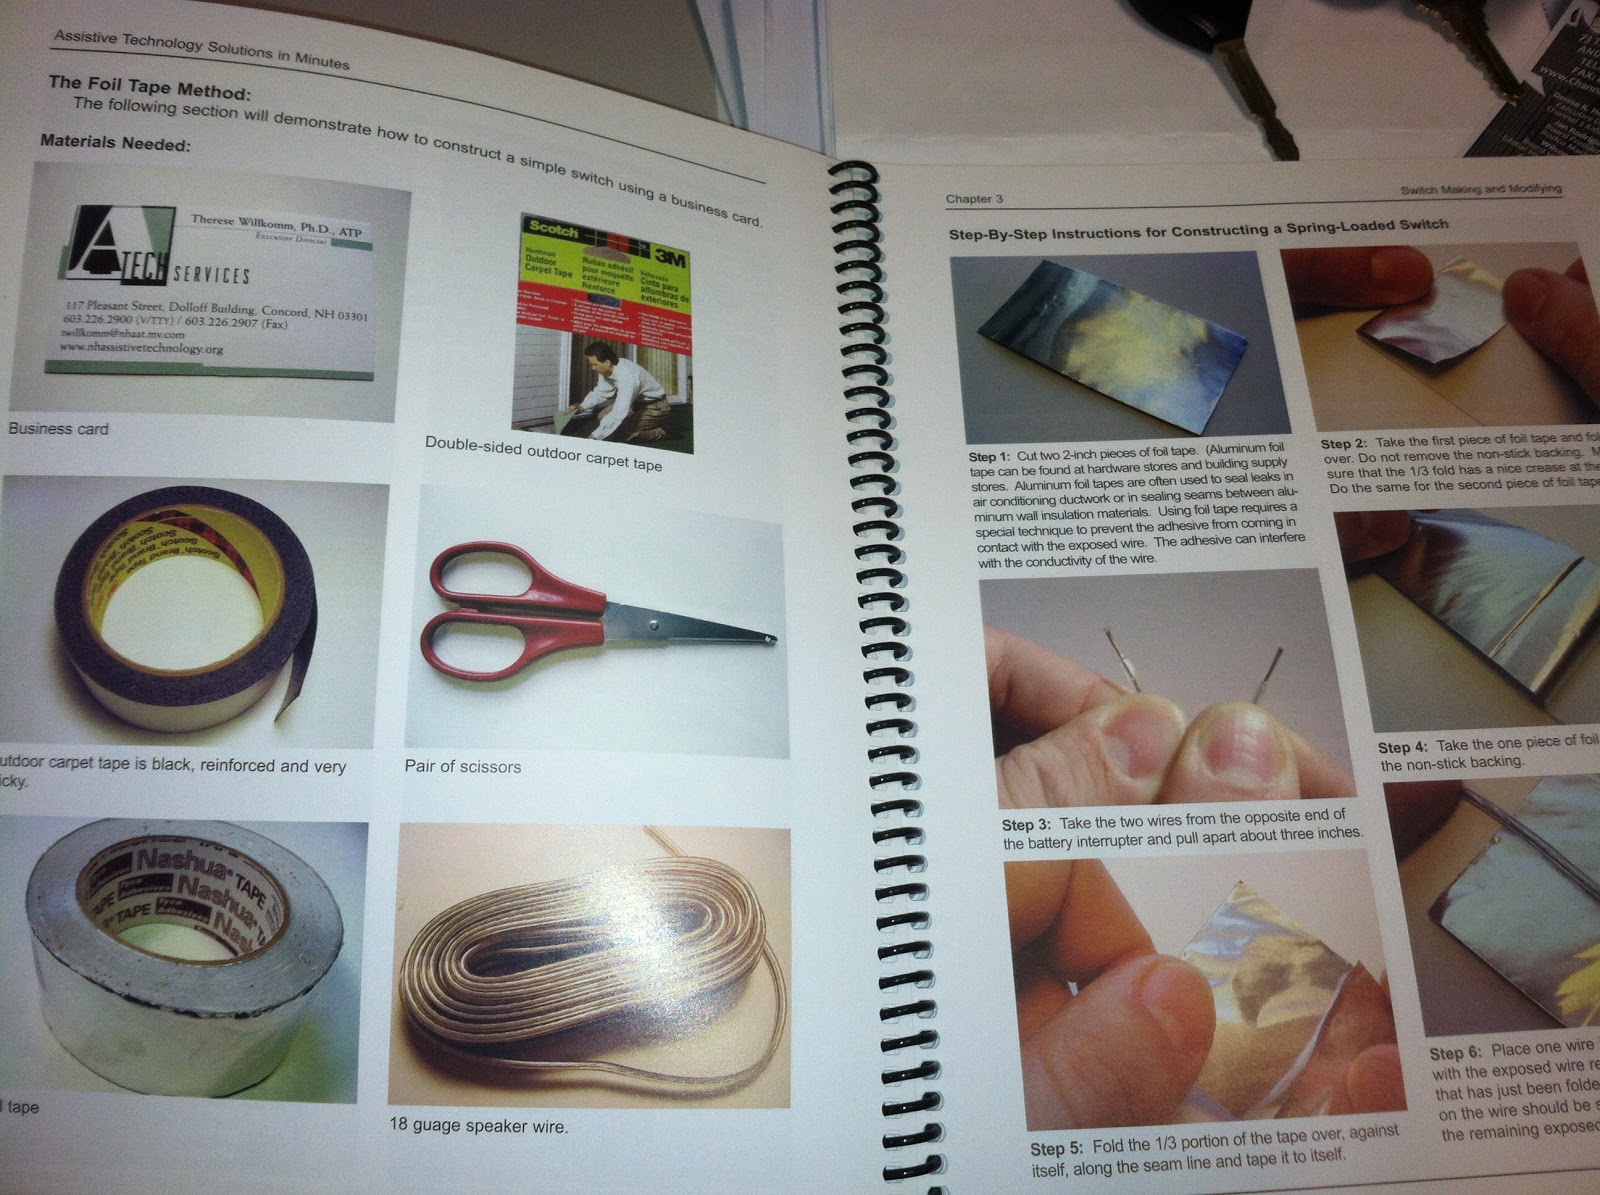
Gail handed me this book and swore I would love it. I perused through and was giddy with excitement when I saw all the resources! I am no true AT expert but love how user friendly this guide is. The solutions are easy peasy and they even provide a shoppers' guide on where to get the goods. I photographed a few pages to give you a feel of the resource including the contact information. From what I read, I think this is a sweet little AT resource for our kiddos with multiple impairments, MIVI/deafblind, ASD/VI, etc.


Tuesday, April 3, 2012

Hand Under Hand Instruction Resources

I came across these instruction videos while I was scouring the web for really good hand under hand instruction (HUH) videos. Teaching hand under hand is so crucial and mastering this technique is a little tricky. I found these for my March RT for the OT presentation that I do yearly for OT/PTs. There are also other videos and really good resources on the site but I love the HUH ones.


The videos are from the Washington Sensory Disability Services.
 Here's a link directly to the videos:  http://www.wsdsonline.org/deafblind/huh/huh-overview.html. Sometimes the hotlink doesn't always work so you can also go to their webpage, www.wsdsonline.org and hit the tab "videos". These are some sweet videos so save this to your favorites tool bar! They have all the right instruction pieces built right in. 


I've also included a link to another helpful article about HUH from FamilyConnect.org. The family friendly article is: http://www.familyconnect.org/parentsite.asp?SectionID=75&TopicID=351&DocumentID=3822

A lot of people may think that HUH is just for children who MIVI or DB. But I use HUH with almost all of my Braille reading students including those who are MIVI, DB and ASDVI. It's just the best way for them to "see" what's going on. In fact, that's my prompt language when I am going to do HUH. I ask my students if they want to "watch me do it". They just pick their hands up and I slide right under them. 
A small side tidbit about HUH that has come up a lot when I have been working with OTs: how do you do HUH with preschool? Their little hands are just so small (and cute!!). Here are a few ideas: hook up under their pinkies and let their hands follow with you prompting from the pinky. I will sit facing them instead of behind them so that their little hands can see what my fingers are doing. Or  I will prompt at their wrists and guide that way. As I write this, I realize that it is a tad tricky to understand if you don't get it. I will do my best to find a preschooler who I can take some pictures with and post them. Until then, watch the videos (again and again). HUH is my ultimate tool when teaching so many of my students. It takes time and practice to get the finesse of it down. Good luck!

Tuesday, May 17, 2011

Playspace Makeover


I am so happy that this mom emailed me this picture! I recently worked with this family and their playroom. The picture I posted is the "after" picture. Originally this space looked exactly like several other homes I visit: toy choices everywhere, bright warm patterns and a toy chest full of toys. Please note: There is nothing wrong with having a play space like this EXCEPT when you have a child with a vision impairment (especially CVI).

This is important: too many choices in a space is overwhelming for children with vision impairments. Too many choices create visual clutter!! It's too much for the child and it is often too much for other members of the family. The dad in this family mentioned that he was overwhelmed when I was discussing this room with them. That was another cue for me that we needed to change the dynamics in the room. It's important that parents and children feel good to work in the space.

How do you fix this space? Head to the fabric store and buy some black fabric in bulk!!
Step one: Reduce the toy choices and send half the toys on a toy vacation!! Pick toys that you know your child loves to play with.

Step two: Organize the toys in a way that your child likes. Some possible ideas are grouping toys by likeness (music toys in one bin), small toys on top shelf, big toys on bottom and super favorite toys at eye level.

Step three: Get a finished box! There should always be a beginning (picking a toy), middle (playing with the toy) and an end (cleaning up). Play time is also a great way to work on connected experiences for children. The children should be the ones who go to the toy shelf and pick something, play with it and they should put it away (either in finished box or back on the shelf).

Step four: Use the black fabric! This family did a great job of covering up the toy clutter. You can do this by using industrial velcro. Mom can pull up the fabric on one shelf at a time when her son is in the room.

Step five: Use a defined workspace! This mom did a great job of also changing the original carpet to a straight up black carpet!! The carpet does two things: 1) it's a defined workspace (her son knows that he has to keep toys on the carpet) and 2) the black is a clutter eraser for any toy. It will help with focusing on the toy and reducing clutter.

You can do this makeover in any space. I have also done a similar "cover up" in closets where there were too many clothing choices and have done this multiple times in playspaces.

The other thing that I love about how this room is that it still looks like a kids play space. The black did not pull away from the kid friendly energy. High five to this family! I had a great time working with them :)

Monday, October 25, 2010

DIY: Theme Boxes

This is a super fun project that you can make and customize for your child. They are called theme boxes and I have provided several of the ones I have made in this post.

What are theme boxes? Theme boxes are great ways that you can teach about how items come together and make a concept. I saw another deafblind teacher make something similar to this a few years ago. The one she made was like picture number one (the winter clothes theme box). I expanded the idea to using simple box tops and adding items in it.

You can use these theme boxes as a way of pre-teaching or reinforcing lessons that teach about these items. For example, the car box has items related to getting into the car. They teach about the seatbelt, car keys, music CD---all things that happen while riding in the car.

Make one (or two or three...) for your child today.
Instuctions & specifics below:
Winter Theme Box-
You can also do this for the other seasons as well. Put all the items into one box. Discuss with your child about winter, cold weather, etc. You can read a book as well that discusses these objects. Allow your child to dress up in the items. You will notice that I included a variety of each of the items. You can also incorporate math, community and other skills into this lesson.

As with all projects, customize the theme boxes to fit your child's visual needs. I included some contrasting bright red & yellow so my students with CVI can participate as well. *Plus red & yellow are good contrast colors--many of my students can see them.

The car box:
You can use this as a pre-teach opportunity to read with a "places I go book". I found the car seat straps at a local REI. I could buy them by the foot. Notice that I used red & yellow to include the visual needs of my CVI students. The large buckle on the red strap was also purchased from CVI for about $5, the small one on the yellow strap for about the same. The other yellow carseat buckle is a replacement buckle I bought from Burlington Coat Factory in the Baby Depot dept. for about $7. I included car keys, old CDs as well. The car keys I got for free at Home Depot. I asked for their damaged keys. They are not pictured but the keys I used for this is a car key (with the black casing on top), small key (for a lock) and regular keys (for a home).


Bathroom/dressing box
Note that I used real objects. You can open the wipe container and explore the wipes. There is lotion in the bottle. That is an actual diaper.

This one is also an example of how I use shiny red wrapping paper to highlight the box. I did this primarily for my CVI students. Notice that I did not do the entire bottom. I only did the edges to highlight what I wanted my student to see.

*The holidays are around the corner, I hit up the Dollar Tree and buy in bulk shiny red wrapping paper!


Eating tray
This is a great pre-teach tool for setting the table as well. Again, I used red and yellow as my contrasting colors.


-All of these items are attached using string, velcro (or hook & loop), or draw string type of cording. I found a way to attach them so if they get tossed, I could still find them.
-Each project cost about $8 to make (except the car one) or less. I looked for items that were common use items and put them in the box.
-I recommend using the wrapping paper for students with vision as it highlights where they should look.

These are just a few of the ideas. I presented this at the last parent education event so I do have a handout that I made. I will do my best to post it but these are the pictures from the handout.

Do it at home: Make your own theme box! You can make it for older children and use a paper box (like the winter clothes theme) or you can make it on a box top. I like to enhance the activity by reading a story and using the items to pre- & post-teach or by taking it to the actual activity. Collect your items & get started today!