Wednesday, December 16, 2015

Holiday Banner

Merry Everything to Everyone--Christmas, Hannukah, Kwanzaa or Happy Holidays! Whatever you celebrate, let's have some holiday fun. I am a Christmas girl myself and so are the students that participated in our after school program.
We made these awesome Christmas banners for home decorations. It's an easy peasy project (especially for all the "not-so-crafty" people). I used the APH Carousel of Textures papers as well as few glittery papers I snagged for super cheap at Walmart and some construction paper.

I Googled a Christmas light clipart and used that as my template. I cutout a ton of lights using my template and all my different textured papers. The textured papers included glitter/sparkles (textures and visually appealing), velvet, bumpy, corrugated cardboard and rough. 


I printed out "Merry Christmas" on card stock. I made sure to use a font and size that were easy for my visual students to read. My Braille students made a Braille label  and put it over the print. 
Then, we used our favorite art friend, the stapler and whipped up these cute banners!
We chose red card stock as our banner base but you can let your Christmas creativity take you to new places and use other textures/fabric/paper. I went with red card stock for the durability, the easiness of it and the contrast with the lights. 


Did you read my last post on why the stapler is your art project's best friend? If not, go back to last week and read about it in the post "Textured Turkeys".


I've blogged a lot of about holiday projects over the years. Go back through my archives and check them out!
Remember, this is also STOCK UP time for your CVI supplies!! All those colored lights, red shiny ornaments and paper---stock up baby!

Tuesday, December 8, 2015

Wiggly Eye Sticker Chart

I was walking past this bulletin board in our of schools today when I stumbled upon this fun reward chart. This is an orientation & mobility reward chart by Linda Bredeen (a fab instructor). Let me tell you why I snapped a quick pic to blog about. Have you ever tried to use sticker charts for elementary school age kids with a vision impairment? It's doable but not awesome because there isn't a ton of fun for our kids with traditional stickers. Other alternatives are usually scratch & sniff stickers but even that doesn't always give instant feedback.  But check out Linda's idea with the wiggly eyes idea! 
I ran into her later that day and chatted with her about it. She told me that the kids LOVE using the wiggly eyes and they get a kick out of putting them on their chart. Lots of good feedback for the kids.  It's an easy peasy way to make a vision modification to an everyday school item. Have fun!


Wednesday, November 18, 2015

Texture Turkey


Happy Thanksgiving!
Thanks to awesome ideas on Pinterest, I was able to find a fun art project for my after school program students. It was easy peasy set up that anyone (even those of you that claim you are 'not creative' can do). All you need is some textured paper, regular card stock, stapler and wiggly eyes. 
Lucky for me I had a spare Carousel of Textures kit (from APH--it's a must have for your resource box). If you don't have the kit, don't sweat it. You can find texture papers at a Michael's or JoAnn Fabrics. You can use felt, foam, crinkle, sparkle, etc. paper. 


I did a quick draw of a large turkey feather and then went to town on cutting them out. One thing that helped me was that I decided to fold the paper (think paper dolls) when I cut out feathers. I was able to cut out three feathers in one cut. Major time saver! I then cut out our turkey body (I used the image of a bowling pin as my inspiration). Check out all the different types of feathers I was able to make (see below--all have a different texture, none are visually complex because we do have CVI students that were participating). 


I kept the feather line up as three on the left side of the body, three on the right. I did that because I wanted to keep a first, next, last sequence. Are you wondering why I had a stapler listed as one of the supplies? Glue works good, glue dots better but I like staplers the best especially for a project like this. Why? If you have ever glued before then you know how tricky it can be. Same story for glue dots. They are tiny and if you are working with tightly fisted kiddos, glue dots are your worst enemy! But the stapler allows a lot of nice partnering, sensory feedback and it gets the job done quickly. See below for my pic. The teacher lined up the feather and body for the student. She gave her hand (which you can see is still pretty fisted, tough for her to open for a flat hand). They linked hands and together they stapled. The student had instant feedback that something happened because the motion of stapling isn't subtle. I also like stapling because a lot of our students enjoy 'banging' and having that feedback. Stapling does the trick!


Here are some real life pictures of the turkey art project. I wanted to post them because I like it when it looks like the student actually did the work (and not as though an adult did it and scribbled the student's name on it). Plus, I am hoping that this is also a little inspiring for all my "not so creative" friends. I know it's a struggle to see perfectly made crafts on Pinterest. This one's for you!


The wiggly eyes I will admit are not stapler friendly. Put the glue dot on the back of they eye and then go in for sticking it onto the project. 


A few other thoughts on how we did this project: We did spend time before the art discussing what a turkey was. We talked about the difference between a live turkey and the turkey we eat (the turkey we eat has no feathers!). We discussed that length and feel of turkey feathers (kudos if you have real feathers for the kids to touch!). We had simple pictures of turkeys as well. I also wanted to play a game so we played "gobble, gobble FEATHER!". In case you have never heard of this, you are right--I made it up. But I have an age gap (10th grade down to 1st grade). It isn't socially awesome for a 10th grader boy to be making a turkey that a first grader was making. So here's what we did:  I spread out all the feathers in a square like arrangement. All the students (except the 10th grader) continually touched the feathers. I had the 10th grader (who is deafblind, just for FYI) call out "gobble, gobble, FEATHER!" When he said 'feather' (with exclamation in his voice), students picked up a feather for their turkey. We repeated until everyone had 6 feathers for their turkeys. It made the project a lot more interactive! 

Can you see how we taught almost all the areas of the Expanded Core Curriculum in this lesson? Think about it and see if you can identify all nine areas.  I really did touch on each area and the whole lesson took just about an hour. 

Happy Thanksgiving my friends! I am incredibly grateful for the opportunities I have to be in our field. I love our students, our teachers, our families and our community. Hugs!

Thursday, November 12, 2015

New Must Have Trays!


Dollar Tree logo

Hello friends! 
I was out on my usual rounds at Dollar Tree buying some calendar object and finished baskets when creativity hit me. I have already blogged about how to use a variety of baskets for sorting, sequencing, calendar box systems and finished boxes. Check out my older posts if you want a review of using these boxes.

Dollar Store trays for teaching blind kids
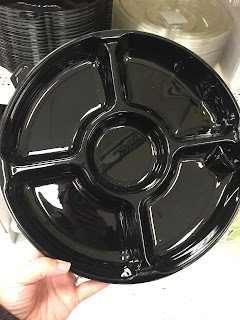
This Dollar Store tray is perfect for teaching sorting skills for blind kids 

I found five other trays that you have to go buy RIGHT NOW! Once Dollar Tree sells out, they can be gone forever especially with the holidays right around the corner. Stock up!

Above (black tray): Of course this is a great sorting tray! You could also do a little sequencing with it, too. The sequence can be following a clock face or just up/down or left/right. Lots of possibilities!

Below (red tray): I saw this one and was intrigued with what we could actually do with it. I thought you might able to use sequencing or sorting with cups. The three rows are really cool because you can use a top, middle and bottom sequence. You can flip it over, add velcro to the circles (in the middle of circle) and you can sequence that way, too.  These are just starter ideas. The sky is the limit!

Dollar Store trays for teaching blind kids
This Dollar Store tray teaching sequencing skills for kids who are blind
Below (red square tray): I loved this tray because I thought this would be nice to use with velcro. You could do some matching with it. The velcro would serve as a place holder.  I also liked the unique "walls" on this tray. The sides are unique to use. Lastly, I liked this tray because it is a square and not a rectangle. They are smaller in size than most trays as well. 


Above (silver tray top): The first thing to remember about this and all Dollar Store trays is that they aren't always make of thick durable material. That doesn't mean you shouldn't buy them. It just means that you should plenty for replacement and/or have reinforcements.  This silver tray is a tray top that I found in the baking tin section. I loved this tray top because of its color and the texture! How fun is this tray!? This is the kind of tray that you could just use alone--no texture, no sequence or anything. Just fun to use!

Below (red tray): This was also found in the backing section. The red is actually just an insert. It is very thin plastic but has potential nonetheless. This tray is a nice size. I like it for putting 1-2 simple items in for discovery or using it for sensory items. But then again, these are all just starter ideas! Have fun and be inventive!!

ps--I found these trays on Tuesday, November 10th. Hit up several Dollar Trees to complete your collection (that's what I like to do!)


Saturday, October 31, 2015

The Unique Connection

I have been recently studying up on development in young children with vision impairments. I have been loving it. It reminded me of a video that I had shared on Facebook awhile back. In the video, the children are blindfolded. They are then brought up to a line of women. Their mother is in the line of women. Each child has to identify their mother by touch alone. Watch how tender it is to see these sweet little children identify their mothers without using their sight. 

I wanted to share this video for several reasons. Most importantly, I wanted to share it for every mom who has a child with a significant vision impairment. The sweet moms who don't get to make eye contact to evoke a smile from their babies. These sweet moms (and dads) worry how their new infant will see them, connect with them, identify them. I always share with these sweet families that their child can see them. They just learn to see them differently. It's through their touch that blind babies and infants learn who mom and dad is. Take heart, your children know who you are. 

I also want to point out how important touch is in general. Touch allows babies and infants with vision impairments to know their caregivers. Touch also teaches these kids about the world and we must not overprotect them. No one ever said touch must be with the hands (although that is the first thing we think about). Touch can be accomplished using feet, arms, belly and legs. Random touch doesn't help much but purposeful, consistent, meaningful touch does wonders! Even for our most impaired-body students. It may take several (and I mean like 100) times before those little limbs respond, but keep going! Use soft blankets, interesting textures, etc. to elicit interest.

Parents, siblings, friends, all caregivers, hug those little ones who have sensory impairments! Enjoy them and encourage them to see the world with touch :)

Sunday, October 18, 2015

DIY Sensory/Music Wall

Have you seen these musical walls on Pinterest? I loved the idea as soon as I saw it! I searched a few different ideas to find the right combination of items to make our sensory wall. I loved the colorful xylophone made out of PVC. I then added different wind chimes and purchased a glockenspiel to mount to the wall. I took lots of pics of everything. You can add a curtain feature (not on this wall) if you need to reduce visual clutter. I am going to give you the directions on how to make this from the perspective of someone who has no building skills (me). 
We (my handsome husband and best partner/builder, Todd) is the guy in the pictures. We purchased everything at Lowe's. To make the PVC xylophone, we used different PVC from 1/2" to 4". Todd cut everything to make the xylophone arrangement with a hack saw and a PVC cutter. We bought joints for each piece of PVC. You can YouTube how to paint PVC. That's what I did. See below for all my painting pics and tools. 


I bought a variety of mallets for the drums and music instruments. 


Here are all the screws, bolts, anchors, etc. we bought. I had no idea on what we needed but Todd did! Here's what we bought. 


Below: here's how I painted the PVC and the metal cans. I used a ton of this primer. Spray it evenly and do it outside for sure.


We had a ton of ideas when we were formulating this wall. Todd was smart--he taped out sections of each area. This helped with mapping out and spacing items.

I ordered this glockenspiel from Amazon. I liked the case because 1) it was black and 2) I could mount it and have it closed off (since this was going to sit outside)

I also wanted to find something that would be accessible to kids with limited arm motion (that couldn't hold a mallet) or were in a wheel chair (and had their heads positioned so that they were looking up). Hello wind chimes! I found two distinct sounding chimes from Ross for about $7 a piece. They had low ropes hanging down the center that would be accessible to these special kids that I was thinking about.
Todd mount the metal cans (treated with primer and and outdoor spray paint for rust issues) with L brackets. 
As we walked through Lowe's and were gathering ideas for items, we found aluminum flexible tubing--ventilation tubing, no rust or mess).  I thought this was fun because of its length and texture. We mounted it with brackets.
There are several versions of these musical walls on Pinterest. Check them out! I hope this inspires you to get handy and make a wall for outside in the backyard or inside a playroom/classroom. 

Thursday, October 15, 2015

White Cane Day 2015

Happy White Cane Day 2015!!!

I have been so excited to see all the fun posts on social media sites about White Cane Day!!
Are you curious to know how I celebrated? We had to do our celebrations a little early due to fall break in Utah. We had a big event last Friday night that was SO much fun!
We were honored to have Blessing Offor (most notably from TV's "The Voice" but is also a very accomplished musician and speaker). Check out his The Voice audition below. 

Blessing was a true blessing as he was motivational, real and energetic about his life and experiences as someone with a vision impairment. Our theme for White Cane Day this year was "Sing Your Song of Independence". I chose that theme because independence isn't the same for everyone. There are truly different levels of it. It's time we have fun and celebrate it! Plus, I totally wanted to empower my students to pick up their white canes and walk with pride. 


I decided to turn White Cane Day into a full on short term program for students. We spent almost two full days with Blessing. We co-wrote a song with him and several talented students shared their musical gifts. I also wanted this to be a big opportunity for community service, education and awareness. Our students got busy by making handout cards with information about White Cane Day and their feelings about the white cane. We made white cane key chains to give away. 


I couldn't have done it without my amazing staff that always steps up and helps with these events! They are a talented group of recreational therapists, OTs, special ed majors and adaptive PE teachers from our surrounding universities. 


The t-shirts were one of my highlights! But if you have been reading my blog for awhile now, you know that I love my t-shirts and designing them is always a fave thing for me to do. 

Did you forget about White Cane Day? It's not too late to celebrate! There are so many ideas that you can do to help promote awareness of White Cane Safety Day. You can have a class presentation (and let your child talk about the white cane), invite mobility instructors to come and demonstrate (and then let you try under blindfold). I have done art contests in the past where students draw white cane safety. There's no "right way" to celebrate as long as you are! 


Can't wait til next year to celebrate one of my favorite holidays again!!

Friday, September 25, 2015

Painting with a Light Box

Doesn't this look fun? This fun idea is shared thanks to our Parent Infant Program at USDB. This painting fun activity uses a simple light box, yellow duct tape, plastic bags and paint. 

This easy peasy activity is so attractive for our little ones and our kiddos with multiple impairments. The yellow tape has a double duty mission responsibilities. First, it holds the plastic bags in place. Second, it has a nice highlight that attracts our kids' attention. You could also use floor tape because it is easier to remove than duct tape. 


The color choices of the dark blue and orange work well because of the way the light  illuminates them. You could also try purple or red and maybe even add some glitter (or something that shines) and see what that does. 


Here is my baby Abigail painting with my older daughter Morgan. Think of all the other ways you can play with this!? 

I met the X Ambassadors!

I had the best experience yesterday because I met the band X Ambassadors! In case you are not up on reading my blog, meeting the X Ambassadors was AWESOME because they are the band that sings "Renegade". The video "Renegade" features some pretty awesome people with vision impairments (see the video at the bottom of the post). 

They were doing a show here in SLC and had a meet and greet opportunity. I immediately thought about how cool it would be to meet Casey Harris from the band (he's the cool blind guy). It was would be fun to bring him a fan letter in Braille. I'm not exactly hip on my knowledge of UEB these days (but isn't that why Duxbury was invented? ha ha). I wrote him my letter and it transcribed and embossed. 

I was the enthusiastic fan that was shrieking with excitement when they entered. I was SO excited when they came in! It was kind of funny because here was the whole band and I basically beelined for Casey. I had to excuse myself to tell the other guys that I was really just there to meet "the cool blind guy". 


The bandmates were great! They were all wonderful to meet. They signed a poster that I can hang in my school. They thought my shirt was cool and we all read it to Casey. My shirt was from White Cane Day 2013 ("I Heart White Canes). 


It was such a rad experience. I invited him (and the band) to my school anytime they had time to make it. I wanted to share the video again. Check it out below!