Wednesday, November 30, 2011

Awesome teenage student showing that it's not about what we SEE, it's about what we DO!

A colleague of mine sent this article over to me this week and I thought it would be fun to share. It's about a teenage girl who runs track with the help of a guide dog. It's a great article!
Teen Blinded by Stargardt's Disease Chases Dreams With Guide Dog (ABC News)

Sunday, November 27, 2011

Fabulous Winter Sport!

      I know I have blogged about this a little bit before, but I had to blog again about wrestling because team sign ups are just around the corner. Some teams have already started signing up! Why wrestling? I love to encourage my students to wrestle because it is a sport that does not require vision in order to be successful. Wrestling is also a team and individual sport. This is a great thing because it allows our students to compete without needing to coordinate with teammates in order to participate. But it still gives that team feeling. Make sense? There are special modifications for our students when they wrestle. They have to remain in constant contact while competing. If wrestlers break contact for more than two seconds, the ref blows the whistle and they have to reset in contact with each other. 
This is a picture from the wrestling weekend program we ran in November. Our wrestling coach, Greg Schultz, is teaching Brian, a Braille reader. It is important that coaches teach by touch and ensure that blind wrestlers understand correct body form.     

 I've been running wrestling at my program for a little over a year now and it has totally taken off! I've had to purchase more mats to accommodate more students. I've also had students decide to join their school/community wrestling clubs. 
     Check out this feature on wrestling I found. The interview starts 45 seconds into the video: http://blindhow.com/posts/362#content. This clip is from the site BlindHow, http://blindhow.com/, a new site that I've discovered. It has a lot of useful resources. 


Still wondering about wrestling? 
Allow me to share some favorite pictures from some of my wrestling program....
Here's another picture from my wrestling weekend. This was my favorite from the weekend! The students competing are two Braille readers.
I also wanted to include a picture from the athletic conditioning portion of the wrestling program. I loved that we added these modules in! Our students ran a mile, did push ups, sit ups and worked out with free weights. This is my other favorite benefit from my students participating in wrestling!! It encourages physical fitness!!
And last but not least, I had to include this picture (with permission) from our big wrestling program. This one includes my student who is a GIRL! That's right, she's a girl wrestler and she is fabulous!! She is actually our most aggressive wrestler and has pinned almost every boy that she has wrestled. So parents don't be afraid to sign up your lady wrestlers :)
So.... are you feeling inspired to help your child sign up for wrestling? It's never too early to start!! Some community clubs start at age 6 (I've had my youngsters wrestle, too). Have questions about how to help your child get on a team or have a coach who feels overwhelmed (sometimes they do...), email me and I will get my wrestling guru, Greg in touch with you. 

Even if you don't choose wrestling, choose an activity that is a lifelong activity such as running, swimming or judo. Look for these awesome activities in your community :)

Tuesday, November 22, 2011

Call for blogs!

Hi friends,
     I hope that everyone is enjoying fall and that if you do celebrate Turkey Day, that you have a good one this week. This past week I received an email about a CVI focused website, Little Bear Sees. I checked it out and actually went to pass it to my colleagues only to find they already it. I enjoyed the site. I love when parents decide to help one another by passing along information. It helps remind everyone in our small but mighty community that we are not alone. Check it out, www.littlebearsees.com.
photo from smowtion.com
It got me thinking about all of the other blogs that our parents are writing. I've read a lot of websites especially those sponsored by large organizations. Most of them are super helpful. I have linked several of them to my blog so you can check them out. But after reading the story of how littlebearsees.com got started and another site that I have blogged about, wonderbaby.org, it really made me want to share some more family stories.
     So this is my official "call for blogs!!" If your family writes about your family's adventures in vision impairment land, please email me and share it. I would love to add it to my blog listing. We are all in this together. I love working with my families and this is another way that I can work with families in lots of places. It's one of the things that I am thankful for this thanksgiving season. I look forward to reading your blogs!!

Student Project


This post was written by my student Cody. He's a senior this year and is heading off to college next fall. He is applying to be in the TVI undergrad teaching program---so excited for him! Read about his project :)

Hey Everybody,                                                                  Cody (on right) with his friend Cooper at a program.
      I just wanted to tell you all about an awesome opportunity I have this summer.  If you have been reading Robbin’s blog for a while, you know that this past July, I was a volunteer counselor at Camp Abilities Alaska (a developmental sports camp for children with vision impairments in Anchorage).  It was an awesome experience and thank you to everybody who contributed to my trip.  Now, this summer, I have been invited to return.
      I will be a volunteer counselor again and will be responsible for one camper with multiple disabilities and teach him or her various adapted sports for one week.                                
      However, flights to Anchorage are pretty expensive and I really could use your help with the costs.  Volunteers for this camp are scarce and the number of children we serve is based on how many volunteers can participate.  You can click on the donate button in the sidebar to contribute via PayPal or visit my website http://tryingtogettocampabilities.weebly.com for more information.  All donations are 100% tax deductible and greatly appreciated.
 
Thank you so much for your continued support!
 Cody Laplante

Tuesday, November 15, 2011

Holiday decorations--their other purpose...


Hi friends,
     Are you wondering what is the purpose behind these random pictures from Target? They are holiday decorations from the dollar bins at Target and they double agents! What? How? Huh? Still wondering what I am talking about....? Holiday decorations have another awesome purpose besides making everything cheery and bright. They are are AWESOME tools for kids with vision impairments especially CVI!! Oh yes, I love this time of year for this special secret purpose. Slinkys, bright shiny ornaments and wrapping paper (always in the color RED) and other fun ribbons (with lots of textures and contrast colors) are everywhere and I go nuts! This is my super stock up time. 
     I thought I would blog about this to give you a heads up. Buy now and buy a lot! I like to hit up the Dollar Tree stores, JoAnns & Michael's dollar bins and Target (my mothership). They have awesome finds there. I know some of you are thinking that it would be better to wait until after the holidays to purchase these items. As a professional retail therapist (aka shopping queen slash vision ninja teacher), I will tell you that the left over clearance items are not what we are looking for usually. We need the shiny ornaments, red glossy wrapping paper (always to be found at dollar stores) and jingle bells, ribbon, etc. Those things can get pretty trashed by the end of the season so I like to go and get first dibs on them the first week of December. This is your time to build your CVI kits.
     Here's what I am going to do for the next few weeks: I am going to cruise my fave hot spots and blog about what I am finding, where, price and how to use it. And of course, just like last year I will snap shots of any projects that are awesome for our students. I am doing my annual Holiday Skills Day (twice this year!!) the first and second weeks of December. I will be sure to share what we are doing. I've also been surfing some craft blogs looking for inspiration. I am going to share a few activities and recipes that I have found. 
     Have you found something awesome? Have a request for a certain activity for this time of the year? Know a great activity or recipe? Please share with me! Email me :)
     Also, start thinking experience books (I've blogged about this, check the literacy label for more info). This is another great time of the year where students who have multiple impairments including deafblindness can really make a lot of  purposeful books to help them further participate. 
    Always remember in your shopping blitz for supplies to be mindful of visual clutter. Buy a lot, but show a little when it comes to presenting things to your student.

Saturday, November 12, 2011

College Life, Part Three--Using Black Board

This post also comes from my recent College Day program. One of my wise TVIs pointed out to me that a lot of our students don't know what Black Board is, how it works, why they need to know about it, etc. I realized this was also something valuable that I could pre-teach about so I hit up our rehab technologist and my good friend who is an adjunct professor at a community college and compiled some resources. I thought I would share with all of you, too!  Below you can read up on what Black Board is and some helpful tips for using it with JAWS. Our rehab technologist, Dennis, didn't write all of this up. Rather, he's been collecting useful tips and what not for using it. He compiled it all in a helpful handout and I asked for permission to share so please note that these tips are from a few different resources. It's a pretty long list of information so this one is one loooooonnnngggg post.... Enjoy :)


Black Board in a Nutshell
by Corina Lopes,
Adjunct Professor, Tunxis Community College
What's Black Board? 
When in college, you might hear your professors talk a lot about it. Basically, it's course content online management system.
Wait, what?
Think of it like your class' online filing cabinet. Some professors use it more than others, but the following are its most common uses:
  • Finding the course policy and syllabus
  • Accessing and submitting homework
  • Participating in and starting discussion threads
  • Accessing your grade
  • Email 
  • Receiving important class announcements
How do I get Black Board?
If your school uses the Black Board system, then you are automatically enrolled in Black Board since you are already enrolled for the course. To access it, check with the IT Help desk of your school (usually found in the computer lab or library). However, you will most likely need to type in your student ID and a password each time you want to log-in to Black Board.

Is it a challenging system to navigate?
No, but like anything else, can take a couple of tries to get a feel for it. The "home page" of Black Board, once you log-in, will populate all the courses for which you are enrolled. You just need to click on a course to access that course's specific Black Board page. For the most part, all course pages will look and feel the same. On the left hand side is a tool bar with labeled tabs. The most important ones for you to know are:
  • Course Documents
  • Announcements
  • Assignments
  • Discussion
  • Homework Dropbox
  • My Grades
  • Email
Is that it?
Yup, as far as the system itself goes. Remember, it is a great tool for academic success. It keeps things neat and organized, plus is a great way for you to take responsibility and be on top of your own academic goals. Check it often, even if your professor doesn't remind you. Many times, I have to change something in an assignment or add something to a lecture that I forgot to mention in class, and I use Black Board as a way to reach my students so they are prepared for the next class meeting. Excuses like, "I forgot to check" or "You didn't say we needed to check" don't work. You know Black Board is part of the course, and so is keeping up with it. Honestly, Black Board is nothing to be afraid of. It gives you more control over your classroom participation, and in the end, that is a very good thing.

Using Blackboard with a Screen Reader
Information compiled by Dennis Gallant
Logging In
To log in to Blackboard, you will need your Blackboard ID and Password. Information about your Blackboard ID and Password are available on the log in page.
Once you log in, it is possible that JAWS may discontinue reading.  This is most likely an indication that you are getting a security warning.  If you hit “Enter” you will be able to go on through, but it will pop up again next time you log in again.  Tabbing twice should get you to a check box that, if reading properly, will say “Always trust content from this publisher.”  If you select that box by hitting enter, then the message should not reappear.
My Blackboard
The first page you come to once you have logged in, is the “My Blackboard” page.  This contains a list of all of your online courses that are in Blackboard.  Using Insert + F7, you should get the list of courses and can choose which course to enter.  You will also get feedback from this page, following each course link, about new content that has been added, but it is not recommended that you utilize this feature in JAWS because the icons read out multiple times and JAWS also reads the HTML code of inactive icons.
Changing Your Blackboard Settings
Certain settings may enhance your experience with JAWS.  You can review your current settings and change them by selecting “My Settings” and then “My Tool Options.”  The changes to the default settings that you may want to consider are:

  • Discussions
    • Mark my own posts as “read”
    • View “threaded”
    • Show “unread only”
  • HTML Creator
    • Make sure “Start the HTML Creator by Default” is unchecked
  • Mail
    • Consider checking the “Forward Messages to Email Address in My Profile” if navigating the Mail Tool is a problem
    • Show “Unread Only”
  • Paging
    • Consider increasing the default number to a higher number (i.e. 30) so that more messages appear on a single page.
  • Who’s online
    • Unless you have spent time learning how to navigate and make sure the chat tool does not interfere with your activity in the course, you may want to consider making your online status “Invisible”.  This prevents other students from sending you messages while you are online.
Reducing Your Channels and Adjusting Layout
You can reduce what appears on the My Blackboard page in order to simplify navigation.  You can always add these items back if you learn that it will be helpful to you in keeping up with course content.  To do this:

  • Select the “Channels” link.
  • Deselect any boxes of items you do not expect to use.
  • Some that might be removed are “To Do List”, “Who’s Online”, and “Personal Bookmarks.”
  • Select the “Save” button at the bottom of the page.
  • Next choose the link called “Layout.”
  • Select the “My Grades” radio button.
  • Select the “Move right” link.
  • Use “B” to move to “Save Button“.  Select “Save“.
  • This will reduce the number of columns and the first thing on the page will be the list of courses.
Adjusting Your JAWS Settings
It is recommended that you change your JAWS settings to ignore inline frames when using Blackboard. To do this:

  • Press Insert +F2, select “Configuration Manager,” and press Enter
  • From the Set Options menu, choose HTML Options
  • Press CTRL+Tab until you move to the Headings and Frames tab
  • Press ALT+N to move to and check the Ignore Inline Frames check box
  • Close Configuration Manager and save your changes
Announcements
Professors are able to choose a setting that causes their announcements to open up in a new window.  This may occur each time you enter the course.  Once you have read the announcements, you can choose “Close this Window” to return to the main screen.  If you lose focus in the announcement window, use Alt + Tab to find it and re-open.  The window’s titled “View Announcements”.  You can read all past and current announcements by selecting the “Announcement” Tool.
Discussions
There are a variety of ways to approach the Discussion Board.  You can select all of the new messages and read through them quickly and determine to which you would like to reply or you can scroll through the posts by title and open only those that are relevant to you.  Directions for both approaches follow.
Reading Multiple Messages in the Discussion Board
Before this tip is helpful, you must first set your Blackboard settings to show only unread items by default.

  • Insert + F7 and then “D” for Discussions (or if that does not work, press “N” for New items Discussion)
  • Select the name of the discussion you would like to enter
  • (Note:  Different courses have different names for the discussions so you may have to read the main content area to become familiar with the discussions that have been started.)
  • Once you enter a specific discussion area, follow these steps for a quick way to catch up on reading and replying to messages.
  • Press F to move to form element that reads  “select all/none check box not checked“
  • Press the Space Bar to select that check box
  • Press Insert + F7 and then press C to go to “Create Printable View“
  • Press the Enter key to open that view in new window
  • Read each message and reply as needed.
Warning:  When you close this window, these messages will all be marked as “read”.  In order to read them again you will have to select “All”.  If you simply minimize that window you can continue to read them as long as you are logged into Blackboard.
Selecting Specific Messages to Read from Discussion Board

  • Press Insert + F7 and then choose “D” for Discussions (or if that does not work, then “N” for New items Discussion)
  • Select the name of the discussion you would like to enter
  • (Note:  Different courses have different names for the discussions so you may have to read the main content area to become familiar with the discussions that have been started.)
  • Once you enter a specific discussion area, make sure your links list is set to read in the order of items on the page.
  • Press Insert + F7 and select “S” to get to “Sorted in descending order click to reverse order“
  • Then when you scroll down in the links list the next item will be the first post on the discussion board
  • From there you can scroll down to hear the titles of all the messages and choose to read the ones you want.
  • When you scroll through you will hear the following for each message:
    • Message title
    • Message author
    • “View People Link Options for this User” (This link allows you to send a message privately to the author of the message.)
  • Once you select message you would like to read, it will open in a new window.
  • You can then use Insert + F7 to choose either:
    • Replay (R)
    • Forward (F): You may only forward this message to people who are listed in the class roster using their Bb identity name.
    • Display complete Thread (D): shows all replies to this message
    • Close this Window (C)
Posting Messages to the Discussion
  • Enter the discussion area where you want to post a message
  • Using Insert + F7, select “Create Message“
  • A Compose Message window will open in a new window.
  • Tab to Subject field and enter forms mode to write your subject
  • Tab again to message body field and type your text
  • Use “B” to navigate to “Post” button and select.
  • Warning: If you use “B” there is a “Preview” button that reads as “Preview” but if you tab, it reads as “Opens in New Window button”
  • Other options available are “Add Attachments”.  To “Add Attachments” follow directions for uploading an assignment below.
Mail Tool
If you are taking more than one course, the easiest way to check your Blackboard mail, may be to use the “Global Mail” tool.  This is available when you first log into Blackboard on the page that has your course list.  Here is a quick way to navigate through your mail from this view:

  • Press Insert + F7 to list links.
  • Press “M” for Mail and space bar to select that item.
  • Press Insert + F7 again for links list.
  • Press “M” again until you find “Mail Account” followed by the course you want to select.
  • Press the space bar to select that item.
  • Press Insert + F7 to hear links again.
  • Press “S” for “Sorted in descending order”
  • Press Alt + M to move to that item.
  • Tab once to the check box for the first mail item.
  • Tab again to the link to the first mail item.  (Warning:  They read exactly the same.)
  • Use Shift + Application Key to open context menu.
  • Select “O” for Open (Opens in new browser window.)
Once in the message, you have lots of options.  Select Insert + F7 and scroll through links to hear all options.  Once you are finished reading this message, it is suggested that you use Insert + F7 and select “N” for Next.  You can move through all of your messages this way while still in this new window.  Once you have read them all, the “Previous” link will no longer be active.
Assignments Tool
Uploading Assignments

  • Once you get into your course, press Insert + F7.
  • Hit “A” until you find “Assignments Assignments”.
  • If that does not come up, try “N” for “New Items Found Assignments Assignments”.
  • Press “H” to navigate to the heading “Assignments”.
  • Tab through the “Submitted”, “Graded”, and “Published” links.
  • The next link will be your first assignment.
  • Hit Enter.  Use “H” to navigate to “Instructions” and “Submission”
  • Once you are ready to submit, tab to the text box that follows “Enable HTML Editor”
  • This is an editable area which is designed to offer a space to enter your assignment.  However, if you prefer to upload your assignment as an attachment, you have that option.
  • You have to type something in the box, such as “Attached is my assignment for module 1″.  Select “Enter” to turn forms mode on.  Type your text.
  • Tab twice to “Add attachments link”.
  • Hit Enter.
  • A new window will open.  Use links list to find “My Computer“.  (Warning:  Do not select “My Files”.)
  • Tab again to “Open File Manager in New Window“
  • Hit Enter.
  • Tab one time and you will be in an editable box where you could type the location of the file on your computer, but if you are like most people you will want to tab again to the “Browse” button.  But they read the same.
  • Hit space bar.
  • The “choose file” dialog window should open
  • Navigate to the file you want to upload.  Tab to the “Open” button and select “enter“
  • There are several of those browse buttons in a row so to save tabbing through all of them, use “Control + End” to go to the bottom of the page, then “shift + tab” until you get to the “OK Button”.  (Warning:  something unexpected occurs when you tab backwards from the end, before getting to the “Cancel” button you will hear a single “Browse” Button.  This is out of the expected order and different from what is visually on the screen.)
  • Select “Enter” and that window should close.
  • It should read out your file as a link on the page you were on before.
  • Tab until you get to the “Submit” Button.
  • Select enter.
  • A dialog button should opening asking you if you are sure you want to submit it.
  • Select “OK“
  • You will be directed to a page that lets you know that you have submitted the assignment successfully.
  • If you return to the assignments page, you can now go to the “Submitted” link and it should list your assignment there.
Using the Quiz Tool
  • Quizzes and exams are posted in under Assessments, so using links list type A or N for Assessments or New Items Added Assessments.
  • The numbers for each question are set up as Level 2 Headings, so you can use “H” key to move from question to question or to find your place if you lose focus.
  • You have the option to save answers as you go, or to “save all” at the end of the quiz.  It is recommended that you save as you go since crashes do occur on occasion.
  • Students using screen reader or magnification software can request extended time ( up to double the normal time) on timed quizzes.
    • Your professor will be the one to make this adjustment. 
  • Each time you complete a question, the focus changes to another frame briefly and then moves back to the quiz frame.  If you try to go quickly through the questions, JAWS may lose focus.
    • The “Finish” link is positioned before the “save all” link so it would be easy to select “finish” and expect that the quiz was completed successfully.  So users should make sure that they either save answers as they go, or tab past the finish link and select “Save All” before choosing “Finish”.

College Life, Part Two

I have lots to blog about regarding college life/transition skills. Remember my post about my student Leah? Have you wondered how she is faring in her freshman year of college? Well, I've been checking in with her a couple of times  a month to see how she is doing. Actually, I can just read on Facebook all the excited and wacky posts about college life and I can see that things are good. Nevertheless, I still wanted to check in with her and pick her brain on freshman life. I loved her email! I used her insight to help with my own College Day (did an intensive day program just this past week...) 
Here's what she had to say:
Dear Robbin.
College had most definitely been a fabulous experience so far. All of my professors are understanding and willing to give assistance if I am having trouble seeing and there are plenty of tuttering centers on campus to help out as well.
As for living with a roommate it most certainly is an adjustment  it takes time to get used to yet its fun because you always have someone around, I was lucky enough to get a roommate that was a fun person to be around and we get along. Everyone in my dorm is supper nice and friendly just about everyones door is always open and we all just hang out .
For dining, They  have the menu for   breakfast lunch and dinner online so you can expect what to be eating  the flow of getting around  to all of the food is quite easy theres a salad bar in the center and then different sections on the sides. getting around the dining hall the  best way would be walking with a few friends its fun and you can plow through easier.
Now for getting around the campus I for one like walking with my friends just for the sake of not walking by yourself yet when your walking to class make sure to map out how to get there before the semester starts this way you are not in a rush. I believe one thing that helped me the most  for entering college would be getting involved  wether its a sport or a club it helps making friends allot easier. My college experience has been super so far I hope this helps .
Leah :)


I wanted to post this because I think it helps parents by reading about successful (and sometimes not so successful) transitions. Leah was on the ball with independent living skills. That was a huge factor in her success. I am proud of my girl! I can't wait to see what else college life brings her!!

Friday, November 4, 2011

Calendar Object System Board

Holy hannah blog family, I have a super awesome find from this week and I couldn't wait to share it!! This fantastic find was from the handy work of Matthew Tietjen with collaboration from Patty Leonard, TVI. Matthew is a TVI student doing his student teaching with us this semester.
I was doing my ususal rounds at the agency getting work to the TVIs and what not when I stumbled upon Matthew working in an empty cubicle.  He had made three fabulous calendar box/object symbol system for children who have multiple impairments that were visual learners (meaning they did not read Braille). These puppies are awesome and they are easy to make! I instantly knew that I had to blog about this so I immediately asked him if I could photograph and blog this. Then I had a few ideas of other ways you could use these boards. I am going to include all of the information on how to use, how to make and how this is awesome in this post. Get ready to read and then head out to round up supplies! I've made the pictures extra large size so you can really see all the details. 

Here's how to get started:
First, you must read my postings on calendar box systems. I've linked some fabulous articles and information about why and how they work. I love calendar box systems. I have used them over and over and I promise you, they are proven effective strategy.


Materials you need:
Thick, foam poster board. Matt used black and whiteCutting blade/box cutter, a good work space. I usually use a broken down cardboard box to cut things on so I don't cut my desk (I've done that before, ha ha...)Board maker softwareLaminatorBlack felt fabric (although any medium thick type fabric would do)Hot glue gun and a lot of glue sticksVelcro or hook & loopObject symbolsTwo hinges (can be purchased from Lowe's for about $3)Black permanent markerSmall plastic flexible bin/basketRed shiny fabricScissors


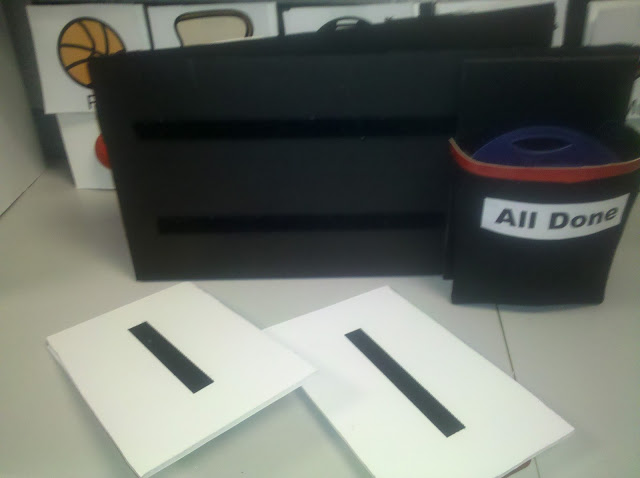
Matthew glued two hinges securely on the back of the board. The hinges allowed the material to be cut in half so the student is overwhelmed with information. 
 The thing that I loved about the hinges is that when it cut the material in half, it also gave it a new use. When folded, it provided two options: two objects followed immediately by the finished box and then three objects on the other side. This is awesome because you may have a student that is not ready for a full calendar box system. But they may be ready for now, next and finished system (remember the boards I made? Read about it in another post...) You could just use this side at the most basic level: now, next and finished with the student. Then, after they have got the hang of that, flip it over so you can use the three object side. You can do a three step sequence!! My favorite!! Three step sequences are awesome because you can do a "first, next, last" teaching sequence or a "beginning, middle, end". When the student has mastered this level, they are ready for the full board and the full line of objects. The other thing is that you can multi-use this board. You can still keep the full board for the object calendar box system but then fold it to the three object side when doing work and just put new Boardmaker pictures for the student to follow. 
 Each picture and symbol have velcro on it. This gives the option of the student using the picture or the symbol or both. I advised Matthew to put the velcro at the top of the picture (cut the velcro into a long rectangle) because when put at the top, it helps with the picture not flopping over at the corners and that helps eliminate glare (since they are laminated).
 I also advised Matthew to take a black marker and outline the velcro spot on the board. This makes it an easier target for placing the object in the right place. You may need to make a thicker black outline. It depends on the student. You could also use red. Then, I gave him some of my red shiny fabric to outline the all done (or can be labeled 'finished') at the top because without it, it was a lot of black and hard to tell with depth perception where to put the object in. Lastly (he was great to let me sit there and pop off all these ideas), I suggested he label the all done box so that they student sees the target. It's not exactly necessary but it can help. It also helps the teachers and support staff remember to label this when instructing. 

I took the individual object boards down so you can see how he put the velcro on it. Now, always remember this, use a lot of velcro! This gives a better target for students and it helps with durability. 
 
 Now, a word about the symbol choices here. You have to be careful with selecting object symbols as you want them to be meaningful not just a bunch of random plastic items. Matthew used symbols that I call 'purposeful plastic'. They are all plastic symbols but they are unique because of their meaning. For example, the soccer ball actually feels like a soccer ball as does the basket ball. They are both pretty darn good replicas of the real thing. Good choice. If he were to use some random plastic ball, there probably wouldn't be a lot of discrimination between the two and it would have been junk.  About the bread object for lunch. This too is plastic BUT I agree with this because it looks identical to the Boardmaker picture, it is thick, has texture and is a pretty good replica instead of using a piece of bread. You could use a fork and a for picture. That is a common object symbol for mealtimes. 
 My favorite of the object symbols is that for computer he used a Big Mac switch. When these students go to computer, this is what they use. A perfect choice for this picture. 


This is something you can do at home, school and for vocational training. I really loved these. They are easy to make, duplicate and aren't too expensive. I have a feeling I will be making these over and over for students to use. 

*Make sure you and your team (that includes parents) read up on calendar box systems. I can't stress it enough, they work!

Tuesday, November 1, 2011

College Life Part One

This post is the first of a few that I am going to blog on college life. Next week I am running my annual College Day. I recently sat down with my mobility superhero colleagues and we created some new handouts for the transition to college life. This first post is from my newest handout, College Living Strategy Plan. 
photo from wikipidia
A little background: Our transition age students need to have good generalization with their skills. Too often, they learn just their high schools, cafeteria lines, familiar restaurants, etc. but lack how to take their skills and generalize them to similar situations, conversations and places.  Some other common issues is that they won't use their canes (if they are visual travelers...) and struggle with independent living skills when they leave to college life. Now not every student struggles with this but a majority of them do in one way or another. So here's what I decided to do: take my students to an actual college campus and get down to intensive lessons for both parents and students. I teamed up with mobility to give our students and parents a checklist of skills for college life. 
photo from flickr
How to understand this: I decided that if we just lectured the students it would just blow right pass them. I wanted to give my students something that they could use easily. That's where my three category plan come into play: mobility plan, independent living skills plan and vision plan.
This isn't rocket science. The category names are exactly as they sound. The vision plan is for how they can modify their vision impairment to a situation. I feel that if students can take these three plans when going into a new situation or place, they have a good first foot forward.

Here's part one...

College Living Strategy Plan
by Robbin Keating, Vision Rehabilitation Therapist
and Dave Ferland, COMS
(with consult from the BESB mobility instructors)

The place: Student Center
Mobility Plan:
§  What entrance would you use?
§  Where is the information desk?
§  Accessible ATM? News & Campus events? Bookstore
§  Where are the bathrooms?
§  What are important landmarks?
o  Designate a meeting landmark
o  What kind of landmarks do you like? Big logos, above ground items, etc.
§  Seating situation/study rooms/chill spots
§  Designate a home base in every building

Independent living skills plan:
§ Can the student use the following independently: Food card, Student ID, money organization, cell phone, using an ATM
§  Low vision devices skills

Vision plan:
§  Lighting situation
§  Systematic search patterns to locate important people, places
§  Find your vantage point for finding seats, people, places, information

Do it at home: Start thinking about your child's chore list. I hope your child has chores because if they don't, plan on heading off to the dorms so you can clean up after them! :)