Showing posts with label Braille projects. Show all posts

Saturday, December 19, 2020

Teach the Expanded Core Curriculum by Writing Letters to North Pole Friends

a graphic that has a big envelope that says Teach the ECC by writing to North Pole friends
Writing letters to Santa Claus is a very popular activity for this time of year. However, you can include a lot more kids and A LOT more Expanded Core skills if you put a twist on this popular activity and write letters to North Pole friends. 
This twist give you a handful more opportunities for skills. Here are some ideas:
Learn about the post office and writing letters free matter for the blind
Addressing envelopes (almost a lost art at this time)
Learn how to write a letter with a greeting and a closing. 
Developing and practicing a signature. 
Make choices about the friend you want to write to (I gave my students Santa, Rudolf or Frosty) and what you want to say or write to that person
Teach about weather (what type of weather do you think the North Pole has?)
Writing to North Pole friends as opposed to just Santa means you can do letter correspondence into January (feel free to pick other North Pole friends).
Give different writing prompts (It doesn't just have to be about what you want for a holiday present--you can write about different things).
Literacy, literacy, literacy! Lots of of opportunities for literacy in a project like this.

an image of a big red mailbox that says letters to the North Pole
I found these super cute mailboxes at Target (there's even a light in the outside). We set up the North Pole mailbox in the office with our secretary because that's where the mail is delivered at our school. However, if you are doing this virtual or just at home as a parent you can use your own mailbox. 
I provided students with three choices for their letters. Santa, Rudolf or Frosty. I whipped up these images on Canva. Notice that I used strong contrast for the pictures to make them friendly for low vision and CVI students. My amazing para took the next leg and put the tactile items on it. We LOVE the APH Carousel of Textures kit but you can also hit up a Joanns or Michaels for some tactile paper. She didn't do the whole picture tactile rather just the critical features of each to highlight them. 

a green background with a simple Santa graphic where his beard is made from cotton balls

an image of a black background with a reindeer cartoon smiling with antlers and nose made tactile

A green background with a while snowman wearing a hat and scarf with tactile on those parts
Our students could write in any writing mode that worked for them (and then received a letter in return in that mode). We received letters in Braille, large print and pictures. Now this is the cool part, we had our high school students write the Braille replies. So if you are a teacher with older students, this could be a fun project that your high school students do for younger students on your caseload! 

4 pages spread on a table each with a simple sentence and a picture from a student to Santa
I wanted to include pictures of how we did the picture letters because sometimes that is tricky for folks to know how to do. The above picture is the letter from a student that uses pictures. There are Braille labels over the large print with large clear pictures. We returned his letter in the same format and signed it from Santa with the same Santa picture (plus tactile beard) as the signature. 

4 pages spread on a table each with a simple sentence and a picture as a reply from Santa. the santa picture has cotton balls on the beard.
Now we started this by writing letters to North Pole friends (again, I meant for this to be inclusive for students who do not celebrate Christmas) but can you see where you can keep this going in the new year? You can continue to use actual letters or you can keep practicing and learn how to transfer this to digital communication such as an email or have a lot of fun and move to Twitter!
Teachers, you can make this as a kit and send it to families and then work together virtually. Parents, you can do this in your home. It's an accessible activity that practically every child can participate in. Happy holidays! 


Wednesday, August 26, 2020

ECC Chill Pill Lesson

A graphic that says ECC Chill Pill Lesson: Put a ECC twist on a popular activity
Happy back to school friends! I know it is crazy right now but we can still provide meaningful Expanded Core instruction for our students. Check out this fun idea: make chill pills with students. Huh? I'm sure you have seen this fun idea floating around on Pinterest or other craft places. You can take this fun idea and infuse a TON of ECC learning and skills practice for students of various abilities. 

A close up of the ECC chill pill bottle with the label that explains how you will become happy when taking the pills
 I referenced our ECC assessments (you should do this, too!)
Here's a few of my ideas of how you can infuse ECC learning:
Community learning: what is a pharmacy? learn about employees that work there--what are their titles? Research different types of pharmacies and locations. Plot a bus/walking route. What are items you can get a pharmacy? Over the counter vs prescription? Safety measures with medication
Social/emotional: review why someone would need to take a "chill pill", what does it mean to "chill out". You can review emotions and healthy ways to manage them and express them. I also like to do a mental health toolbox where students learn different ways to manage mental health and then select ideas to build their own coping skills. 
Independent living skills: how do you manage your personal medication? Hygiene is another great topic at this time. How do you open and store medication safely? Use technology to read medication labels. 

A pic of the ECC Chill Pill bottle and a small bottle of hand sanitizer
Now it's important to remind you that you want to have intentional, meaningful instruction so ponder how you will present this and work through material with students. Don't shove all this information into one lesson! The bonus part is the actual chill pills. We used a mix of Skittles and M&Ms. Another bonus ILS is to review favorite snacks, prices, location of these items, etc. Allow students to mix it up and select their own "pill combinations". 

A top view of the bottle with the lid off so you can see the candy inside.
These make great gifts for others. You may have to stuff them with pre-packaged candies for Covid safety but all in all, it will still work. Last but not least, the label lesson! Teach students what is on a prescription label. We had print and then Braille labels for students. Big shout out to my secretary who assembled these ones! She did a great job. Our students loved them. They were part of our back to school for our residential students. 
Would you like the label to make your own? I'm happy to share! Email me at robbin.keating@gmail.com and I'll get you the template. 


Thursday, December 7, 2017

Braille Cheater Beater

Hi friends, I am so excited to share this post because this is from my hot husband, Todd, who is an itinerant TVI. He has a handful of low vision students who are learning Braille. He kept finding that they always wanted to cheat and peek with their eyes. That's not uncommon. Lots of our kids who are learning Braille and have usable vision try to cheat while doing Braille lessons. My husband wanted to find a way to work bust the cheating and still have a little fun with instruction. 
[The picture below is a picture of the Braille cheater beater which is a black screen the blocks a student from being able to see the Braille. They have to use their fingers to read it only. On the black screen there are Braille cards with contractions on them]
He also made some Braille contraction cards to help with memorization. A lot of his students still like to look at items to learn so he has visual Braille cards. He puts the contractions that he is teaching on the screen to remind the students of the them. (He also made a Braille contraction Go Fish game with cards like this). 

[Side view of the Braille cheater beater screen. You can see how a Braille book fits and the screen blocks the Braille.]
The original version of this has the long legs (as seen in the picture). He later cut the legs shorter so it wasn't so long. He used black felt and CPVC. We just sewed it up on the side to slide over the PVC. It was cheap and easy to make and has worked pretty well with his students. 

 Below are the directions and the materials used to make one. It's worked like a charm to bust the cheating with Braille.


Friday, September 29, 2017

Name Activity for Early Childhood


Happy back to school friends! Sorry for time with no posts. It's been crazy but I have lots of fun ideas all saved on my phone to blog about so I promise to get caught up!
This post is inspired by a typical activity from preschool. I kept seeing all these fun name activities to teach students their names. The goal for our school is to transition our students back to their neighborhood schools so I always like to see what activities they are doing in typical classrooms. 
I found this fun name activities and with a few tweaks made them for our preschoolers. 

Student name in Braille and print

The name activity I made for our Braille readers have actual Braille and simulated Braille using buttons, felt circles or pins. The green dots are textured dots so students can point out individual letters. NOTE: The enlarged dots (made with buttons, pins, etc) are for our pre-Braille readers. It is to "warm up" their fingers and get them learning about the dot combinations. I also used Braille labels to type out their names in Braille. You can also use the ABC stickers from APH (ask your TVI for some stickers--they also have print  & Braille).


I used the KG Red Hands font to make these. I looked around for some free teacher fonts and I like this font because it has a bold and an outline of the font. It's easy to read (not a lot of visual clutter) but still looks like kid font. It is important to know what font size or just size that your little ones can see. Regular ed teachers may need a little support for this from TVIs.  Also, be careful about the white background with lamination. It might be too much glare for some kids (both the laminate and the white could be too much). I made a few other versions of these and used green outline to the letters because some of my students see green (or red) when those highlights are there. Make sure there is still contrast (meaning don't use green letters on green paper--that's probably too much green).

Make sure that whenever there is Braille that there is print as well (as a cheat for people that don't know Braille). See the above picture with the Braille cards.  The teachers had a great idea of putting a straight line of Velcro so students can just put their letters on the line.

Remember to keep your Braille labels consistent like the ones in the picture above. I didn't want our students to feel all over the paper to find the Braille. The Braille letters of Maeve's name are consistent--they are straight and in the same place so she can track.  I liked this idea because it is something that our kids will recognize when they move to the district in an early childhood class. We did make some printouts (with the same font--in the outline version) so our kids could trace and start their writing skills. These are easy to make! You just need cardstock (I also like to add a pop of color as a frame), laminate (they also make non-glare laminate if you have students that are sensitive to glare), Velcro and items to make your Braille (be careful of the size of the buttons. I noticed that one set of sim Braille was a little too big for our students' little fingers).  Best part of this whole activity: it's teaching the Expanded Core Curriculum!

Friday, April 7, 2017

DIY Braille ABC Cards

Hi friends, this week I am sharing another project that was a collaboration with my awesome teachers. One day while I was hanging out in one of our preschool classes I noticed that are future Braille readers were left out of the ABC cards. This wasn't anything to be mean to our Braille readers. Our teacher just didn't have anything like the print ABC cards that our low vision students were using. 
Many print readers have large print letters and activities to help them learn how to recognize and print letters. Annie, our preschool teacher, wanted to include all of her students in the letters center but was a little stumped on how to include her Braille students with the same type of cards her low vision students have. We put our two heads together and came up with these easy DIY Braille cards. These cards are just one idea of many brilliant Braille ideas. 
These are simple to make but a tad time consuming. 
We made a template of the Braille cell and then copied them so that we would have one for all 26 letters of the alphabet. Then they were laminated and cut out. I bought buttons in black and white colors (for contrast). All the buttons were hot glued into the different Braille dot configurations to make 'Braille letters'. Kudos to our amazing paraprofessionals who helped make these sets. They were all hole punched and put on a book ring to keep them organized and easily managed. 
The contrast between the buttons and the paper was meant to be fun for young students. You could easily switch up the colors if you like. Contrasting colors may not always be relevant to future Braille readers. The colors help with appearance with other children in a classroom.
You could also make one Braille cell template, add velcro to both the dots and the buttons so that students could arrange Braille letters (or match to one of the Braille cards) similar to how print students trace or match print letters. 
These ABC Braille cards are part of the Expanded Core Curriculum. Braille instruction is part of the area of compensatory skills. Now don't go thinking that compensatory is the only ECC area covered by these cards! The implementation of the cards can also cover other ECC areas such as career education and independent living skills.
We use these cards in our preschool and with our primary grades (that have children with some additional disabilities). However, feel free to use them with whatever grade or ability of student you would like. 


Tuesday, November 1, 2016

Braille Sundae


I was hanging in one of our preschool classes with my new fave preschool teacher, Annie, to co-teach with her. She had a fun lesson for dipping apples into different toppings. We did a quick brainstorm and turned her lesson into a Braille lesson with a few quick changes. Next thing we know, we have this fun ECC lesson and are making Braille sundaes. 

Annie's lesson started like this:

And became an Expanded Core Curriculum lesson:
We added an APH tray (any tray will do though) and arrange the toppings into a Braille cell. 
Easy update!
For instruction, we reviewed the Braille cell and the corresponding numbers. 
For example, (look at the picture above), the chocolate chips are "dot one", the caramel sauce is "dot 2", etc.  
Students took turns selecting toppings but had to request it by the number (to teach the number configuration of a Braille cell). It was a success! The students did great requesting using the dot numbers. For example,  "dot 6, sprinkles".We did a quick but direct instruction on the Braille cell to set the students up for success in the lesson. 
This wasn't just a Braille lesson though. We incorporated much of the Expanded Core, too! 
We addressed other areas of the ECC such as:
Independent Living Skills: cooking skills at the preschool level
Orientation & mobility: positional concepts 
Self-determination: making choices, trying new things and making opinions about them
Social skills: turn taking, eating etiquette and conversation.

These were the areas that also received special instruction during this Braille lesson. We had each of these areas in mind during instruction (that's the secret to implementing ECC!). This was a preschool lesson so the whole lesson was about 30-35 minutes. My favorite part: listening to these sweet little preschoolers request their toppings using it as a Braille cell ("dot 2, caramel sauce!"). 


Tuesday, April 5, 2016

Literacy Fun with Chicka Chicka Boom Boom!

We have a long walk from our classrooms to certain areas such as the cafeteria or library on our campus. One of our preschool teachers had a difficult time herding her class back and forth. I saw an idea she tried where she put items for the students to touch on their walk. This gave some anticipation, hurried those little feet along and provided some exploration experiences. I thought it was a great idea and decided to add some literacy fun. I selected the book Chicka Chicka Boom Boom because it is one of the best children's books! It has great rhythm. It was one of my favorites when I was a classroom teacher.

It didn't take me long to create a walkway with the story. The book walk begins with the coconut tree. I had a cardboard box that was the perfect length and width for the base of my tree. I also had this awesome leather fabric that I hot glued around the box. The palms were made out of cardboard (I peeled the layers of cardboard apart. I didn't have anything that was similar to palm leaf that would be as sturdy as cardboard) and spray painted it green. I used plastic balls (like from sensory play ball bins) and used them as my "coconuts".
literacy for blind kids

I didn't want to get carried away with the design. I wanted to keep it simple and accessible for students. Keep that in mind: your textures, items, etc. shouldn't become a distraction. My focus was the story. I also wanted to include some pre-Braille and something for our kiddos with multiple impairments.
I typed everything in Arial bold large print. The letters are highlighted in different colors. I also made Braille letters (so if you see the letter B, you can also feel the Braille letter B on top). I used the standard Braille label paper. I also put Braille on the words "coconut tree". I used tactual symbols for the parts of the story that mention coconut tree. I did that because the goal is that the student starts with touching the coconut tree. I then took the same tactual pieces (leather and ball aka tree and coconut) and placed them on the signs. The leather and ball were consistently placed on every sign. This was specifically for our children who have multiple impairments.

 Braille literacy project

Braille literacy project

Braille literacy project

There is also Braille on the "chicka chicka boom boom".

Something to consider: glare factor. Can you see some glare on the signs? I used our roll laminator but the down side is the glare factor. What to do? I redid some of the signs that got hit hard with light with non-glare laminate. I bought mine from School Specialty but you can look it up anywhere. You can also look for matte laminate to help with this. I also considered the placement of the signs.

Lucky for me that I was given a large print copy of the book. I used it at the beginning of the walk.
This hallway doesn't really have much going on so there aren't too many areas to explore. Literacy is all around us and for kiddos with vision impairments, we have to create opportunities to access it. Can you see how this book walk is an expanded core lesson as well? Hints: think of it's location (orientation and mobility), reading the Braille or symbols (compensatory), recreation of the reading the story (recreation and leisure), discussion of who writes a story (career education)....and the list goes on and on! 


Wednesday, February 11, 2015

Quick and Easy Tactile Hearts

Still searching for that just right Valentine's Day project with your students?
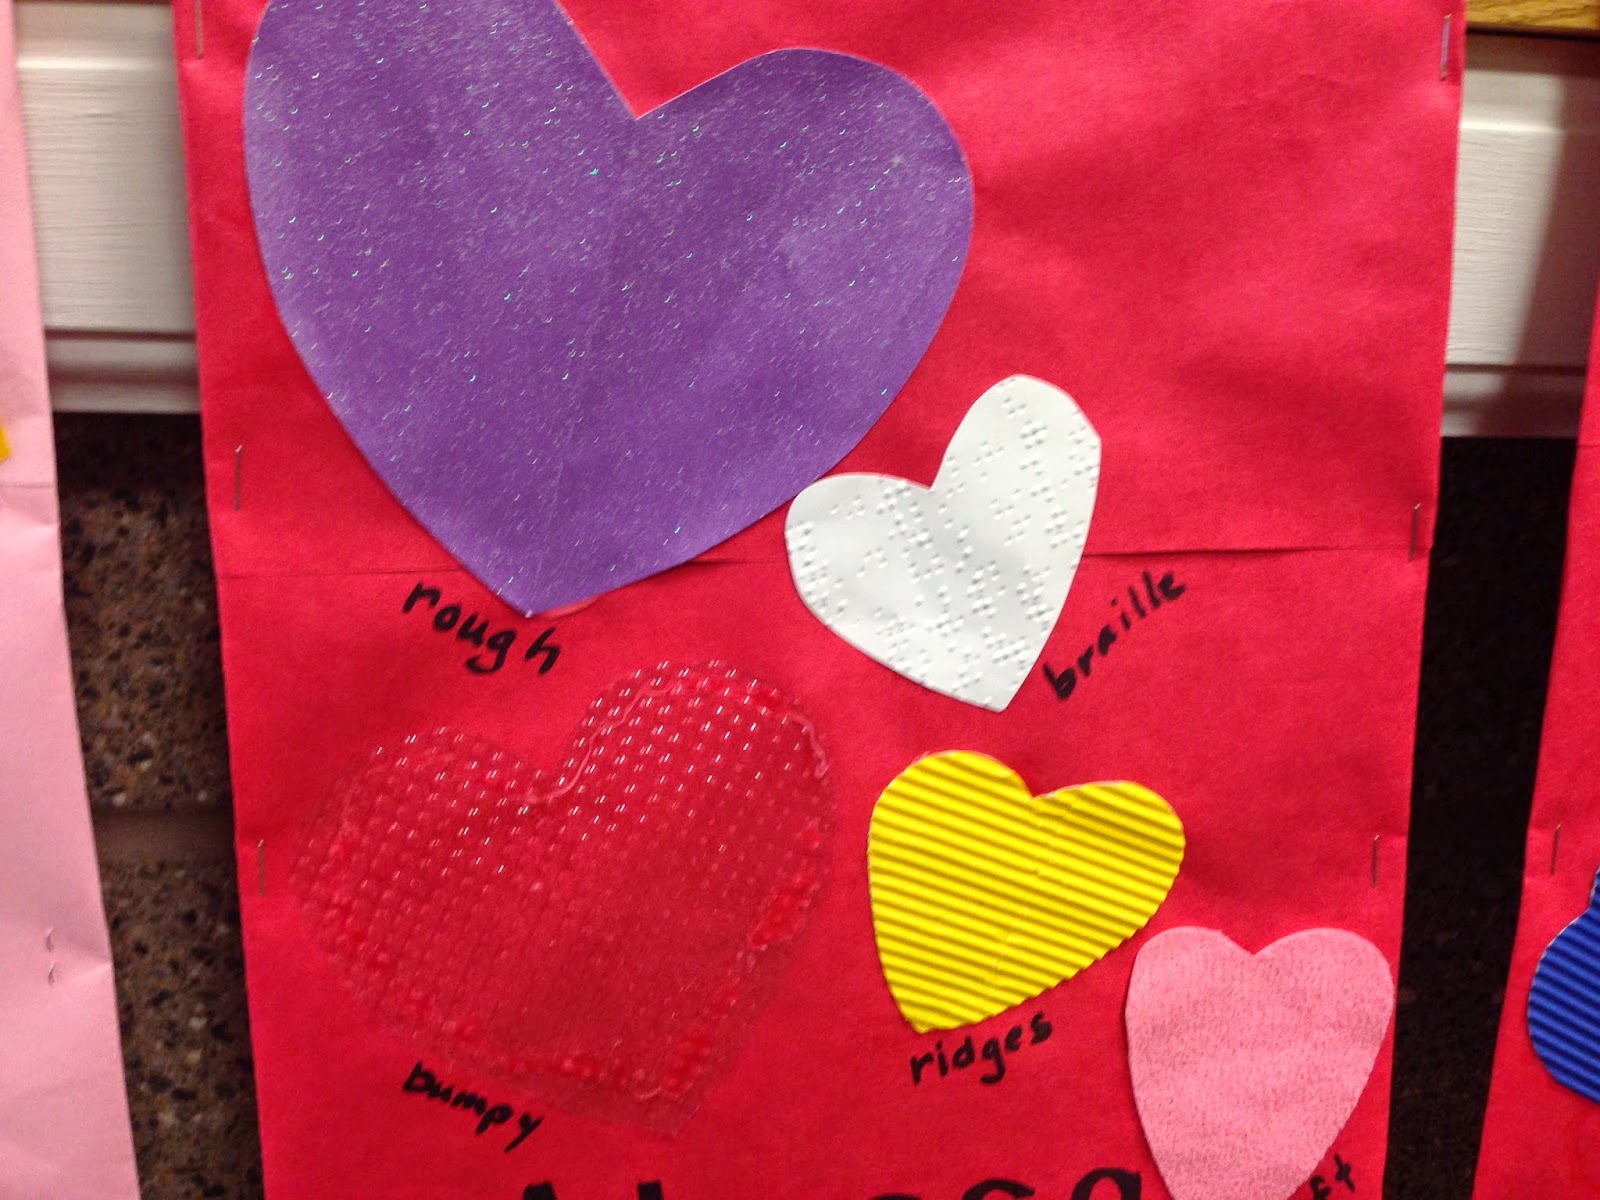
I have a great easy, peasy idea that packs a lot of educational punch. I was strolling down our hallways when I came upon Annette's preschool display board and instantly pulled up my camera app. This idea incorporates textures, math concepts, social skills, compensatory, sensory efficiency and choice making skill areas.
Plus it is just dang cute! 

You could easily do matching and discrimination skills before you glue these hearts on. Follow up your matching lesson with comparison about size, texture or color (if you can). Lastly, let your students choose where they want to place their hearts and glue them on! It's a perfect little project that is great for little hands on Valentine's Day. The bonus, this project also has potential for kids who are MIVI. You may have to do the cutting for them but you can still work this easily for these kiddos as well. Dare I give just one more idea---can you add a scent to the hearts? Spray a little scent onto these hearts. The ideas are endless!! Thanks Annette for letting me share another of your projects!

Saturday, May 31, 2014

Discount on SMART Brailler & LightAide

Hi friends,  our friend Amber over at www.wonderbaby.com has something really cool going on! 
Here's what's going on:
For a limited time, Perkins Products is offering the SMART Brailler® at 20% off and the LightAide™ at 10% off!


Just use promo code "SMART20" when ordering the SMART Brailler and "LIGHT10" when ordering the LightAide.

Click here to get the full article and the how to for getting in on this cool offer:


Tuesday, February 12, 2013

Love is in the air...

Hello my friends! I am back from my wedding fun and back to blogging! Well to be honest, I am buried in the snow! CT was one of the lucky recipients of Snow Storm Nemo.  Valentine's Day is just around the corner so I thought I would do some searches around Pinterest, Blogger, FamilyFun, etc. to look for some blind friendly crafts and treats. 

A few easy modifications for the classroom V-Day fun:
*Ask teachers to have the kids in their classrooms put their V-Day mailboxes in the same location at their desks. Usually mailboxes are made up of paper bags or boxes. Tape them to the same place at each desk (i.e. on the right side of each desk).
*Remind teachers to tone down the visual chaos! Sometimes V-Day gets a little visually overstimulating---hearts, candy, ribbons everywhere are just a visual nightmare. This can be especially true when crafting or baking. How do you know if it is overwhelming? Pay attention to your kiddo!! Look for them showing signs (verbally and non-verbally) that they are overwhelmed by things. 
*Put forth the effort to add some Braille to your cards. Get some Braille labels or just put them in the good ol'Perkins and put each classmate's name in Braille. You could even use some Braille to make a V-Day riddle! Have the sighted peers 'decode' and figure out the Braille on the card. 
*As with every holiday or event in the classroom, PRE-TEACH! Give our kids a heads up on what the special events are so that our kids can anticipate what's going to happen. 
*When crafting for V-Day, you may need to think about some contrast. As with most things for our kids, put a dark placemat (or play tray) underneath to provide some contrast. Dycem can also help, too. 

Are you a parent or a classroom teacher that's not sure what are some good activities for children with vision impairments? The activities and treats I found cover just about all of our kids. I think almost every one of these can be done for early childhood up to teens including kids who are MIVI (which includes DB and ASD/VI).
Here's some fun activities and recipes that I have found:
*Valentine Heart Button Craft. Here's the link: http://handsonaswegrow.com/sorted-button-valentine-heart/
Valentine Heart Button Craft for Kids
This particular craft is geared towards younger children. I also thought you could vary the size of the hearts, put the paper on chipboards or foam boards (more sturdy). Good for early childhood up through primary grades in school age, MIVI kids too (as long as they don't swallow buttons). You could make this a 3-step sequence: first, paper--next glue--last buttons. The white glue on a dark red paper also creates a nice layer of contrast to follow the glue line. Make sure you put buttons in easy to access storage. The blog suggest cookie tins. 

*Egg Carton heart. Link: http://www.ivillage.com/kids-valentines-day-crafts/6-b-142009#142016
Egg-cellent Heart Art
You can trend this up (like the picture) for older kids (teens) or it's also something that younger kids can do too. I think our MIVI kids can do it too with a little support from a teacher/parent.

*XO wreath. This was available on Etsy for purchase but I also thought it would be a good craft for us to make as well.
XOXO Decor - Berry Wreath - Kisses and Hugs - XO - Holiday Wreath - Valentine's Day Decor
Another one that is doable for our range of kids. You could also add some fragrance to the mix to wake up the sensory input as well. The "O" may be a little tricky. I think you could go to the store and buy the "O".


*Valentine Chex Mix. Link: http://www.bettycrocker.com/recipes/valentine-chex-mix-12-recipe/f6d4a741-f15c-4c78-8f40-94ab312a2e46
Valentine Chex® Mix (1/2 Recipe)
Another fantastic cooking project that is simple and easy. It's also another good one that can be made into a 3 step sequence: First: candies, Next: Chex Mix, Last: Sprinkles (or your last step could be the baggie that you can package them). You could also add another 3 step after you "prepare the food" (the steps I just wrote). The next round of 3 steps could be the 'vocational sequence': First: food, Next: package, Last: label. In case I was confusing:
'Cooking Sequence': First: candies, Next: Chex Mix, Last: Sprinkles. You combine all ingredients into a bag and shake (most kids love this step).
'Vocational Sequence': First: food, Next: package, Last: label
For kids with kitchen and cooking skills you can have them prepare the peanut butter mixture. You may have to substitute the PB mixture. You might need to try something like almond butter.

*Valentine's Pop Box Treats. Link: http://lilluna.com/valentines-pop-box-treats/
 
I thought the Pop Box was a great idea for teenagers or tweens. 

You guys know I blog about doing peppermint bark at Christmas but I never thought about doing it at V-Day! What a great idea!! This is awesome for any ability or age!

Tuesday, April 17, 2012

Toy Story

It's a toy story post day!
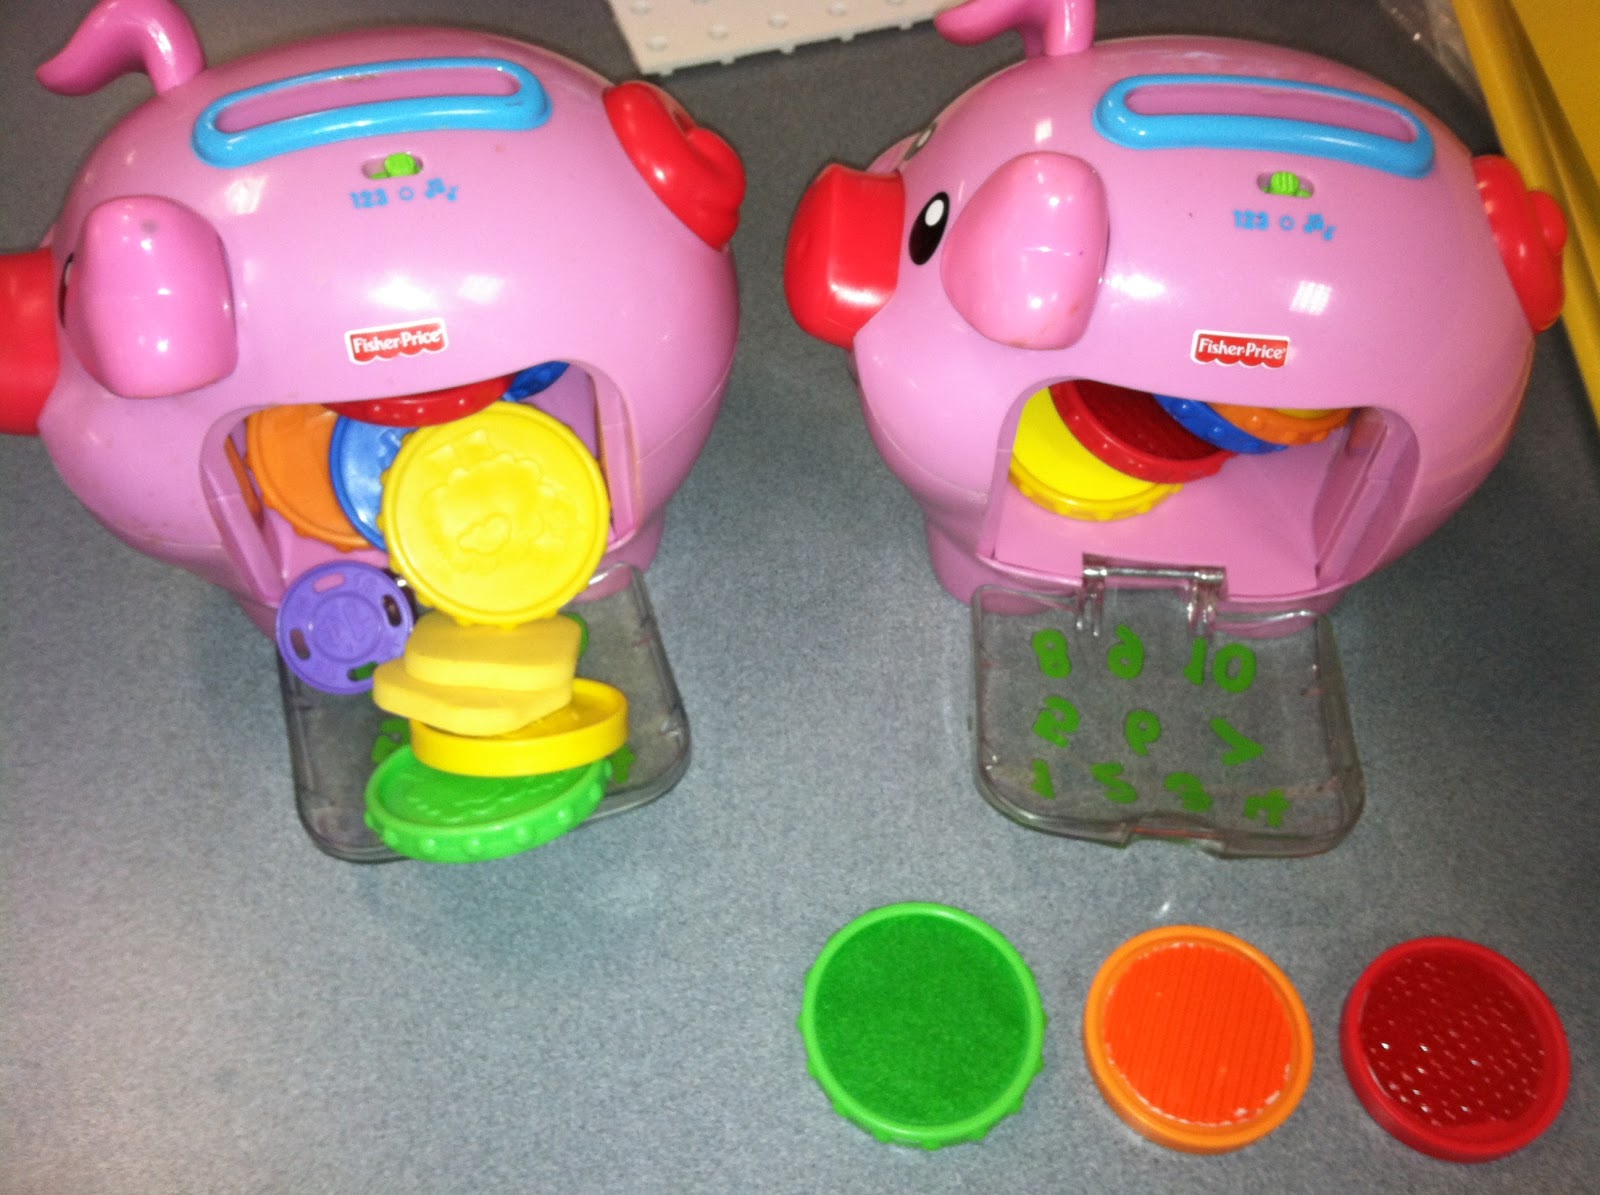
These are pictures of toys that were adapted by the super fab preschool teacher, Yvonne Locke. I knew I had to take pics and blog about toy mods when I saw her awesome goody toy bag! I love these toys because they are typical toys found at any Toys R Us with simple and fast adaptions. The first thing you need to grab is texture! I suggest the APH texture paper collection (last picture). I don't think you can really see all the texture on the paper but it's there and you can cut and stick it on in a snap! The toys that I have taken pictures of work on spatial skills, bilateral hand skills, matching, etc. And it's all PLAY! These are just a few toy ideas. I think that once you see these ideas the light bulb will be going off in your head!!

The piggy banks:
 On the left is mine without texture. It's a good toy even without the tactile modification. On the right is Yvonne's adaption. She added the texture to each coin and that's it. Now for kiddos with total blindness a new dimension has been added. We always want to keep their fingers engaged and getting them into a variety of textures. 

Old school ring stacker:
Again, Yvonne cut some textures (velcro--both sides of the hook and loop), ridged paper, and rough texture and hot glued them to the ring stacker. Yvonne likes the matchy match so she kept it all the same. The other thing that great about Yvonne's matchy match is that the texture is embedded. There's no contrast and it really works because there's no visual clutter or contrast competition. 

Pool noodle stringing:
Cut pool noodles (summer is coming, think Dollar Tree!!) and make them into big loops. Grab a rope and make a good knot at the end and viola! Great stringing activity. You can of course also add different textures to each pool noodle and do patterns!
The red canister is an old oatmeal container with a red cardstock (or use fabric) and hot glue it on. 

Pop up toy:
Okay I'll be honest, I am not entirely sure the name of this toy but you all know what I mean. Again, Yvonne added color corresponding textures. Notice that the textures are on top (of the pop up) and then down below at the knobs. It also supports matching skills. There's no visual clutter and the texture samples are big enough for little hands to explore. 

APH All-in-one Board with race track by Yvonne Locke:
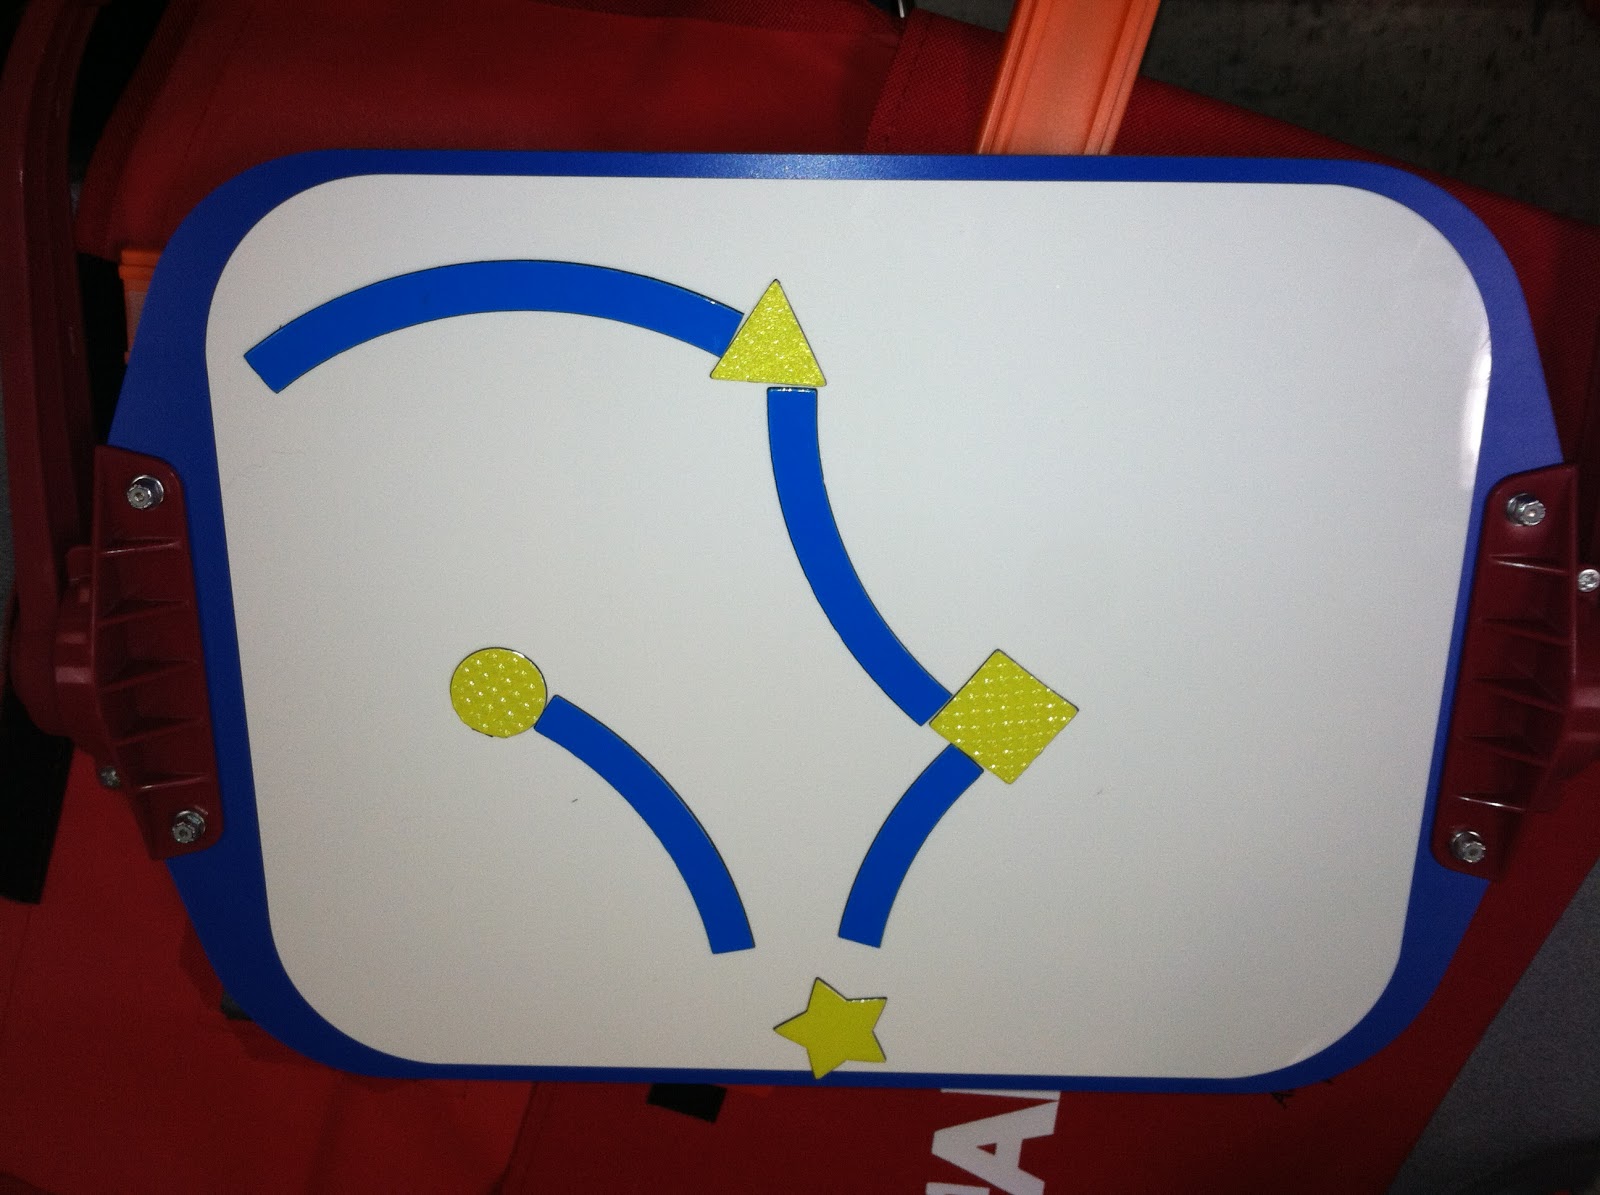
This is an all-in-one board. The awesome thing that Yvonne did was add race tracks. The race tracks work for tracking skills, direction development. The student practice tracking the track (notice the bump dot notches as place markers). She also took a race track and put velcro down the center of it. She attaches different shapes that the student has to find. Genius!
Here's the link for the All-in-one board from APH:

APH All-in-one Board, Dry Erase Side:
Yvonne uses this with these little magnetic pieces for tracking. You can mix it up and have them find each piece. Super fun!
APH Textured Paper Collection:

Always remember:
-Avoid visual clutter!! If you aren't sure about what it looks like to NOT have visual clutter, refer back to Yvonne's toys. Look how the texture is clean with the toy. The goal of adding texture to toys to to target the hands and fingers. We need those tiny fingers and hands to be able to discriminate between textures regardless of their future reading modes. Yes, a few pieces of contrast or highlighting is helpful (think CVI especially) but let's target the tactual readiness!
-Expect things to fall apart or not work out. It's okay to glue things over and over. The hot glue gun (I have an industrial one) is my best friend. 
-Go to garage sales! The classic toys are always there. I find almost all of my preschool toys from sales. 

Please remember that all pics and posts are copyrighted. The toys were all from Yvonne Locke, Preschool Teacher for Children with Vision Impairments. She is an amazing teacher so please give credit where credit is due.