Saturday, May 23, 2015

Build A Sensory Garden!

Happy spring time! 
Last month I built a sensory garden with my students at our school. It was awesome! It is also something anyone can do so I've included some tips for your own DIY sensory garden geared towards children with vision impairments including multiple impairments/deafblindness. Why a sensory garden? My answer to that question is another question--have you been to a sensory garden? They are awesome with inspiring creativity, understanding, calmness, recreation and concept development. My love of sensory gardens came from this little tiny garden (it was literally two planter boxes) that I had when I was a deafblind teacher in Las Vegas. The point to the story that I will share is if I can make this happen in a little dirt/sand mix planter in Las Vegas, you can make it happen anywhere. Thanks to my best ever paraprofessional, Darlene Link, (who also taught me everything), we planted chocolate mint, jasmine, rosemary and all kinds of little flowers and herbs. Our garden became our basis of our science unit that allowed such great concept development to be discovered. That was about 10 years ago. Darlene messaged me to tell me that our rosemary from our little garden is still alive in her garden after all this time. Special memory to me as I searched out three different stores because I had to plant rosemary in my new sensory garden as an homage to my deafblind classroom. 
Sensory gardens also teach almost every aspect of the Expanded Core Curriculum for both typically developing children and those with who are MIVI. 
Here's some suggestions for ECC instruction using a sensory garden:
Orientation & Mobility: positional concepts (left/right, center, up/down)
Recreation & Leisure: gardening is a recreational activity that can be done alone or with others.
Career Education: discuss vocational jobs related to gardening including maintenance
Independent Living Skills: maintaining a garden
Social skills development: using appropriate conversational language, joining a gardening club or public garden, going to farmer's market
Self-determination: designing a personal garden, selecting herbs/flowers based on interest
Sensory efficiency: the whole garden project! We used a variety of different textures, scents, sizes, colors and tastes.


 Above: our intro to gardening table with our herbs and flowers. This student is smelling the basil. I sampled tons of herbs to make sure that we had a variety of tastes. My favorite one? I found stevia! It had a great sugar sweet taste! This was our pre-teach table where we discussed gardening topics.
A few other of my favorite additions to the garden were the wind chimes. We have several different types that play beautiful music as the wind comes through. I love it!

Our planter boxes were made for an Eagle Scout project. We used weather treated wood and made them about 8ft long and of various heights. We did this so that our preschool children and our older students who are in wheelchairs could access the garden boxes. We also put wheels on the bottom of the planters so we can move them around. I also bought these awesome large plastic pots from Lowe's for $10 that came in these bold, bright colors. We planted a variety of different flowers including this awesome tall grass in each pots. 

This garden was made on large scale. I also bought 9ft shepherd hooks and hung pots that had flowers hanging over. I did this so that our students in wheelchairs could look up at things. We spent an entire day planting, learning, smelling and having a great time. We also made stepping stones. Our students at my school help me water the garden. 
Take time to buy some planters or boxes or in the till the ground and plant some herbs and flowers! You can also plant fruits and vegetables. I am not an expert and still pulled off a great garden. I am quite thankful to Alex and Susan Westergard who were generous with their gardening skills that tutored me and helped with design. It's also an ECC skill session to go to a nursery or Lowe's and ask for assistance. We planted several marigolds (as several students could see them very easy and enjoyed their fragrance), snapdragons, pansies, lillies, daisies. Herbs: stevia, basil, bee balm, rosemary, lavendar, chives & parsley. 
It's not too late to get your sensory garden off the ground! 

Sunday, May 10, 2015

At First Sight

    
You have to watch this awesome video of a blind mom and her ultrasound of her baby! It was so special to watch. It got me thinking this Mother's Day weekend of my own mom. I think of her often of course but sometimes I get too clinical because I ponder things from a blind perspective or from a third party, an outsider if you will, insights. But after I watched this video, I simply just thought of her.

For those of you who are new to my blog, my mom is totally blind and has been since before I was born. She has never seen me. I never thought of her as my "blind mom". Blindness was quite noticeable in my life--we didn't have car (she was a single mom), I read a lot of stuff to her, it was hard for her to help me with homework or do my hair. It wasn't that blindness was a bad thing or something that held me back. It was simply just there. A way of life for both of us. She knew she was blind and I knew how to make countermoves to accommodate for it.

I have been in the field of blindness as a professional for over 10 years now. I love it. It is a way of life, a passion, dare I even say a special talent to understand blindness. I learned a tremendous amount from my mom although I didn't truly understand this until much later in my life. As I have said, blindness was just a way of life--nothing out of the ordinary or special to me. I give a lot of presentations on the Expanded Core Curriculum and work with a lot of parents. I like to share stories of my childhood. The stories are true and they are funny. Most of my life was spent just my mom and I and we had to figure things out unlike a lot of mother/daughter teams. We were poor and resources were slim to none. That's where I learned self-determination (an area of the Expanded Core Curriculum). I realized, not too long ago, that I learned my self-determination from my mom. My self-determination is easily my biggest strength. I am motivated, strong, determined, passionate and even a little too demanding. I could have easily gone another direction in my life. I could've skipped school, got into trouble and turned to a lot of unsavory coping skills but I didn't. My mom went down a lot of different roads in life but the one thing she stood strong on was that she could do things. She was wrong a lot--sure, but she was hell bent determined on what she wanted to do.

Then I saw this Huggies video about a blind mom and her first ultra sound. The mom wondered what her baby would look like and his features. It is a beautiful video. I wondered about my mom and her thoughts of me for the first time in my life. My birth story is unlike traditional stories. My mom didn't know she was pregnant until she went into labor. The whole thing was a surprise (although if you knew me, you would know that I can make an entrance...). My mother also has epilepsy as well as my father. This was quite dramatic thing to happen to two of them. She thought she was having stomach cramps and headed for the toilet. I don't think I need to go on further as you can imagine what she thought was actually happening. It wasn't until the paramedics arrived that she learned that I was looking to make my entrance.

And now I think of her sitting on a hospital bed alone with her newborn baby. It takes me a minute to connect to this as this if often 'just a story' about my birth that is retold to me. What an emotional mess my mom had to be?! She couldn't have dreamt a story like this if she wanted to. And yet there she was, sitting on a hospital bed with a baby girl, her baby girl in her arms. I wonder what it must have looked like for her to touch my face, my head, nose and ears. I was a full size baby of 6lbs. I was strong enough for her to hold without machines or tubes. Did she count my toes and fingers? I wonder if she pleaded with God to give her back her sight so she could see me or did she already know me by her touch? Blindness was all around her. Her physical blindness was obviously there but what about all the other blindness that would quickly approach her? The blindness of those around her that would tell her that she would't be able to do this as a blind mom. The blindness from her own lack of self confidence to raise a child that she couldn't see. The blindness of not being prepared to do this--no crib ready, no car seat, no list of potential names to give.

Well, it's definitely been an adventure over the last 35 years of my life! A lot of people could easily look at me and think I am the miracle. They even called me a 'miracle baby' when I was in the hospital. The definition of the word 'miracle' includes that it is a: "surprising and welcome event that is not explicable by natural or scientific laws and is therefore considered to be the work of a divine agency." or "a highly improbable or extraordinary event, development, or accomplishment that brings very welcome consequences." Motherhood for my mother the past 35 years has been a miracle. She has done an amazing job. She hasn't done it all alone. No mother has. My mother was humble enough to let others step in when she could not do it. She might not have been the one to teach me a lot of things but she was always the first one who was the proudest. I've always known that. She's doing the best that she can. Just like I am sure she swore she would do the first time they put me in her arms.

Tuesday, May 5, 2015

On the go!

We recently had our early intervention family camp and oh man, did I see some good ideas and meet some great families!! I have so many fun things to blog about that I had a hard time choosing what to start first with. I met this great mom, Angela, the first night of camp. I was instantly drawn to her cute little girl, Abigail, in this wagon. I instantly noticed it because lots of parents were there and pushing their kids in strollers. Angela had her son (about 1 1/2 years old I am guessing) in tow. I inquired why she chose a wagon. Abi was sitting in her tumble form chair relaxed and taking all the activities in. Angela showed me how easy it was to put her son right in the wagon and tow the both of them. We chatted and I went on with my work at camp. 

I saw them later that night and just couldn't stop thinking about what a neat idea this wagon was. I got to thinking about how many other families use a wagon for parades, vacations, etc. to tow their little ones. I also thought about how cumbersome a stroller can be (as I am still using one for my sweet little girl). Angela told me that she purchased her wagon from Costco for about $50. She also has another one that is a Radio Flyer. I know that sometimes when you have a child with impairments it feels like you are always standing out. It can be hard to lug around equipment, rangle other children and take care of everyone's needs. I liked this because this wagon is something that lots of parents use for things. I felt like it kinda took away some "stigma". I also thought about visual needs and how sometimes when I am pushing my daughter in our stroller the sun hits her and I can't move the shade down far enough. I love that Angela could just reverse the seating position of the tumble form so that Abigail isn't facing the sun.  

Just as I was pretty sure that this was the coolest thing I'd seen at camp, Angela showed me how easy peasy this wagon is to fold up. She did this all by herself in about 2 minutes max! She unbuckled her girl, lifted her up with one hand, picked up the tumble form chair and then grabs this handle and the whole wagon folds up into a compact square. She did it all with just one hand!

I found out that Angela writes a blog about her beautiful little girl. Here's the link: http://abigailsepilepsy.blogspot.com/. It's worth your time to check it out. Thanks again to Angela and Abigail for sharing your great idea with us!

Tuesday, April 28, 2015

Hungry, Hungry Hippos!

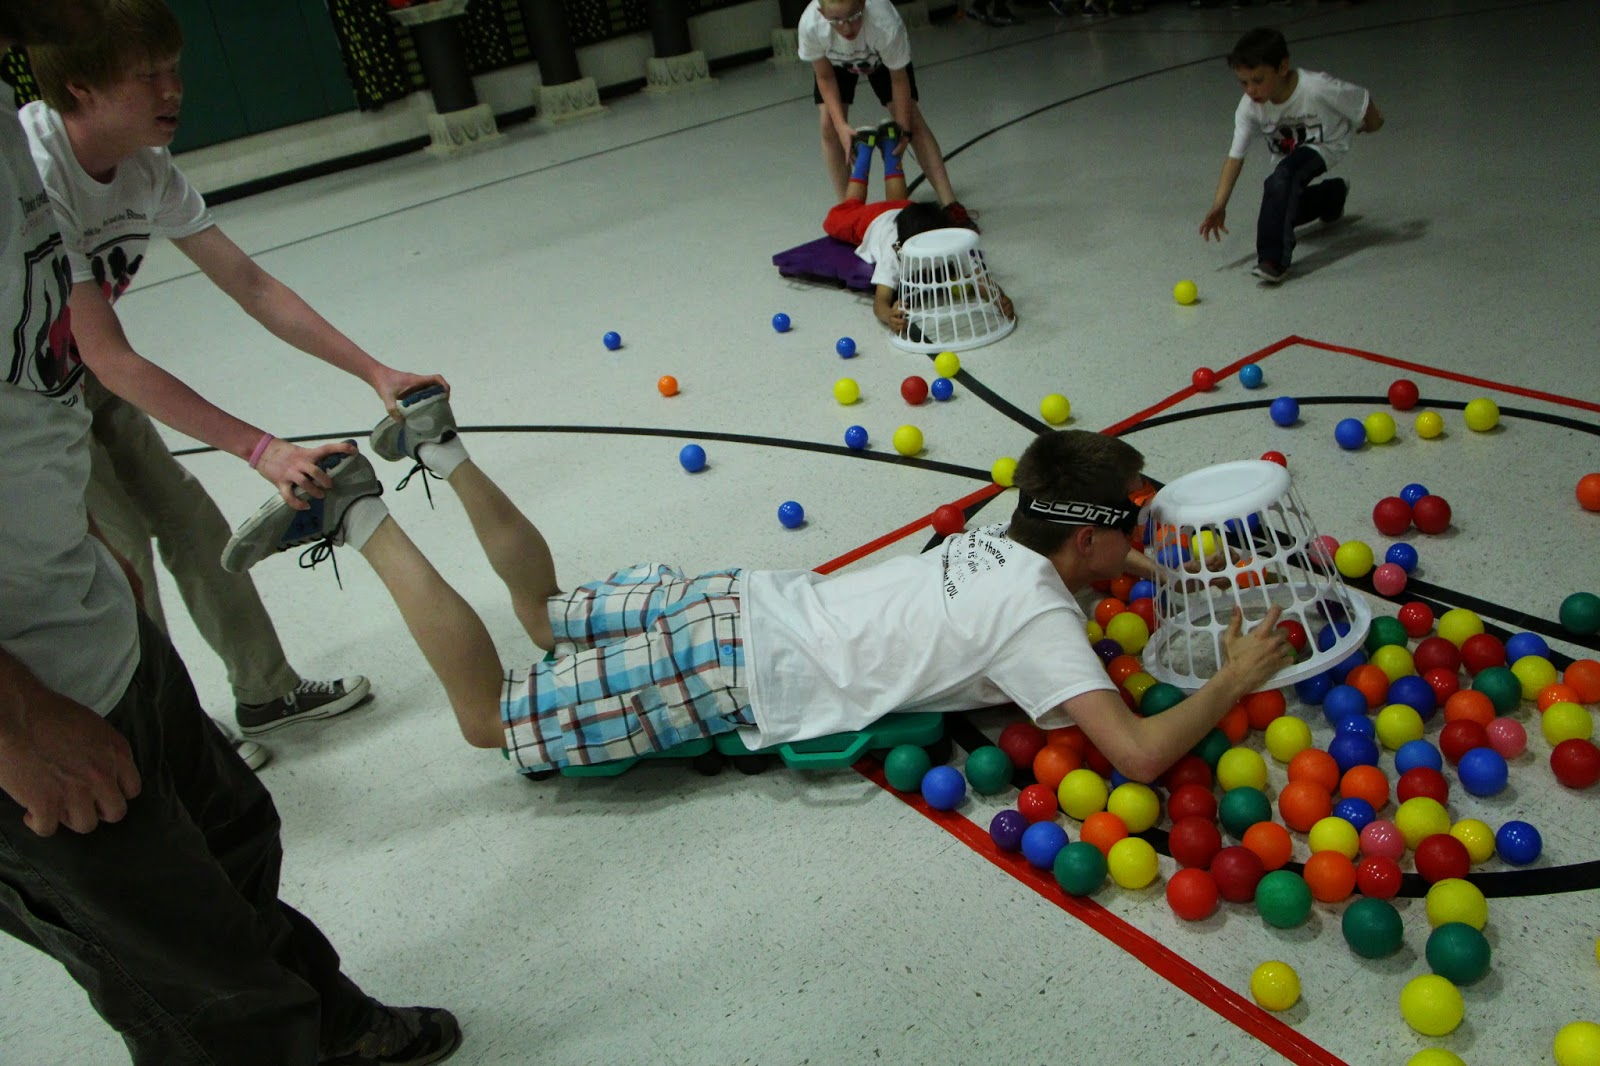
Have you seen the human version of hungry, hungry hippos on Facebook??? I saw it and the moment I saw it, I knew I had to do this with my students!! I shared the link on FB with my APE/PE peeps to get their ideas. I spent some time carefully thinking about modifications and meaning. I wanted this to be awesome and fun, yet hands-on and meaningful for my students with little to no vision. We decided to debut it at our most recent program, Girls Weekend/Man Camp as our finale battle of the sexes game. Holy Hannah, we had the BEST TIME EVER!!

Here's how we did it:
1. I bought some regular play balls (that you would use in ball pit). I bought mine from S&S Worldwide. You can buy them anywhere. They are pretty standard. I bought the pack of 100 and realized that with over 20 people playing, I would need more. I would plan on two. 
2. We established the playing area using floor tape. My new fave PE teacher, Nick, made the "game box" similar to a goalball line (we put rope underneath the floor tape to make a tactual boundary). Brilliant idea!
3. We wanted to establish an audible cue to let students know that they were approaching the "game box". We used our trusty beep kickballs for this and had an extra APH sound source on hand. If players captured a beep kickball, it was worth a bonus 25 points. We played two rounds with the beep kickballs and then retired them. We used the beep kickballs as 'training wheels' to teach students about what and where the balls were. 
4. You need to do pre-teach skills with "trapping" (using the baskets to get the balls). Make sure students understand that you can only do one "trap" with the basket. Students quickly figured out effective strategies for getting maximum balls (one popular strategy was when they 'trapped' the ball, they kept their forearms close to the ground so that their arms also 'trapped' balls. 
5. I saw a few versions of the game where they used rope to reel the player back in. I decided to not go this route because I wanted to go for maximum participation from everyone on the team. We had 'drivers' that drove students out and then brought them back. This allowed all students to understand all the facets of the game, especially our students with little to no vision. 


 6. Students laid down on two scooter boards that were hooked together. All students who were playing the role of the "hippos" wore goalball goggles. I wasn't sure if everyone knew what goalball goggles looked like so I included a picture. My phone erased my original picture so I borrowed a pic of the goggles online. See below. 

7. We played until all the balls were captured and the each team counted up their total balls. Each time a team sent a "hippo" out to trap balls, they had to change players (both drivers and hippos). This allowed the everyone on the team to get maximum participation. 


Equipment Recap:
1. Play balls (for a ball pit)
2. Beep kickball and APH Sound source (if needed)
3. Two scooter boards hooked together per team
4. Floor tape (we made our "game box" with tactual lines--rope with floor tape over rope).
5. Medium size laundry baskets. We bought ours from Walmart for a couple of bucks each.
6. Goalball goggles for each 'hippo'

At first we were concerned about collisions but we got pretty lucky with almost none. We had plenty of referees on watch that helped coach and ensured that each team did just one 'trap' per person. We had a variety of ages and visual abilities (including students who were deafblind) play. It was SO fun! It has definitely been added to our fave games list. I can't wait to play again!!

*Just in case you were wondering, the girls won the game!!

Friday, April 17, 2015

Keeping Up With Jimmy: Inspired


Robbin: This has to be my favorite post (so far) from Kristi. Read on and you will know why.
Hello Hello all!!! It has been some time since I have seen you all! We are finally thawing out from the cold snowy winter here in Connecticut and I cannot tell you how happy I am. This blog is going to be a little different than the usual keeping up with Jimmy; I would like to share some news with you, nothing bad so don’t worry. Just a little journey I went on. About a month or so ago I was filling out some so paper work for Jimmy to be able to go to a couple camps with Perkins Outreach program up in Watertown, MA. On the back of one of the programs was a quote… “Just because you can’t see the stars, doesn’t mean you can’t reach for them.” (At the time I had no idea that Helen Keller spoke these beautiful words and actually didn’t learn she did until after I got the tattoo) I read it and all I could think about was how accurate it was for our household. Everyday Jimmy proves to me that he reaches for those stars and makes me so proud and honored and grateful that I get to call him my son! These words to me personifies just what Jimmy does each and every day. He does not let his blindness get him down. He just goes out there and tries anything asked and not asked of him (he is my daredevil after all). These words that were spoken by Ms. Keller is what I hope everyone, blind or not blind, can hear and take to heart. To overcome any odds in their way and prove to everyone that you can accomplish anything you put your heart and mind to. So obviously I was so obsessed with this quote that I was telling it to anyone who would listen to me. (Actually I was even telling people who didn’t want to listen to me too) anyways I decided that I was going to do something that I had not done for 10+ years and that was get a new tattoo, and that tattoo was going to be this quote.
The plan was to get it done it some fancy print on my forearm. Then one night as I was sitting in my room thinking about it, I had what I like to call a 'brain fart', I decided that not only was I going to get these words tattooed on me but the font I would chose would be BRAILLE!!!! I got so excited that I wanted to do it all myself that I started looking up websites to find contracted braille so it would be spelt out correctly and everything. I finally found one got my contractions and went into Jimmy’s room and Brailled it out myself. Of course I had Jimmy check it to make sure I did it right, and I really thought I nailed it this time…nope, not this time. I give Jimmy my paper and he turns to me and goes “you did really good mom but you missed the “ea” contraction. (Darn that “ea” contraction) but that was the only one I missed so I was actually really excited! When Jimmy asked me why I did that I told him, “well bud I did it for you” he was very confused by this statement. I went on to explain to him that I was going to tattoo the quote in braille on my arm. At first he was a little like ooookkkk, not really believing me. But afterward I went and had it done, he told me that he thought my new tattoo was “Crazy Awesome”. I know people are going to ask me “why did you have them do it in braille? No one is going to understand it. To which I will reply, those who have been affected with blindness will get it, and I did it in braille to pay homage to all the people in the world who are blind including my son. To let the world see that I have been touched by blindness and am not ashamed of it. Instead it is a part of my life, and I want to honor it. This may not have been the life I would have chosen for myself or my son, but it is the one we have so I am going to enjoy the ride and be proud to say yes I know “some” braille (I am telling you it is the hardest thing to learn by sight) and I am proud to know it! Yes our kids are “different” but that doesn’t mean they are going to have any less of a life than anyone else on this planet!  I hope you all like it!! See you again soon!

Monday, April 6, 2015

Add this to your calendar box tool box!

Hi friends, happy spring! I am happy to share this product and encourage you to add it to your teacher resource toolbox. This is a great find for making calendar box items. I found out about this awesome find while visiting our preschool classroom and the teacher, Tammy. Are you still wondering what this great product is? See picture below for the name and what the box look like. This high gloss finish protects and preserves items. I found it on Amazon for about $65 plus tax (a large bottle of it). I found the one pictured below for $14.99 from Hobby Lobby. This finish is like using 50 coats of varnish (description from the manufacturer). 
But why did I get so excited about this finish? See the pictures below. Here is an example of a calendar system that the teacher made with the finish over the item. Take a close look at the pretzel!  The pretzel is 5 years old (if I remember correctly from my discussion with Tammy). Look at how well it preserves the textures, color, etc. of the item. Plus they are water proof!! Our students can drool on them and can hold up against accidental drops in water or paint. 


Above: rug time symbol. 
Below: the actual rug. 
The team in this classroom used felt and made a replica of the actual rug. Look at how well they match up!

I loved this stuff! I definitely recommend you add it to your resource tool box. I am sure you can use this finish for other items but I thought it was a gem for creating calendar box symbols. Thanks to Tammy and her crew for letting me snap some shots and share this awesome find!!