Tuesday, April 28, 2015

Hungry, Hungry Hippos!

Have you seen the human version of hungry, hungry hippos on Facebook??? I saw it and the moment I saw it, I knew I had to do this with my students!! I shared the link on FB with my APE/PE peeps to get their ideas. I spent some time carefully thinking about modifications and meaning. I wanted this to be awesome and fun, yet hands-on and meaningful for my students with little to no vision. We decided to debut it at our most recent program, Girls Weekend/Man Camp as our finale battle of the sexes game. Holy Hannah, we had the BEST TIME EVER!!

Here's how we did it:
1. I bought some regular play balls (that you would use in ball pit). I bought mine from S&S Worldwide. You can buy them anywhere. They are pretty standard. I bought the pack of 100 and realized that with over 20 people playing, I would need more. I would plan on two. 
2. We established the playing area using floor tape. My new fave PE teacher, Nick, made the "game box" similar to a goalball line (we put rope underneath the floor tape to make a tactual boundary). Brilliant idea!
3. We wanted to establish an audible cue to let students know that they were approaching the "game box". We used our trusty beep kickballs for this and had an extra APH sound source on hand. If players captured a beep kickball, it was worth a bonus 25 points. We played two rounds with the beep kickballs and then retired them. We used the beep kickballs as 'training wheels' to teach students about what and where the balls were. 
4. You need to do pre-teach skills with "trapping" (using the baskets to get the balls). Make sure students understand that you can only do one "trap" with the basket. Students quickly figured out effective strategies for getting maximum balls (one popular strategy was when they 'trapped' the ball, they kept their forearms close to the ground so that their arms also 'trapped' balls. 
5. I saw a few versions of the game where they used rope to reel the player back in. I decided to not go this route because I wanted to go for maximum participation from everyone on the team. We had 'drivers' that drove students out and then brought them back. This allowed all students to understand all the facets of the game, especially our students with little to no vision. 
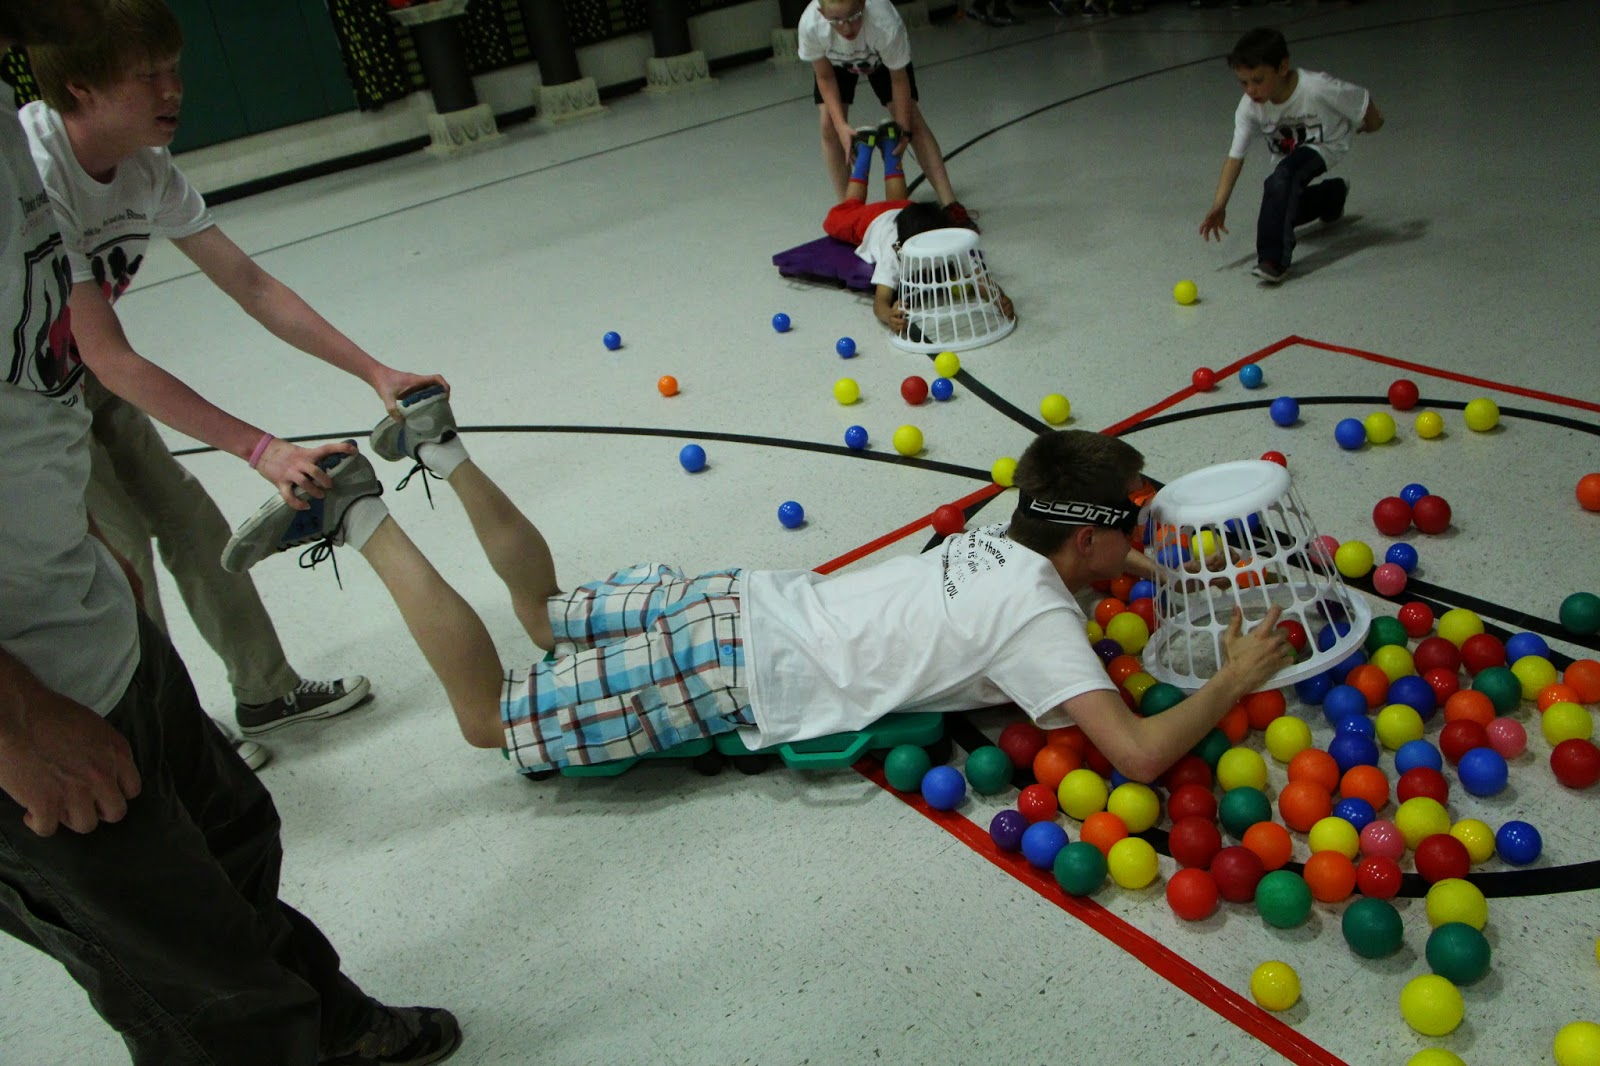
 

 6. Students laid down on two scooter boards that were hooked together. All students who were playing the role of the "hippos" wore goalball goggles. I wasn't sure if everyone knew what goalball goggles looked like so I included a picture. My phone erased my original picture so I borrowed a pic of the goggles online. See below. 

7. We played until all the balls were captured and the each team counted up their total balls. Each time a team sent a "hippo" out to trap balls, they had to change players (both drivers and hippos). This allowed the everyone on the team to get maximum participation. 


Equipment Recap:
1. Play balls (for a ball pit)
2. Beep kickball and APH Sound source (if needed)
3. Two scooter boards hooked together per team
4. Floor tape (we made our "game box" with tactual lines--rope with floor tape over rope).
5. Medium size laundry baskets. We bought ours from Walmart for a couple of bucks each.
6. Goalball goggles for each 'hippo'

At first we were concerned about collisions but we got pretty lucky with almost none. We had plenty of referees on watch that helped coach and ensured that each team did just one 'trap' per person. We had a variety of ages and visual abilities (including students who were deafblind) play. It was SO fun! It has definitely been added to our fave games list. I can't wait to play again!!

*Just in case you were wondering, the girls won the game!!

Friday, April 17, 2015

Keeping Up With Jimmy: Inspired


Robbin: This has to be my favorite post (so far) from Kristi. Read on and you will know why.
Hello Hello all!!! It has been some time since I have seen you all! We are finally thawing out from the cold snowy winter here in Connecticut and I cannot tell you how happy I am. This blog is going to be a little different than the usual keeping up with Jimmy; I would like to share some news with you, nothing bad so don’t worry. Just a little journey I went on. About a month or so ago I was filling out some so paper work for Jimmy to be able to go to a couple camps with Perkins Outreach program up in Watertown, MA. On the back of one of the programs was a quote… “Just because you can’t see the stars, doesn’t mean you can’t reach for them.” (At the time I had no idea that Helen Keller spoke these beautiful words and actually didn’t learn she did until after I got the tattoo) I read it and all I could think about was how accurate it was for our household. Everyday Jimmy proves to me that he reaches for those stars and makes me so proud and honored and grateful that I get to call him my son! These words to me personifies just what Jimmy does each and every day. He does not let his blindness get him down. He just goes out there and tries anything asked and not asked of him (he is my daredevil after all). These words that were spoken by Ms. Keller is what I hope everyone, blind or not blind, can hear and take to heart. To overcome any odds in their way and prove to everyone that you can accomplish anything you put your heart and mind to. So obviously I was so obsessed with this quote that I was telling it to anyone who would listen to me. (Actually I was even telling people who didn’t want to listen to me too) anyways I decided that I was going to do something that I had not done for 10+ years and that was get a new tattoo, and that tattoo was going to be this quote.
The plan was to get it done it some fancy print on my forearm. Then one night as I was sitting in my room thinking about it, I had what I like to call a 'brain fart', I decided that not only was I going to get these words tattooed on me but the font I would chose would be BRAILLE!!!! I got so excited that I wanted to do it all myself that I started looking up websites to find contracted braille so it would be spelt out correctly and everything. I finally found one got my contractions and went into Jimmy’s room and Brailled it out myself. Of course I had Jimmy check it to make sure I did it right, and I really thought I nailed it this time…nope, not this time. I give Jimmy my paper and he turns to me and goes “you did really good mom but you missed the “ea” contraction. (Darn that “ea” contraction) but that was the only one I missed so I was actually really excited! When Jimmy asked me why I did that I told him, “well bud I did it for you” he was very confused by this statement. I went on to explain to him that I was going to tattoo the quote in braille on my arm. At first he was a little like ooookkkk, not really believing me. But afterward I went and had it done, he told me that he thought my new tattoo was “Crazy Awesome”. I know people are going to ask me “why did you have them do it in braille? No one is going to understand it. To which I will reply, those who have been affected with blindness will get it, and I did it in braille to pay homage to all the people in the world who are blind including my son. To let the world see that I have been touched by blindness and am not ashamed of it. Instead it is a part of my life, and I want to honor it. This may not have been the life I would have chosen for myself or my son, but it is the one we have so I am going to enjoy the ride and be proud to say yes I know “some” braille (I am telling you it is the hardest thing to learn by sight) and I am proud to know it! Yes our kids are “different” but that doesn’t mean they are going to have any less of a life than anyone else on this planet!  I hope you all like it!! See you again soon!

Monday, April 6, 2015

Add this to your calendar box tool box!

Hi friends, happy spring! I am happy to share this product and encourage you to add it to your teacher resource toolbox. This is a great find for making calendar box items. I found out about this awesome find while visiting our preschool classroom and the teacher, Tammy. Are you still wondering what this great product is? See picture below for the name and what the box look like. This high gloss finish protects and preserves items. I found it on Amazon for about $65 plus tax (a large bottle of it). I found the one pictured below for $14.99 from Hobby Lobby. This finish is like using 50 coats of varnish (description from the manufacturer). 
But why did I get so excited about this finish? See the pictures below. Here is an example of a calendar system that the teacher made with the finish over the item. Take a close look at the pretzel!  The pretzel is 5 years old (if I remember correctly from my discussion with Tammy). Look at how well it preserves the textures, color, etc. of the item. Plus they are water proof!! Our students can drool on them and can hold up against accidental drops in water or paint. 


Above: rug time symbol. 
Below: the actual rug. 
The team in this classroom used felt and made a replica of the actual rug. Look at how well they match up!

I loved this stuff! I definitely recommend you add it to your resource tool box. I am sure you can use this finish for other items but I thought it was a gem for creating calendar box symbols. Thanks to Tammy and her crew for letting me snap some shots and share this awesome find!!

Thursday, March 26, 2015

Braille Kit for GE Electric Range

Hi friends,
I am going to share this press release that I read today. It's about a Braille kit (label system) that you can apply to the GE Artistry electric range.


Here's the press release:
LOUISVILLE, Ky. — March 19, 2015 — The simplicity of
GE’s Artistry™ Series of appliances—an affordable suite of appliances targeted to first-time homebuyers and Millennials—lends itself to a unique market segment: the visually impaired. Working with students from the Kentucky School for the Blind, GE engineers and designers in Louisville, Ky. developed an accessory kit of braille overlays for the new Artistry electric range controls that helps the visually impaired use its cooktop and oven functions.

According to an American Foundation for the Blind article, stoves are the least accessible class of appliances.1 Many ranges today have smooth, push buttons on a back control panel. The ADA-compliant Artistry range offers front-control knobs that are within reach, and a straightforward design that lends itself to a braille accessory kit for the blind or visually impaired.

“Both my parents taught special education,” says Lee Lagomarcino, a GE product manager who initially championed the project and observed Kentucky School for the Blind students interacting with ranges. “As we developed the Artistry electric range, we knew its simplicity made it more universally appealing and ideal for a braille application.”

The Kentucky School for the Blind helped GE engineers determine that a high, medium and low heat setting was needed for the cooktop.

Student input leads to product concept
Students from the Kentucky School for the Blind helped the GE team determine what was needed—a high, medium and low heat setting for the cooktop, and a low, 350 degree and broil option for the oven. With those readily accessible features to serve as a baseline, the oven can be adjusted to a recipe as needed.

A focus group of students at the school came up with ways to make ranges more user friendly—using puffy paint and brightly contrasting colors to showcase their ideas. GE took those ideas and turned them into the custom-designed Braille kit. Students also tested the initial designs for ease of use.

Kentucky School for the Blind Program Coordinator Paula Penrod said, “Many times, manufacturers will introduce a new product, then seek comments from consumers with disabilities. Consumers who are blind and visually impaired have unique needs when using appliances. By working with GE during the production stage, our students were able to demonstrate the type of Braille modifications that would be most helpful. We appreciate GE for seeking our students’ input on the front end of GE’s Artistry range project.”

As a thank you to the Kentucky School for the Blind and its students for their help, GE donated a full suite of Artistry kitchen appliances to the school’s campus on Frankfurt Avenue in Louisville, Ky.

Pricing and availability
The GE Artistry electric ranges and Braille kits are available in black and white and can be purchased nationwide where GE appliances are sold. For help locating a dealer, go to
www.GEAppliances.com and use the Dealer Locator tool or call the GE Answer Center at 1-800-626-2000. The estimated retail price of the Artistry electric range is $599, and the braille kit is $15.75.* (Retailers - Pub number 4-A034 fits the black Artistry range model ABS45DFBS, and pub number 4-A024 fits the white Artistry range model ABS45DFWS.)

In addition to the braille kits for ranges, GE offers a standard braille kit for common buttons on its microwave ovens. The kit (pub number 4-A212) can be ordered where GE appliances are sold.

GE Appliances
GE Appliances is at the forefront of building innovative, energy-efficient appliances that improve people’s lives. GE Appliances’ products include refrigerators, freezers, cooking products, dishwashers, washers, dryers, air conditioners, water filtration systems and water heaters. General Electric (NYSE: GE) works on things that matter to build a world that works better. For more information on GE Appliances, visit
www.GEAppliances.com.

1. As a group, stoves are the least accessible class of appliances we evaluated. The vast majority have flat, inaccessible oven controls. – American Foundation for the Blind
http://www.afb.org/section.aspx?FolderID=2&SectionID=4&TopicID=380&DocumentID=4218
* Retailers set their own prices.

Categories:
Ranges, Wall Ovens, Cooktops

Tuesday, March 17, 2015

Magnifier Discovery Board

Happy March! I am sorry that I have not blogged since the beginning of the month! The time has just flown by as I have been adventuring it with new friends in Canada. I had the pleasure of presenting in Calgary, Edmonton and Saskatoon over the past two weeks. I loved meeting their teachers, parents and related service providers. But you know me, I was on the look out for ideas for our kids! I loved brainstorming ideas that support the Expanded Core Curriculum. 

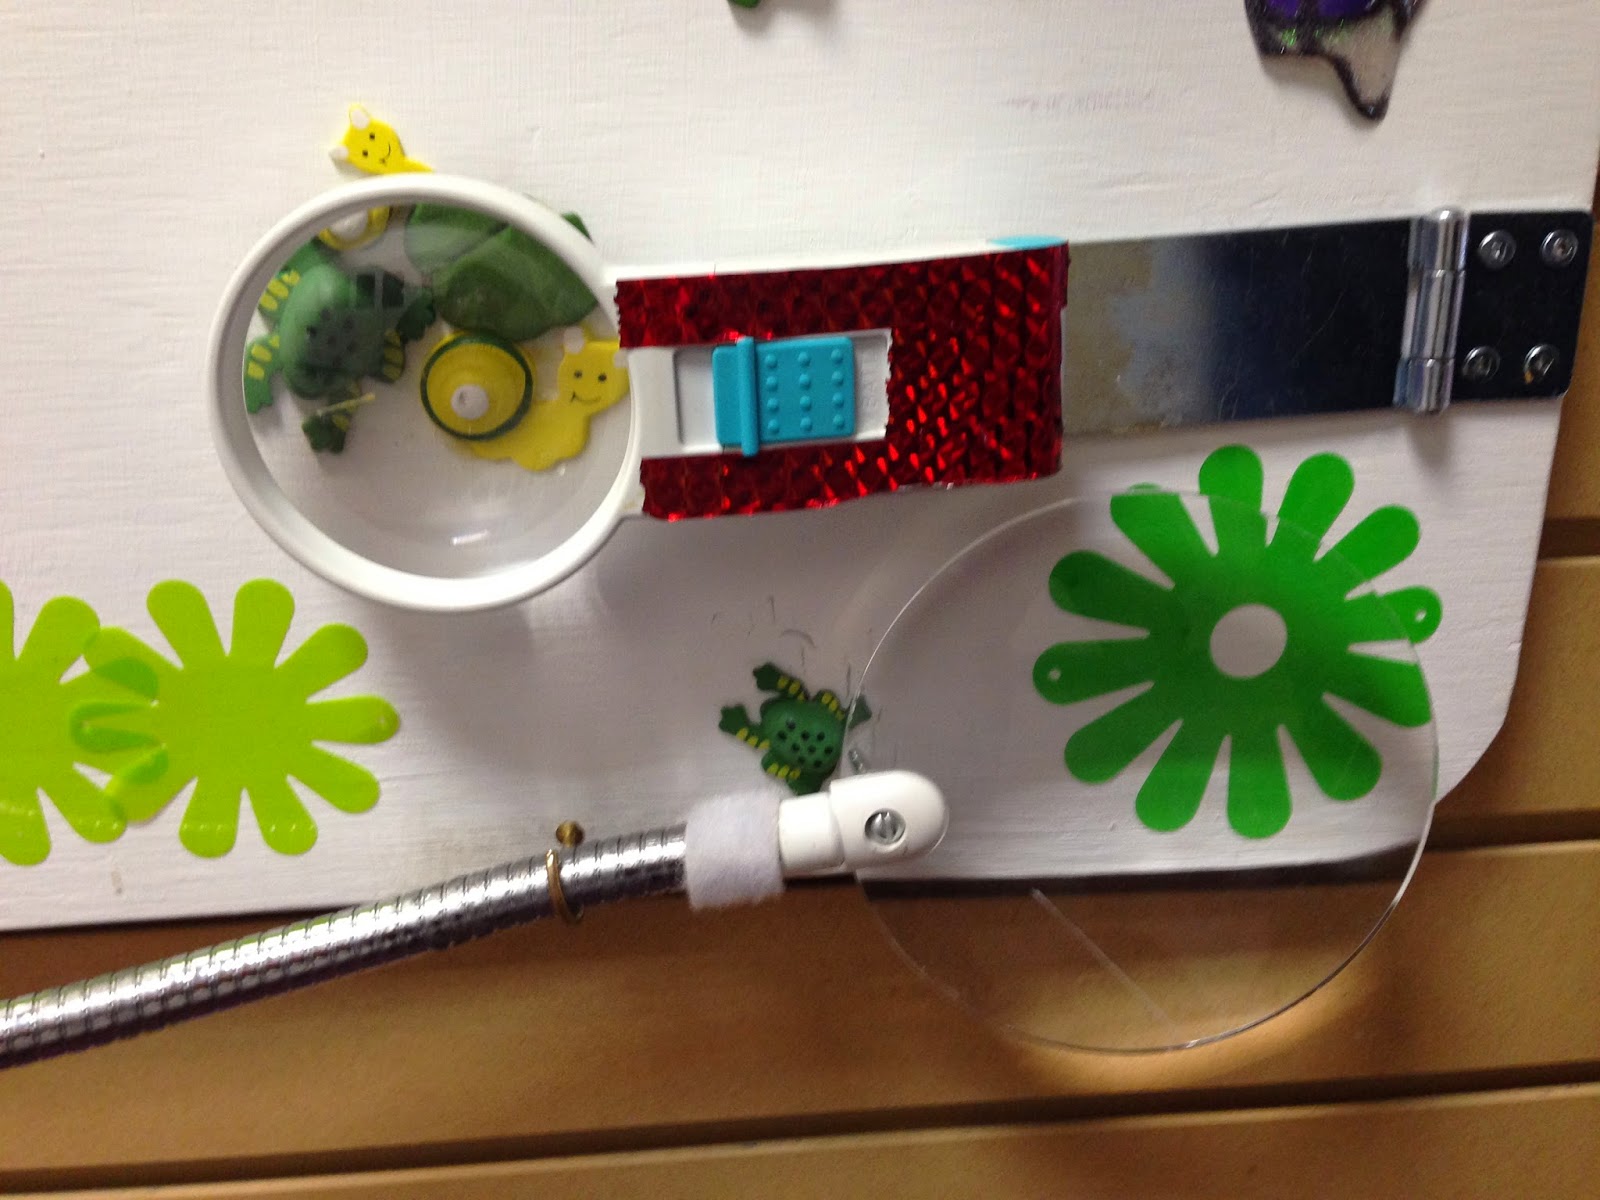
One idea I wanted to share was this one from CNIB (in Calgary, Alberta) early childhood hallway. They had several of these discovery boards but the magnification one really caught my eye. This board is a painted white with little items to discover with mounted magnifiers. I suspected that these are 4x handheld magnifiers. Three of the magnifiers have a light option.


The bottom magnifier with the long adjustable neck isn't the strongest of the magnifiers but it is fun for little hands to use. Notice that the maggie right above the bottom maggie has red shiny paper on the handle (hello visual efficiency!). The magnifier is mounted to a hinge.
I love this idea for many reasons; the discovery fun with the magnifiers and getting our kids comfortable with using magnifiers. I also thought this would be something that could be added to a center in a general education classroom. This is another great idea that helps our students as well as engages our sighted kids as well. You know my next question...what areas of the ECC could you incorporate into this discovery board?
The items that they used were permanently mounted to the board. I had another idea that I thought of was using a magnetic board that you could spray paint. I wonder if you could use the magnetic backing to swap out new items? I'm going to make some of my own (thanks to CNIB!) and I will post  pics and updates if it was or was not a good idea. 

Special note: make sure that you use magnifiers with a power of at least 4x (x=power). I dispensed magnifiers for several years with students and I have found that most students need at least a 4x. 4x handheld "maggies" (my code word for magnifiers) are usually the minimum strength that our kids can use. A lot of school age students would rather die than use a handheld maggie. Dome maggies seem to be a home run with our kids. They come in a variety of different sizes. Most are 4x. You can order handheld magnifiers for a reasonable price. 
There are several places that you can order handheld magnifiers with and without lights. The prices can vary. The stronger the power of the magnifier, the more skill required. Dome magnifiers and 3.5x/4x handhelds are pretty easy for kids to use. I find that one of the most family friendly places to recommend are places like MaxiAids or Independent Living Aids. You can order a handheld at 
www.maxiaids.com: the cost is about $14-$25. Dome magnifiers can run anywhere from $14-$35 and are pretty reliable, easy to use durable items. 

Sunday, March 1, 2015

DIY Vision Project: Easy Busy Board Project


Hi friends, I have a super fun project that's easy peasy to do: a busy board! I know you have seen them around. You can buy them (really expensive) or have seen them floating around on Pinterest. My faithful partner-in-crime hubby helped me make two busy boards in one afternoon. Why busy boards? These boards are great for learning about cause and effect, problem solving, discovery and fine motor skills. Here's how to make them for our kids:
I decided to go with a smooth finished round circle for our board because I liked the thickness, weight and shape of it. I bought it at Lowe's for about $7 a piece.

Next, I had Todd spray paint it a nice shade of red (visual efficiency for our kiddos). He did several coats on both sides and let it dry for a few hours. The spray paint was about $10 (or less) from Lowe's as well. I made sure to buy a flat finish to avoid glare.


Last, we added our latches. You can also buy these from Lowe's (or any home improvement store) for under $5 a piece. This latch board were simple ones that promoted easy fine motor skills. These busy boards went to my preschool age students. I really liked the contrast that the red backdrop provided. We placed each latch in a clock layout. It's simple but effective with the layout. Not too much visual clutter at all!


I also like the possibilities that can come from this. You can easily keep this as is and let your kids explore and have fun. You can build on skills by discussing positional directions or clock layout or buy two of each latch and mount the extra latch onto cards for matching games.

I've seen some really cool ideas for these busy boards on Pinterest where they have added zippers,  chains, light swtiches, and casters. I also thought about making another one and including a tap light (I will post pics if I do!).  All you need to do these is a drill, spray paint and latches--easy peasy!