Saturday, January 16, 2016

Easy Play Kitchen Accessibility Ideas

How many of our little ones have a play kitchen in their classroom or homes? Kitchens are a really fun creative imagination place for kids. It's also a great opportunity for independent living skills. A lot of times it can be limiting for our students especially those with very limited or no vision. Here's one that was in one of our classrooms. It's quality built and is fun....for kids with a lot of vision. I decided that this kitchen needed a definite upgrade so that our students with limited or no vision could play with better accessibility. These are quick fixes, easy to do! Just grab your glue gun and pipe cleaners and plan a trip to Goodwill. 

Play kitchen for preschool

First, head to Goodwill and look though their kitchen section. I actually found most of these at a store called Deseret Industries (DI). Deseret Industries is similar to Goodwill or Savers. I had good luck there. I was able to find all kinds of interesting cooking utensils and tools. Check out the pic below. Note: the items in the picture are small little utensils, pans, etc. They are not full size at all.
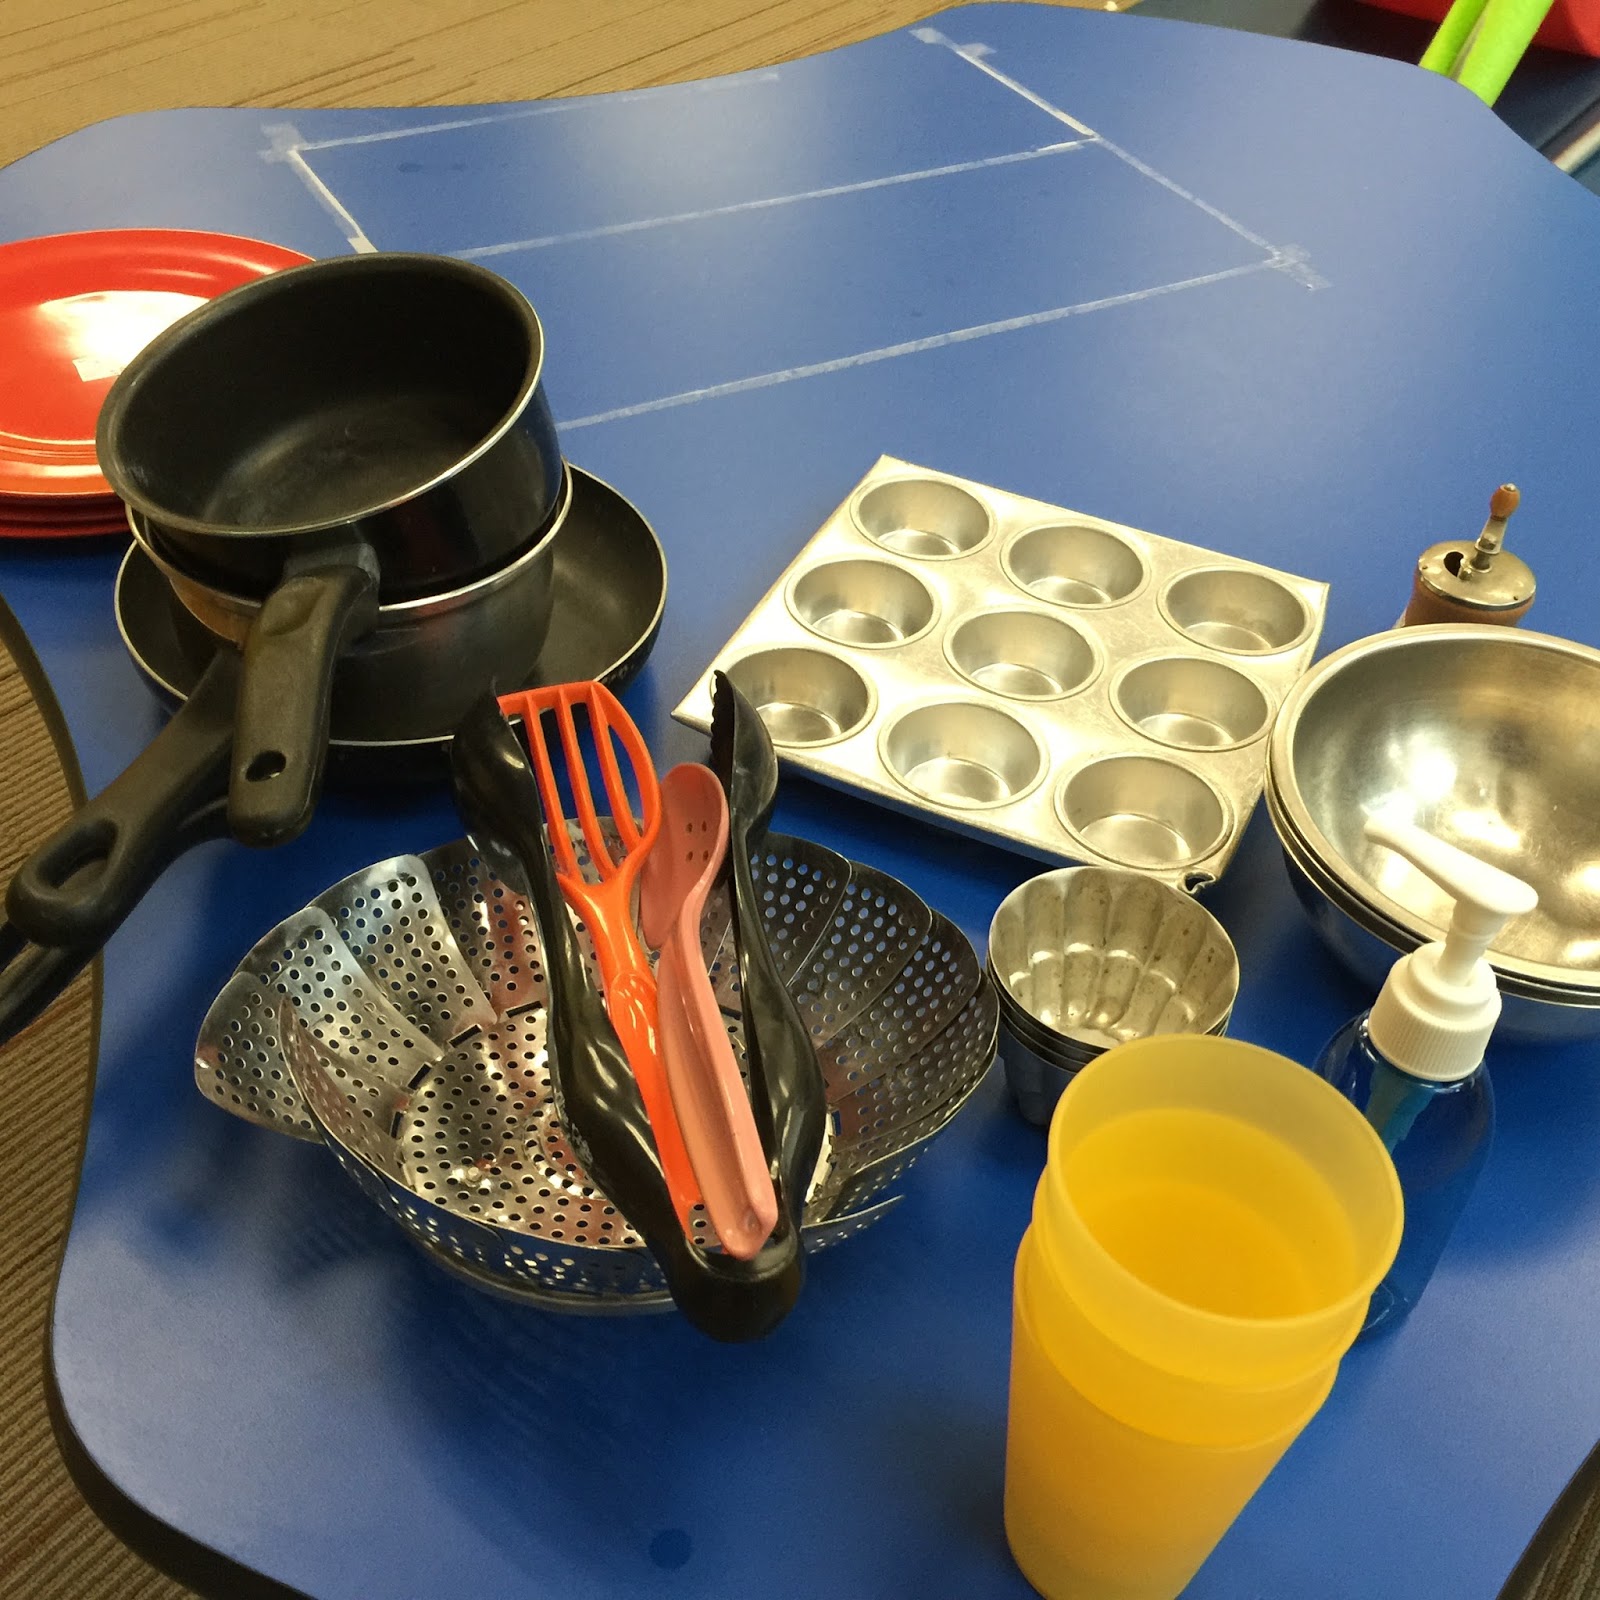
I found all kinds of fun metal options. I like the metal because so many things are plastic and this gives some variety. My favorite find was the old school vegetable steamer. How fun to experience concepts like open/closed, empty/full, big/little, cause & effect and water play. I also found this tiny little pepper grinder. It was fun to replace the pepper with something else (i.e. scented sand) and let those little hands turn the crank. The little metal bowels and cupcake pans were fun, too.  Goodwills are also perfect places to find small sauce pans which are perfect for little hands to cook with! You can also find little soap dispensers, cups, slotted spoons and all kinds of options for kitchen fun.  
One of my talented preschool teachers, Annette, gave me a great idea to add to the kitchen: real food! As in boxes of rice, macaroni, etc. or cans of vegetables, soup, etc. Stock your kitchen with real items and then work them in to a lesson when possible! You can find a toaster (and obviously never plug it in!) and "cook" with toast during centers then during another time, cook real toast (or waffles) and eat it! You can also do letters (T for Toast!). 

But now back to the kitchen itself. How about those darn painted on burners? How do you cook on that?! Grab those pipe cleaners and heat up that hot glue gun!! I used some bold color pipe cleaners for my burners. I simply glued on the pipe cleaners (grab a craft stick or something that can help you press on the pipe cleaners. I totally burned my fingers off!). The next thing I did was grab some black pipe cleaners. The problem with this "stove" is that nothing is defined--not the burners, not the cooking space, nothing! This creates a problem when we develop concept development of what a stove actually is. The black pipe cleaners were used to actually make a defined stove top. The other part of our kitchen set that wasn't really defined was the oven. This was an easy fix thanks to my APH Carousel of Textures kit. I grabbed a silver shiny whole piece of paper and hot glued that to make my oven door pop. 

You can add more modifications if you would like but these quick fixes were enough to include all of our kiddos with vision impairments without a lot of hassle. The hot glue is also easy to take off in case your kitchen set needs to go to another teacher.  Let's get cooking!

Play kitchen for a blind kids classroom
Easy textures added to the play kitchen for kids  who are blind or have vision impairments

Friday, January 15, 2016

The student that changed my life

I received a call on Christmas Eve letting me know that Kyle Hardy passed away. I've kept it private, only sharing it with a few friends, because the grief is quite strong. But then I thought about how much Kyle truly is one of the most influential people in my life and I wanted to honor him. I wanted to share my tribute to Kyle now that I am ready to share this with all of you.
I am sure many people passed by Kyle throughout his life with thinking that he would not be famous. That he would not influence teachers, students, paraprofessionals, parents and countless others in the education field all over the country. He did though. Every time I instruct in the classroom, consult with a teacher, present at a conference or spend individual time with a student, Kyle's influence can be felt. He's at the heart of all my teaching over the last 10 years of my career. His picture sits on my desk and I look at him almost everyday. I look at his smile and remember that I probably blew on his face to get that one of a kind smile for that picture. He thought it was funny if you blew on his face. 
Lots of people credit me for bringing the world to Kyle. That may be true. I see it differently. I credit Kyle for taking a chance on me. I was a new teacher with decent sign language skills. He was game for anything I put his hands on---and it was a lot of crazy ideas! We have played rugby, roller skated, became jump rope champs, jumped, crawled, climbed on so many things I can't keep count. We have cooked, read books, sang songs, gardened, did a ton of art, science and math lessons, learned break dance moves, talked about girls, went to Church together, shopped at Gap---everything that could be done, we did it!
I learned countless important concepts about educating people who are deafblind from Kyle. I especially came to appreciate the power of language and how it can bring to life anything as long as you can pair it with words, signs, touch, feeling. How grateful am I that some pretty cool Deaf people taught me their language. How grateful am I that I could share the world with my hands holding Kyle's. 
I've not been Kyle's day to day teacher for some time now. I haven't talked with him everyday but the distance never broke our connection. I can't express how special I feel that he never forgot me. His mom could sign my name sign and he would know it was me. Not a bird or a chicken but Robbin. I feel his mischievous, funny, smart, fierce spirit every time I sign 'yes' on a student's shoulder (just like Kyle likes it). I think about him every time I read with my kids (because he loved to read with Darlene and me. I especially think about him more recently when I read The Napping House with Abigail). I think about him every time I watch a student with a walker, every time I talk about keeping students feeling like the cool kids ("What's up dog?" is my favorite Kyle expression), every time I teach I think of Kyle because he was THAT awesome.


I know that everyone who has ever been my friend or sat in my office or asked me why I like to teach kids with vision or sensory impairments knows that I always talk about Kyle first. Everyone I have ever met since I met Kyle Hardy knows Kyle because he was, he is, that big part of my life. Kyle didn't have kids of his own. But my son is Rexten Kyle, named after Kyle Hardy. I see so much of Kyle in my son. Rexten knows that he is named after "my Kyle". He knows he has some big shoes to fill, a model man to look up to because of who Kyle was. 
I know Kyle is in a better place. How could I not be happy for him now that he is at peace? I feel like I'm just gonna have to walk behind his spirit now. Walking behind him the same way I have for years, or next to his walker, or behind him with my hands supporting him at his shoulders or waist. He was at the lead. His hands stretched out, checking things out. 

Wednesday, December 16, 2015

Holiday Banner

Merry Everything to Everyone--Christmas, Hannukah, Kwanzaa or Happy Holidays! Whatever you celebrate, let's have some holiday fun. I am a Christmas girl myself and so are the students that participated in our after school program.
We made these awesome Christmas banners for home decorations. It's an easy peasy project (especially for all the "not-so-crafty" people). I used the APH Carousel of Textures papers as well as few glittery papers I snagged for super cheap at Walmart and some construction paper.

I Googled a Christmas light clipart and used that as my template. I cutout a ton of lights using my template and all my different textured papers. The textured papers included glitter/sparkles (textures and visually appealing), velvet, bumpy, corrugated cardboard and rough. 


I printed out "Merry Christmas" on card stock. I made sure to use a font and size that were easy for my visual students to read. My Braille students made a Braille label  and put it over the print. 
Then, we used our favorite art friend, the stapler and whipped up these cute banners!
We chose red card stock as our banner base but you can let your Christmas creativity take you to new places and use other textures/fabric/paper. I went with red card stock for the durability, the easiness of it and the contrast with the lights. 


Did you read my last post on why the stapler is your art project's best friend? If not, go back to last week and read about it in the post "Textured Turkeys".


I've blogged a lot of about holiday projects over the years. Go back through my archives and check them out!
Remember, this is also STOCK UP time for your CVI supplies!! All those colored lights, red shiny ornaments and paper---stock up baby!

Tuesday, December 8, 2015

Wiggly Eye Sticker Chart

I was walking past this bulletin board in our of schools today when I stumbled upon this fun reward chart. This is an orientation & mobility reward chart by Linda Bredeen (a fab instructor). Let me tell you why I snapped a quick pic to blog about. Have you ever tried to use sticker charts for elementary school age kids with a vision impairment? It's doable but not awesome because there isn't a ton of fun for our kids with traditional stickers. Other alternatives are usually scratch & sniff stickers but even that doesn't always give instant feedback.  But check out Linda's idea with the wiggly eyes idea! 
I ran into her later that day and chatted with her about it. She told me that the kids LOVE using the wiggly eyes and they get a kick out of putting them on their chart. Lots of good feedback for the kids.  It's an easy peasy way to make a vision modification to an everyday school item. Have fun!


Wednesday, November 18, 2015

Texture Turkey


Happy Thanksgiving!
Thanks to awesome ideas on Pinterest, I was able to find a fun art project for my after school program students. It was easy peasy set up that anyone (even those of you that claim you are 'not creative' can do). All you need is some textured paper, regular card stock, stapler and wiggly eyes. 
Lucky for me I had a spare Carousel of Textures kit (from APH--it's a must have for your resource box). If you don't have the kit, don't sweat it. You can find texture papers at a Michael's or JoAnn Fabrics. You can use felt, foam, crinkle, sparkle, etc. paper. 


I did a quick draw of a large turkey feather and then went to town on cutting them out. One thing that helped me was that I decided to fold the paper (think paper dolls) when I cut out feathers. I was able to cut out three feathers in one cut. Major time saver! I then cut out our turkey body (I used the image of a bowling pin as my inspiration). Check out all the different types of feathers I was able to make (see below--all have a different texture, none are visually complex because we do have CVI students that were participating). 


I kept the feather line up as three on the left side of the body, three on the right. I did that because I wanted to keep a first, next, last sequence. Are you wondering why I had a stapler listed as one of the supplies? Glue works good, glue dots better but I like staplers the best especially for a project like this. Why? If you have ever glued before then you know how tricky it can be. Same story for glue dots. They are tiny and if you are working with tightly fisted kiddos, glue dots are your worst enemy! But the stapler allows a lot of nice partnering, sensory feedback and it gets the job done quickly. See below for my pic. The teacher lined up the feather and body for the student. She gave her hand (which you can see is still pretty fisted, tough for her to open for a flat hand). They linked hands and together they stapled. The student had instant feedback that something happened because the motion of stapling isn't subtle. I also like stapling because a lot of our students enjoy 'banging' and having that feedback. Stapling does the trick!


Here are some real life pictures of the turkey art project. I wanted to post them because I like it when it looks like the student actually did the work (and not as though an adult did it and scribbled the student's name on it). Plus, I am hoping that this is also a little inspiring for all my "not so creative" friends. I know it's a struggle to see perfectly made crafts on Pinterest. This one's for you!


The wiggly eyes I will admit are not stapler friendly. Put the glue dot on the back of they eye and then go in for sticking it onto the project. 


A few other thoughts on how we did this project: We did spend time before the art discussing what a turkey was. We talked about the difference between a live turkey and the turkey we eat (the turkey we eat has no feathers!). We discussed that length and feel of turkey feathers (kudos if you have real feathers for the kids to touch!). We had simple pictures of turkeys as well. I also wanted to play a game so we played "gobble, gobble FEATHER!". In case you have never heard of this, you are right--I made it up. But I have an age gap (10th grade down to 1st grade). It isn't socially awesome for a 10th grader boy to be making a turkey that a first grader was making. So here's what we did:  I spread out all the feathers in a square like arrangement. All the students (except the 10th grader) continually touched the feathers. I had the 10th grader (who is deafblind, just for FYI) call out "gobble, gobble, FEATHER!" When he said 'feather' (with exclamation in his voice), students picked up a feather for their turkey. We repeated until everyone had 6 feathers for their turkeys. It made the project a lot more interactive! 

Can you see how we taught almost all the areas of the Expanded Core Curriculum in this lesson? Think about it and see if you can identify all nine areas.  I really did touch on each area and the whole lesson took just about an hour. 

Happy Thanksgiving my friends! I am incredibly grateful for the opportunities I have to be in our field. I love our students, our teachers, our families and our community. Hugs!

Thursday, November 12, 2015

New Must Have Trays!


Dollar Tree logo

Hello friends! 
I was out on my usual rounds at Dollar Tree buying some calendar object and finished baskets when creativity hit me. I have already blogged about how to use a variety of baskets for sorting, sequencing, calendar box systems and finished boxes. Check out my older posts if you want a review of using these boxes.

Dollar Store trays for teaching blind kids
This Dollar Store tray is perfect for teaching sorting skills for blind kids 

I found five other trays that you have to go buy RIGHT NOW! Once Dollar Tree sells out, they can be gone forever especially with the holidays right around the corner. Stock up!

Above (black tray): Of course this is a great sorting tray! You could also do a little sequencing with it, too. The sequence can be following a clock face or just up/down or left/right. Lots of possibilities!

Below (red tray): I saw this one and was intrigued with what we could actually do with it. I thought you might able to use sequencing or sorting with cups. The three rows are really cool because you can use a top, middle and bottom sequence. You can flip it over, add velcro to the circles (in the middle of circle) and you can sequence that way, too.  These are just starter ideas. The sky is the limit!

Dollar Store trays for teaching blind kids
This Dollar Store tray teaching sequencing skills for kids who are blind
Below (red square tray): I loved this tray because I thought this would be nice to use with velcro. You could do some matching with it. The velcro would serve as a place holder.  I also liked the unique "walls" on this tray. The sides are unique to use. Lastly, I liked this tray because it is a square and not a rectangle. They are smaller in size than most trays as well. 


Above (silver tray top): The first thing to remember about this and all Dollar Store trays is that they aren't always make of thick durable material. That doesn't mean you shouldn't buy them. It just means that you should plenty for replacement and/or have reinforcements.  This silver tray is a tray top that I found in the baking tin section. I loved this tray top because of its color and the texture! How fun is this tray!? This is the kind of tray that you could just use alone--no texture, no sequence or anything. Just fun to use!

Below (red tray): This was also found in the backing section. The red is actually just an insert. It is very thin plastic but has potential nonetheless. This tray is a nice size. I like it for putting 1-2 simple items in for discovery or using it for sensory items. But then again, these are all just starter ideas! Have fun and be inventive!!

ps--I found these trays on Tuesday, November 10th. Hit up several Dollar Trees to complete your collection (that's what I like to do!)