Showing posts with label occupational therapist. Show all posts

Sunday, April 30, 2017

Joystick Tactile Object Attachment for Tactile Calendar System


A long time ago I posted about this awesome assistive technology lady, Therese Willkomm, who did this great workshop on easy assistive technology solutions. I only got to see half of her presentation and always wished I could have learned more. As luck would have it, several years later I find myself enrolled in Therese's Assistive Technology Solutions in Minutes class through Perkins e-learning series. I highly recommend this class!
Each week we learn about all kinds of fun things--adhesives, PVC, corrugated plastics, etc and we build and share our new ideas. This past week we learned about instamorph and I am in love! 
I am excited about this idea that I camp up with (thanks to the class): it's a joystick attachment for calendar object symbols. 
I have several students that have a goal of grasping items in their hands. We have some joystick switches that work with our switch adapted toys. Unfortunately, we haven't been able to expand options for giving our students meaningful ways of grasping things. Many of my students use calendar object systems but they are limited because grasping their objects is difficult. We can use eye gaze but that doesn't work for students who have significant vision loss. 
I wanted to find a way to make a more meaningful joystick for students other than with toys. I combined the joystick with the calendar object system.  I used the APH Tactile Connections Kit for this project.
You can buy Instamorph at several places including Michael's and Amazon. It dries white but you can buy colored pellets to add color to it. You can grab a good size bag for about $20. It's totally reusable (about 6 different times to reuse for best uses) and you can make stuff in a snap. 

Here's the How To:
First, start with your original symbol. This is the music symbol for one of my students. 

 I took apart the symbol, grabbed two strong magnets and got to work with the Instamorph.

 I flipped the symbol foundation (the green thing you see) over and glued the magnet to the bottom.

I used my Instamorph and molded it into a joystick and made sure that I flattened the bottom so that I could Gorilla Glue it to the magnet.


It worked! I hovered the magnet joystick over the symbol (with the magnet on the bottom) and it instantly magnetized. Now my student can practice grasping things in a meaningful way and can make choices using their object calendar system. 

Improvement to be made: I will find thinner magnets for the back side OR make sure I put a piece of foam so that the symbol isn't slanted.
Of course you will have to modify based on your calendar system items. I actually did several more for my students. 
Now I can really work on two different goals with students easier: 1) grasping in a meaningful way and 2) encouraging students to make choices. Remember to go at the students' pace and teach/reinforce/practice a lot so that they get the meaningful piece of this.
Resources for calendar object systems:
Calendar Boxes and Schedule Systems as Literacy Tools
Check back to my other posts on calendar systems because I have posted several times about them in the past. 


Monday, April 6, 2015

Add this to your calendar box tool box!

Hi friends, happy spring! I am happy to share this product and encourage you to add it to your teacher resource toolbox. This is a great find for making calendar box items. I found out about this awesome find while visiting our preschool classroom and the teacher, Tammy. Are you still wondering what this great product is? See picture below for the name and what the box look like. This high gloss finish protects and preserves items. I found it on Amazon for about $65 plus tax (a large bottle of it). I found the one pictured below for $14.99 from Hobby Lobby. This finish is like using 50 coats of varnish (description from the manufacturer). 
But why did I get so excited about this finish? See the pictures below. Here is an example of a calendar system that the teacher made with the finish over the item. Take a close look at the pretzel!  The pretzel is 5 years old (if I remember correctly from my discussion with Tammy). Look at how well it preserves the textures, color, etc. of the item. Plus they are water proof!! Our students can drool on them and can hold up against accidental drops in water or paint. 


Above: rug time symbol. 
Below: the actual rug. 
The team in this classroom used felt and made a replica of the actual rug. Look at how well they match up!

I loved this stuff! I definitely recommend you add it to your resource tool box. I am sure you can use this finish for other items but I thought it was a gem for creating calendar box symbols. Thanks to Tammy and her crew for letting me snap some shots and share this awesome find!!

Tuesday, April 17, 2012

Toy Story

It's a toy story post day!
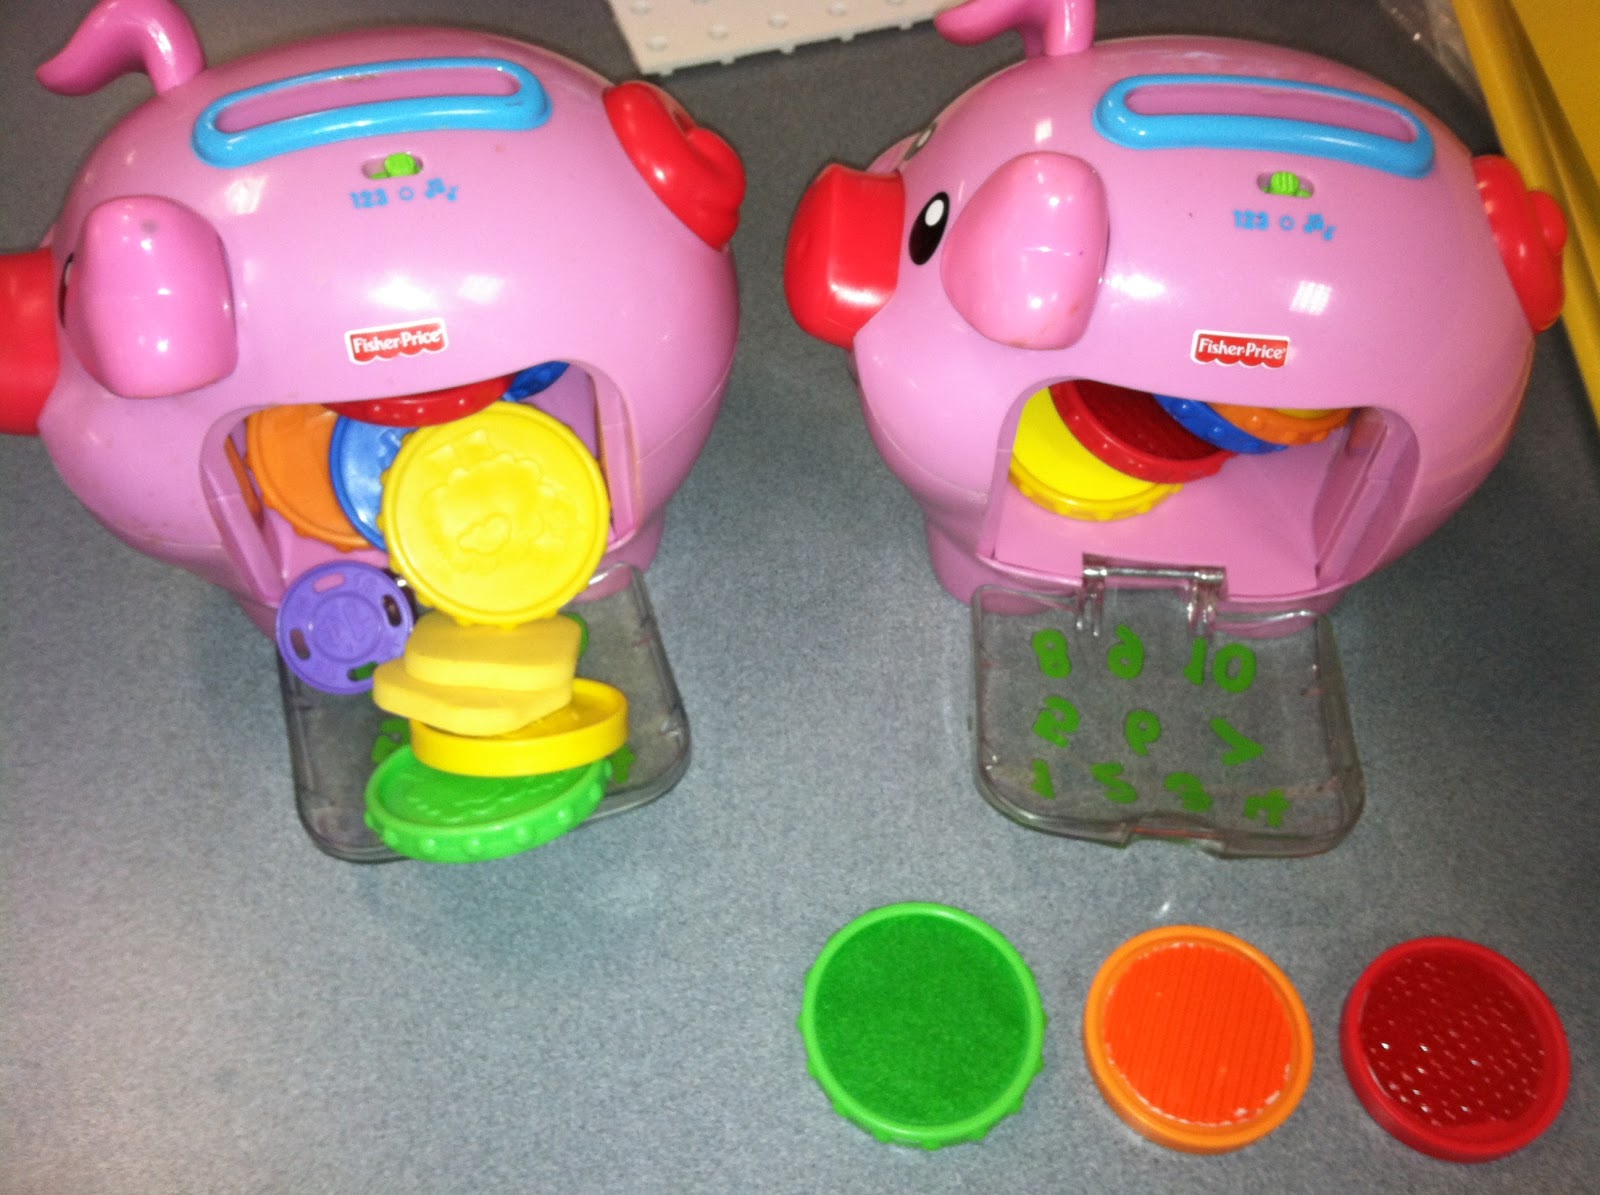
These are pictures of toys that were adapted by the super fab preschool teacher, Yvonne Locke. I knew I had to take pics and blog about toy mods when I saw her awesome goody toy bag! I love these toys because they are typical toys found at any Toys R Us with simple and fast adaptions. The first thing you need to grab is texture! I suggest the APH texture paper collection (last picture). I don't think you can really see all the texture on the paper but it's there and you can cut and stick it on in a snap! The toys that I have taken pictures of work on spatial skills, bilateral hand skills, matching, etc. And it's all PLAY! These are just a few toy ideas. I think that once you see these ideas the light bulb will be going off in your head!!

The piggy banks:
 On the left is mine without texture. It's a good toy even without the tactile modification. On the right is Yvonne's adaption. She added the texture to each coin and that's it. Now for kiddos with total blindness a new dimension has been added. We always want to keep their fingers engaged and getting them into a variety of textures. 

Old school ring stacker:
Again, Yvonne cut some textures (velcro--both sides of the hook and loop), ridged paper, and rough texture and hot glued them to the ring stacker. Yvonne likes the matchy match so she kept it all the same. The other thing that great about Yvonne's matchy match is that the texture is embedded. There's no contrast and it really works because there's no visual clutter or contrast competition. 

Pool noodle stringing:
Cut pool noodles (summer is coming, think Dollar Tree!!) and make them into big loops. Grab a rope and make a good knot at the end and viola! Great stringing activity. You can of course also add different textures to each pool noodle and do patterns!
The red canister is an old oatmeal container with a red cardstock (or use fabric) and hot glue it on. 

Pop up toy:
Okay I'll be honest, I am not entirely sure the name of this toy but you all know what I mean. Again, Yvonne added color corresponding textures. Notice that the textures are on top (of the pop up) and then down below at the knobs. It also supports matching skills. There's no visual clutter and the texture samples are big enough for little hands to explore. 

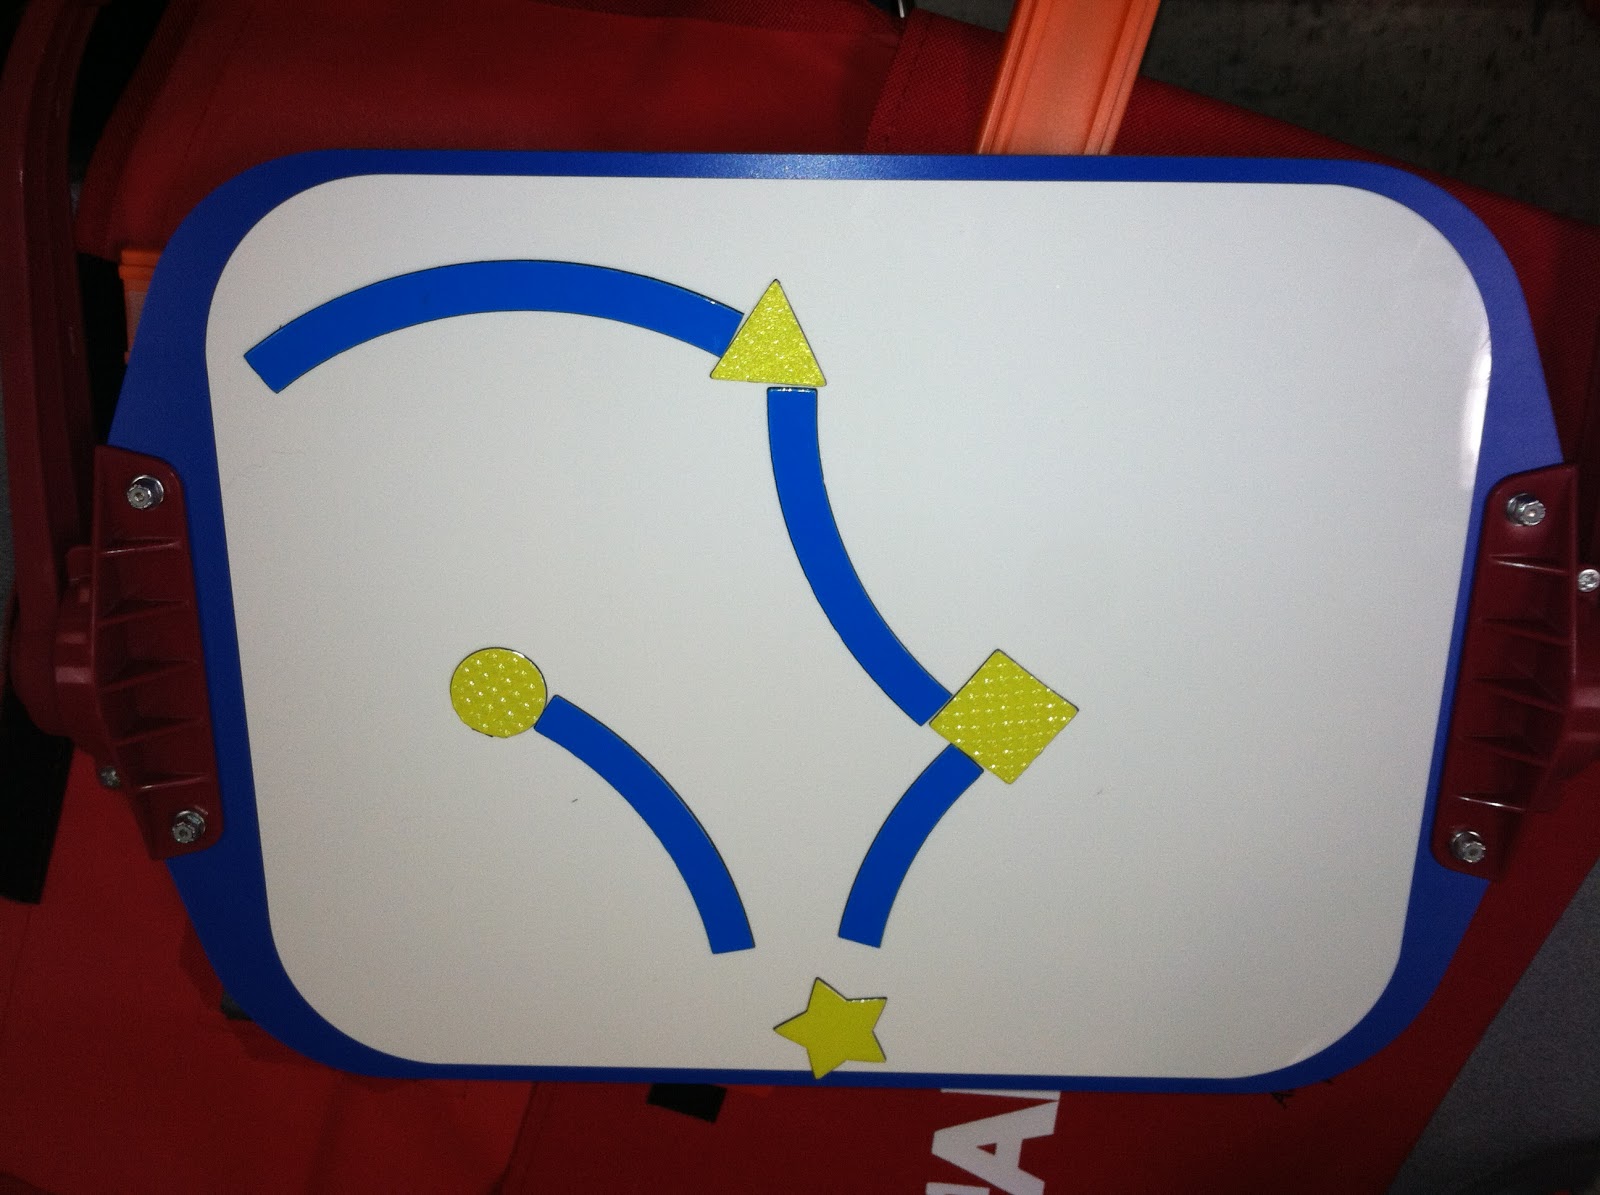
APH All-in-one Board with race track by Yvonne Locke:
This is an all-in-one board. The awesome thing that Yvonne did was add race tracks. The race tracks work for tracking skills, direction development. The student practice tracking the track (notice the bump dot notches as place markers). She also took a race track and put velcro down the center of it. She attaches different shapes that the student has to find. Genius!
Here's the link for the All-in-one board from APH:

APH All-in-one Board, Dry Erase Side:
Yvonne uses this with these little magnetic pieces for tracking. You can mix it up and have them find each piece. Super fun!
APH Textured Paper Collection:

Always remember:
-Avoid visual clutter!! If you aren't sure about what it looks like to NOT have visual clutter, refer back to Yvonne's toys. Look how the texture is clean with the toy. The goal of adding texture to toys to to target the hands and fingers. We need those tiny fingers and hands to be able to discriminate between textures regardless of their future reading modes. Yes, a few pieces of contrast or highlighting is helpful (think CVI especially) but let's target the tactual readiness!
-Expect things to fall apart or not work out. It's okay to glue things over and over. The hot glue gun (I have an industrial one) is my best friend. 
-Go to garage sales! The classic toys are always there. I find almost all of my preschool toys from sales. 

Please remember that all pics and posts are copyrighted. The toys were all from Yvonne Locke, Preschool Teacher for Children with Vision Impairments. She is an amazing teacher so please give credit where credit is due. 

Tuesday, April 10, 2012

Another Target Find!

I kinda just think I should give Target their own label because I am always finding steals and deals at Target. I found another one in the Easter clearance section tonight. Yep, it's plastic Easter eggs! Why eggs? Because this is a great bilateral hand skill activity! Putting eggs together, finding things inside of them, opening them up and dumping them, etc.The possibilities are endless! AND it's not just for the Easter holiday! Get a medium plastic sweater box and put it on a kid table and fill it with Easter grass (also on sale!) and have the preschoolers go for an egg hunt. Are you thinking that the sweater box also doubles as a defined work space? Because it does! You can also work on systematic search patterns and mobility and spatial concepts as well. I actually suggest you put the box on a table and take away the chairs so the student has to stand and walk (or trail) around the table to do activities. Lastly, throw a finish box on the table to make it a complete activity and viola! You are ready to rock!
 

Tuesday, April 3, 2012

Hand Under Hand Instruction Resources

I came across these instruction videos while I was scouring the web for really good hand under hand instruction (HUH) videos. Teaching hand under hand is so crucial and mastering this technique is a little tricky. I found these for my March RT for the OT presentation that I do yearly for OT/PTs. There are also other videos and really good resources on the site but I love the HUH ones.


The videos are from the Washington Sensory Disability Services.
 Here's a link directly to the videos:  http://www.wsdsonline.org/deafblind/huh/huh-overview.html. Sometimes the hotlink doesn't always work so you can also go to their webpage, www.wsdsonline.org and hit the tab "videos". These are some sweet videos so save this to your favorites tool bar! They have all the right instruction pieces built right in. 


I've also included a link to another helpful article about HUH from FamilyConnect.org. The family friendly article is: http://www.familyconnect.org/parentsite.asp?SectionID=75&TopicID=351&DocumentID=3822

A lot of people may think that HUH is just for children who MIVI or DB. But I use HUH with almost all of my Braille reading students including those who are MIVI, DB and ASDVI. It's just the best way for them to "see" what's going on. In fact, that's my prompt language when I am going to do HUH. I ask my students if they want to "watch me do it". They just pick their hands up and I slide right under them. 
A small side tidbit about HUH that has come up a lot when I have been working with OTs: how do you do HUH with preschool? Their little hands are just so small (and cute!!). Here are a few ideas: hook up under their pinkies and let their hands follow with you prompting from the pinky. I will sit facing them instead of behind them so that their little hands can see what my fingers are doing. Or  I will prompt at their wrists and guide that way. As I write this, I realize that it is a tad tricky to understand if you don't get it. I will do my best to find a preschooler who I can take some pictures with and post them. Until then, watch the videos (again and again). HUH is my ultimate tool when teaching so many of my students. It takes time and practice to get the finesse of it down. Good luck!

Tuesday, March 20, 2012

NO bake cake

Happy birthday to ME! Yes, I know many of you are thinking that with my witty writing and youthful good looks I could only be a hair older than a young college girl but the truth is that I am several hairs older and turned 32 this past weekend. My birthday is no excuse for me not to be on the look out for new ideas to blog about so.... Viola! This week's posting! Zebra Cake! 
Why zebra cake? It's an easy cake to make that is tasty (and calorie friendly...) for everyone. In addition, it works on kitchen skills, patterns, and even some spatial orientation skills. Your main ingredients are vanilla, whipped topping and chocolate wafers. The wafers are probably the trickiest thing to find. I find them at our local grocery store in the cookie aisle. They are usually on the top shelf next to some obscure diabetic cookie or something. They run for about $3.89 each. 

It really is as easy as I show in the pictures. The whipped topping acts like a glue and holds the wafers in place. I've actually done this cooking project with students who have multiple impairments several times. I like to keep my whipped topping cold but not yet frozen because it is easier for my MI/VI students to use. I would also suggest a bright red (or yellow) spoon for contrast as the whipped topping can easily take over the spoon. Make sure your spoon is a large one--that helps a lot.  It can be messy and fun and is only a repeated two step sequence! The only thing that might turn a student or two off is that it can be sticky. On the flip side, this is great for younger students because who doesn't like to lick off whipped cream? 
 
I've also included a link to allrecipes.com with a recipe that you can use. There is also one on the box.
 Here's the recipe link: http://allrecipes.com/recipe/zebra-cake-2/

I also have included some pictures of other variations of the zebra cake that you can do. These are all from allrecipes.com.


Remember, you can also make this a connected experience by going to the grocery store and purchasing ingredients. You an print out the pictures that I posted for this one and use it for a picture symbol for visual learners. You can make this a complete experience by having the student take out the needed materials (pan, bowl, etc.), prepare the cake and then cleaning up. Younger students can have a little contrast fun by adding fun topping like strawberries, chocolate chips, Oreo cookies, etc. 
Just remember the zebra cake requires about 4 hours in the freezer to finish.
 Do it early in the day so you can enjoy it later!

Wednesday, February 22, 2012

Grab your tool belt!


Happy DIY projects! My colleague gave me a new copy of FamilyFun this week and I instantly smiled. I love FamilyFun magazine!! I found another hot little idea that I knew I had to blog about. I took lots of pictures of this page with all the details. This idea is great for preschoolers through first/second grade. It's easy and it totally works so many ECC skills (systematic search patterns, bilateral hand skill activity, cause and effect, etc. plus it is a totally functional activity). You could totally take this a step further and go to a hardware store and see where you buy nails and screws and stuff (now you have incorporated mobility and made it a community based instruction activity--voila!!). This is also a great activity for dads to take the lead on. Think dad date (or uncle or man date...) and head to Home Depot! Get a tool belt to dress up (imaginary play, meet a construction worker too!) and put nails and screws of different lengths in baggies (and now it's a sorting project! ding ding!!). Check out this project!!


Read the "take it further" tip! It's a good one ;)


I also like to find little gems like this in magazines because I want all of my parents to see that they can still be part of all the typical education activities, magazines, etc. You can't be part of every one of them (no one can. Trust me, I am a single mom and I know this well). But there are so many things that we can get ideas from! It also helps me learn how to tweak something for our kiddos in a pinch.  So, pick up a magazine and look for good projects and think about how you can do an easy tweak to it. Here's one tip, I usually can do these modifications or get ideas for them in about 10 minutes. If I have to recreate the wheel in order to the project, then it is a no-go (so don't kill yourself with over complicating things!)  Happy reading :)


Tuesday, October 4, 2011

Least prompts assistance aka hand-under-hand

Happy Tuesday! This week I want to share something that one of my favorite preschool TVIs, Yvonne Locke, compiled into one amazing handout! This handout  is to help teams and families understand least prompts assistance.  (We call this hand-under-hand.) Yvonne took the information from the Developmental Guidelines for Infants with Visual Impairments, (Lueck, A., Chen D., et al (2008) page 15-16) and tweaked it.  It is only one page, so it’s easy to use as a reference tool.  
LEAST PROMPTS ASSISTANCE
Least prompts assistance is a child centered approach for instruction, which has been proven to be effective when teaching children with a range of disabilities.  The belief is that instruction should begin with the prompt that provides the least amount of assistance whenever possible.  If the most assistance is needed, the goal is to fade to the least amount of assistance for the child to participate in the activity.  The intention of this sequence is to encourage a child’s active participation and to minimize dependence on prompts (dependent/passive learning). Below you will find a list of prompts that move from least to most intrusive, which has been adapted for children who are visually impaired with and without additional disabilities. 

Hierarchy of Prompts
Natural Cue
The offer of an object for the child to see or feel elicits the desired reaction.
Gestural Cue
Movement or gesture, such as a point or a wave, indicates the desired action to the child and elicits the desired response.
Direct Verbal Cue
Verbal request for the action elicits desired response by the child.
Modeling
Demonstration of the action to the child elicits the desired response.  Completely blind children should be encouraged to place both hands on the modeler’s hands to feel the movement (tactile modeling).
Physical Prompt
Physical contact is provided that can range from a touch of the child’s hand to placement of a hand under the child’s hand (hand-under-hand assistance) to guide him/her through part of the action to elicit the desired response.
Physical Guidance
The interventionist’s hand is placed of the child’s hand in full physical contact to complete the desired action.  This is known as hand-over-hand assistance.  Some children may dislike this kind of physical assistance and find it intrusive.  To encourage a child’s active participation, hand-over-hand assistance should be used only when absolutely necessary.

Tuesday, April 19, 2011

Dressing Boards for Children with Multiple Impairments

This is a project that I did a couple of years ago for a student that had CVI and CP. He was a youngster who was in a hospital bed and needed his mom to physically assist with him with many tasks. His team called me in because his mom wanted to find a way for him to be independent about picking out his clothes.

Here's the situation: when dressing, he cannot sit up or walk over to pick out clothes. Here's what I want all of you to read very carefully: there are still ways we can help our students be independent!! It doesn't matter what their needs are. We can still encourage choices and initiation.

Here's what I did: First I had to interview mom and find out more about the dressing routine. She dresses him in the morning alone. He can grasp items. He can see red very well. These are some of the things I wrote down as I interviewed mom. After talking to mom and then observing their dressing routine, I had an idea and headed off to the fabric store. I purchased a sturdy, thick foam board, red shiny with sequins fabric and clothes pins. Next, I whipped out my all purpose industrial hot glue gun and industrial strength velcro and got to work. See picture below.


Here's what I made: a dressing frame that he could use to 'pick out' his clothes.
Here's how it works: Mom puts his shirt on the board using the clothes pins. She holds it above him (as he is laying down in his bed) and using a combination of hand under hand and verbal cues (and PATIENCE), she has him feel the collar of the shirt.


Here's the language: She uses scripted, consistent language (especially in the beginning when teaching the new routine):
1.Here's your shirt.
2. Feel the collar (all of his shirts have collars)
3. Grab your shirt. He has a fantastic grasp so he can grab his shirt and pull it off the frame.

Mom repeats the same sequence with his pants:
1. Here's your pants.
2. Feel the zipper.
3. Grab your pants.

Now the beauty of this is that it is homemade. It's easy and fast to replace. Eventually the clothespins will come off. I bought mom a bag of them that she could replace as needed. The total cost was about $10.

I used sparkly, red fabric because he has CVI. After he demonstrates understanding of the sequence, mom can start offering him a choice. Which does he want to pick out first: his pants or his shirt? He can tactually initiate and make his choice.

There was one tricky thing that I had to think about when making this initially. Mom has to do all of this by herself and has about 5 minutes--max to do it in. Being a single mom to preschool age students, I got the bind mom was in. I needed to make her something that she could put on and use without needing a second pair of hands. Check out the picture below! I added velcro straps on the back! This little guy just slides onto her arm and she can hold it above her son and help him hand under hand without needing a second pair of hands! I practiced with it several times and could slip it on in about ten seconds.

This dressing frame was the foundation to dressing skills and independent living skills for this preschooler. He can't use this forever but it is the start to daily living skills.

Wednesday, March 9, 2011

A Resource You Should Read, Save, Print, Use and Share!

I did my annual training of occupational therapists yesterday. It was a great workshop and one that I am always excited to do. I love working with occupational therapists. I feel like when we combine forces, we do super amazing things! I learned so much when I was a classroom deafblind teacher.

I invite my colleagues to come and participate in these workshops. One of my colleagues presented on multiple impairments. She shared a resource that I had forgotten about. The resource is a PDF from the Ohio Deafblind Project.
On their site,/http://www.ohiodeafblind.org/assets/files/images/products/holdon.pdf, they have a wonderful PDF called "Hold Everything: Twenty “Stay-Put” Play Spaces For Infants, Preschoolers and Developmentally Young Children With Sensory Impairments and Other Special Needs". This is a FANTASTIC resource for children who are MIVI/DB and perhaps for several children who are ASD/VI.


My colleague had another great idea. This is one for the therapists. She printed out each page and laminated each one. She hole punched it, put it into a 3 ring binder and turned it into a book! This way she can show her teams the ideas.

Parents and members of the education team should take the time to read (save, print and use...) the materials from this PDF. It truly is a great resource. Each of the "stay put" play spaces are pretty easy to make and cheap. There truly is something for all abilities including children who may have limited upper body movements.

Do it at home: Parents, select a "stay put" place for your child. Discuss it with your TVI and make one (or two...) for your home. All of our children who are MIVI/DB & ASD/VI could benefit from having exposure to these kinds of activities. The most important thing to remember is to WAIT and BACK OFF when your child is in these activities. Remember, it may take several trials for your child to get used to the activity or notice that something is there. By backing off and being quiet, you are allowing your child to explore and become aware. This is an active characteristic (exploration) and one that we want developed for our children with these unique needs.

Monday, January 24, 2011

A Case for Teaching Functional Skills

Hey everyone, I am so excited to share this article with you. I am posting it directly to this post. I share this one frequently especially with team members who do not fully understand the expanded core curriculum.

I think that once you read this, you will get it. I do not have the author. I got it from one of my grad school classes. This article is not written by me. Feel free to print it and share it. I hope it becomes one of your favorites, too.

A CASE FOR TEACHING FUNCTIONAL SKILLS

My other brother Daryl
18 years old, TMH (30-40 IQ).
Been in school 12 years.
Never been served in any setting other than elementary school. He has had a number of years of "individual instruction." He has learned to do a lot of things!

Daryl can now do lots of things he couldn't do before!

He can put 100 pegs in a board in less than 10 minutes while in his seat with 95 percent accuracy.

But, he can't put quarters in vending machines.

Upon command he can "touch" nose, shoulder, leg, foot, hair, ear. He's still working on wrist, ankle, hips.

But, he can't blow his nose when needed.

He can now do a 12 piece Big Bird puzzle with 100 percent accuracy and color an Easter Bunny and stay in the lines!

But, he prefers music, but was never taught how to use a radio or record player.

He can now fold primary paper in halves and even quarters.

But he can't fold his clothes.

He can sort blocks by color, up to 10 different colors! But, he can't sort clothes; whites from colors for washing.

He can roll Play Dough and make wonderful clay snakes!

But, he can't roll bread dough and cut out biscuits.

He can string beads in alternating colors and match it to a pattern on a DLM card!

But, he can't lace his shoes.

He can be told it's cloudy or rainy and take a black felt cloud and put it on the day of the week on an enlarged calendar (with assistance.)

But, he still goes out in the rain without a raincoat or hat.
He can identify with 100 percent accuracy 100 different Peabody Picture Cards by pointing!

But, he can't order a hamburger by pointing to a picture or gesturing. He can walk a balance beam frontwards, sideways and backwards!

But he can"t walk up the steps or bleachers unassisted in the gym to go to a basketball game.

He can count to 100 by rote memory!

But, he doesn't know how many dollars to pay the waitress for a $2.50 McDonald's coupon special.

He can sit in a circle with appropriate behavior and sing songs and play "Duck, Duck, Goose."

But, nobody else in his neighborhood his age seems to want to do that. I guess he's just not ready yet.

Excerpted from: TASH Newsletter, December, 1987, page 6 CPSERRC
EHH
Warsinske/Enggren/Rudisill
33.011

Tuesday, June 1, 2010

Teaching functional tactual skills--a great article to read!

I have one of the best articles for teaching functional tactual skills. It's kind of a lengthy read but it is packed with super awesome information. It's one of my faves to hand out when I work with education teams especially occupational therapists. The article is Feelin' Groovy: Functional Tactual Skills. If you have an OT who needs a little "vision impairment education", I highly recommend this article. I also love this article because I think it has great insight for working with children who are MIVI/DB.
Question: do you know what "functional tactual skills" are? Although there are many ways of describing this, the most user friendly way to describe it are these are skills that are part of daily living skills. For example, cleaning a table, folding clothes, etc. are functional skills. Tactual means touch. Students with vision impairments can be and mostly are tactual learners even if they have some usable vision.
Here's the link. It's from the Texas School for the Blind & Visually Impaired See/Hear Newsletter (a gem of info can be found here!!)
http://www.tsbvi.edu/Outreach/seehear/summer98/groovy.htm
Try it at home: think of 3 things at home that your child interacts with. Then ask yourself, what do these items tell my child? How does your child take in their information? There will be lots of posts later on object symbols and tactual learning. This is jus to get your brains thinking...