Showing posts with label Kitchen and Cooking Skills. Show all posts

Monday, July 1, 2019

Teach the ECC at a Home Improvement Store

Text with three pictures of students touching appliances at The Home Depot

Hello friends! I am finally getting around to blogging about one of my favorite places in the community for Expanded Core instruction: a home improvement store! Yep, like Lowe's or The Home Depot. These stores a treasure box of skills, experiences and learning opportunities. There are many options for doing community based instruction (CBI) at a home improvement store. I recommend doing it as a series. This means you come back several times and break up the store into smaller parts. I like this option because there is more opportunity for students to have a stronger connection to the concepts. After all, there's much to learn, see, touch and do at a big home improvement store. The pictures from this post are part of a two part series I did. We did some work in the classroom and then put it together at the store. Part one was dedicated to learning about tools and basic home improvement around the house. Students learned a lot from the difference between a flathead and a Phillips screwdriver to how to plunge a toilet! Note: I always buy a new plunger and label it so students can touch it and explore it without it being gross! I feel that students should know basics of their home. These areas often get overlooked but it is a valuable skillset. Plan time for this. It's easy to just do a "show and tell" lesson. That's not effective ECC instruction. Use the "I do. We do. Y'all Do. You do." approach for this one! It's okay to break it up into a series of learning as well! 

A male young adult examines a stove dial appliance close up

A male teenager examines a refridgerator at the home depot.

A home improvement store is also great for a variety of age groups. I brought younger students to high school students for this outing. My younger students had a bonus lesson: they went and explored different textures! There were so many textures for younger hands to find and discuss. We also did a scavenger hunt of shapes, textures, measurement and comparing/contrasting sizes with their group. 

A young adult male and an elementary age male touch a display of small rugs

A group of young students tactually explore a wall of carpet samples.
 Plan a few hours for an ECC CBI--even if you are breaking it up in a series. There are many departments that have lots of hands on exploration even for older students. Check out the picture below with all the different faucets! We had lots of discussions about student's preferences, uses and locations of just faucets!
a photo of a wall display of faucets at The Home Depot.

a group of teenagers hold up flooring samples and smile for a picture
 I brought a medium sized group of students for this outing. I broke them up into small groups and gave them an "educational scavenger hunt" (aka a creative list of things I want them to learn about). Each group had time to go about the store at their own pace. They had to check out major departments and apply their new "tool knowledge" to each department. Can you see all the possibilities?? We spent almost an entire day on our home improvement unit.
a group of students listen to a male teacher as he points out items on a heating system
 There's another reason why I like doing ECC lessons at a home improvement store: the appliance section! Many students haven't had the opportunity to check out a variety of appliances. Their knowledge is usually just their own home appliances. I like to do a whole lesson about accessible appliances. I like to review what makes an appliance accessible. I give the students a checklist of accessible options to consider and tell them to find these options on appliances. I encourage them to learn about their own accessibility needs. Then look for appliances that match their needs. Note: I don't rush this lesson. We go appliance by appliance---we do laundry first, then kitchen, etc. I let students discover features of appliances.
A female student explores a washing machine

a male young adult smiles next to a washing machine.

Don't forget to talk about the money! We also discuss prices and budgets. I kind of like to play "The Price is Right" for this. I have students take a guess at how much appliances cost including their dream accessible appliances. Fortunately, many of the most accessible appliances are the most basic ones. We compare and contrast pricier models with basic. We discuss all the bells and whistles. It's such a great ECC lesson!! 

a close up of a basic dial on washing machine
 Make sure you go during off hours if possible. It makes it easier to have "department to yourself". You can do a lot more instruction without everyone staring at you. The workers are usually awesome to work with. Many employees will take extra time and really help out where possible.
a male young adult turns the knobs on a stove as he checks it out.
 I have students pack their assistive technology (that includes their phones) for this CBI. I like them to use their AT when determining what accessibility they need. Feel free to invite an orientation & mobility instructor as well for this one. There's so much to gain on this ECC adventure!
a male young adult checks out the knob on a stove.

Tuesday, November 1, 2016

Braille Sundae


I was hanging in one of our preschool classes with my new fave preschool teacher, Annie, to co-teach with her. She had a fun lesson for dipping apples into different toppings. We did a quick brainstorm and turned her lesson into a Braille lesson with a few quick changes. Next thing we know, we have this fun ECC lesson and are making Braille sundaes. 

Annie's lesson started like this:

And became an Expanded Core Curriculum lesson:
We added an APH tray (any tray will do though) and arrange the toppings into a Braille cell. 
Easy update!
For instruction, we reviewed the Braille cell and the corresponding numbers. 
For example, (look at the picture above), the chocolate chips are "dot one", the caramel sauce is "dot 2", etc.  
Students took turns selecting toppings but had to request it by the number (to teach the number configuration of a Braille cell). It was a success! The students did great requesting using the dot numbers. For example,  "dot 6, sprinkles".We did a quick but direct instruction on the Braille cell to set the students up for success in the lesson. 
This wasn't just a Braille lesson though. We incorporated much of the Expanded Core, too! 
We addressed other areas of the ECC such as:
Independent Living Skills: cooking skills at the preschool level
Orientation & mobility: positional concepts 
Self-determination: making choices, trying new things and making opinions about them
Social skills: turn taking, eating etiquette and conversation.

These were the areas that also received special instruction during this Braille lesson. We had each of these areas in mind during instruction (that's the secret to implementing ECC!). This was a preschool lesson so the whole lesson was about 30-35 minutes. My favorite part: listening to these sweet little preschoolers request their toppings using it as a Braille cell ("dot 2, caramel sauce!"). 


Friday, April 22, 2016

DIY Career Academy

Looking for an interactive way to teach career education? Organize a career academy! This was part of my short term program a few months ago (other part was going to a trampoline park--I called it "jump into the career academy"). The idea came to me as a way of teaching about career education to my intermediate through high school grades. This was a hands-on experience that taught about different types of careers. Here are some of the careers we had: massage, cake decorating/baking, catering, culinary, therapy dog trainer and mechanics. 
I invited several community partners to be with us. Paul Mitchell (the school) came and ran our beauty/handsome school and taught our students about hygiene, styling your hair and how to look your best. I love how their instructors taught our kids! They had them feel their own hair and how to identify their own hair texture. They brought props to help with teaching braiding and products to learn how to use them.  I also invited a chef (we met him when I took my students to do hibachi),  a catering manager and massage therapists. I love bringing in community partners because of the mutual learning opportunities it provides. Not only do we learn about them but they learn how to work with people with vision impairments. It's such a win, win!! 


There are a few tricks of the trade that I want to share when planning your own career academy. 
1. Group students--organize them based on skill and maturity. This way the lesson can go at a good pace for all students. It is difficult for the teachers to teach scattered levels of ability in a short amount of time. I did have students that required a slower or more modified pace. They were in the same group in break out sessions and it helped them not feel rushed. 
2. Use related service and community partners as instructors--In culinary school I had our professional chef lead but used my OT students to provide support. The combined knowledge was a great skill set for teaching students skills.
3. Look for careers and not just jobs---There is a difference between a job and a career. The focus was to discuss careers. We discussed the type of training, assistive technology needs and realistic opportunities for people with vision impairments. Did you know that massage is a great opportunity for our kids? We discussed how some things that are recreational could be developed into something more (like becoming a therapy dog trainer).
4. KISS--Keep it simple stupid! The lessons were all designed to fit into a 50 minute window. The cooking recipe needed to be something doable but that also really taught skills at the same time. We made chicken fried rice. We used electric skillets, cooked chicken and incorporated frozen veggies and a rice cooker. 
5. Think outside of the box--I invited some mechanics to come and teach our kids about auto mechanics because usually our kids get passed by about learning about this topic.  Students learned how to identify all four tires, remove a flat tire (and fix it) and learn about what happens under the hood. Naturally there are things that may be beyond what our kids can do (simply because of the vision required) but we should still "fill them in" so they can have the understanding.  I also invited a cake decorator to come and teach our kids how to cake decorate. We brainstormed awesome ways for our kids (including those with no vision) how to make beautiful cakes. 


Students learned how to remove and fix a flat tire.

Our cake decorator instructor had the brilliant idea to use cookie cutters to teach design. Students placed the cookie cutter on their cake and used it to follow the "pattern". 


We learned all about massage and the different types of massage that can be offered. 


The day went by fast and crazy but all students had a great time. We were able to have a follow up Q&A with all our instructors and students were able to take home projects and tip sheets. 
Can you identify all the nine areas of the ECC that we covered today? We hit on all of them in a meaningful way. 

My follow up activity will be taking the students off campus to the actual locations. We have been fortunate enough to have our community partners stay on as mentors. Our catering manager has volunteered to be our catering mentor for our campus transition students that are now running their own catering business. Our mentor gives our students feedback and training. This is valuable because it develops their skill set and even provides an opportunity for some to apply to work at a Paradise Bakery or Panera in their catering department. I'll write up our part two as soon as we have it!


Saturday, January 16, 2016

Easy Play Kitchen Accessibility Ideas

How many of our little ones have a play kitchen in their classroom or homes? Kitchens are a really fun creative imagination place for kids. It's also a great opportunity for independent living skills. A lot of times it can be limiting for our students especially those with very limited or no vision. Here's one that was in one of our classrooms. It's quality built and is fun....for kids with a lot of vision. I decided that this kitchen needed a definite upgrade so that our students with limited or no vision could play with better accessibility. These are quick fixes, easy to do! Just grab your glue gun and pipe cleaners and plan a trip to Goodwill. 

Play kitchen for preschool

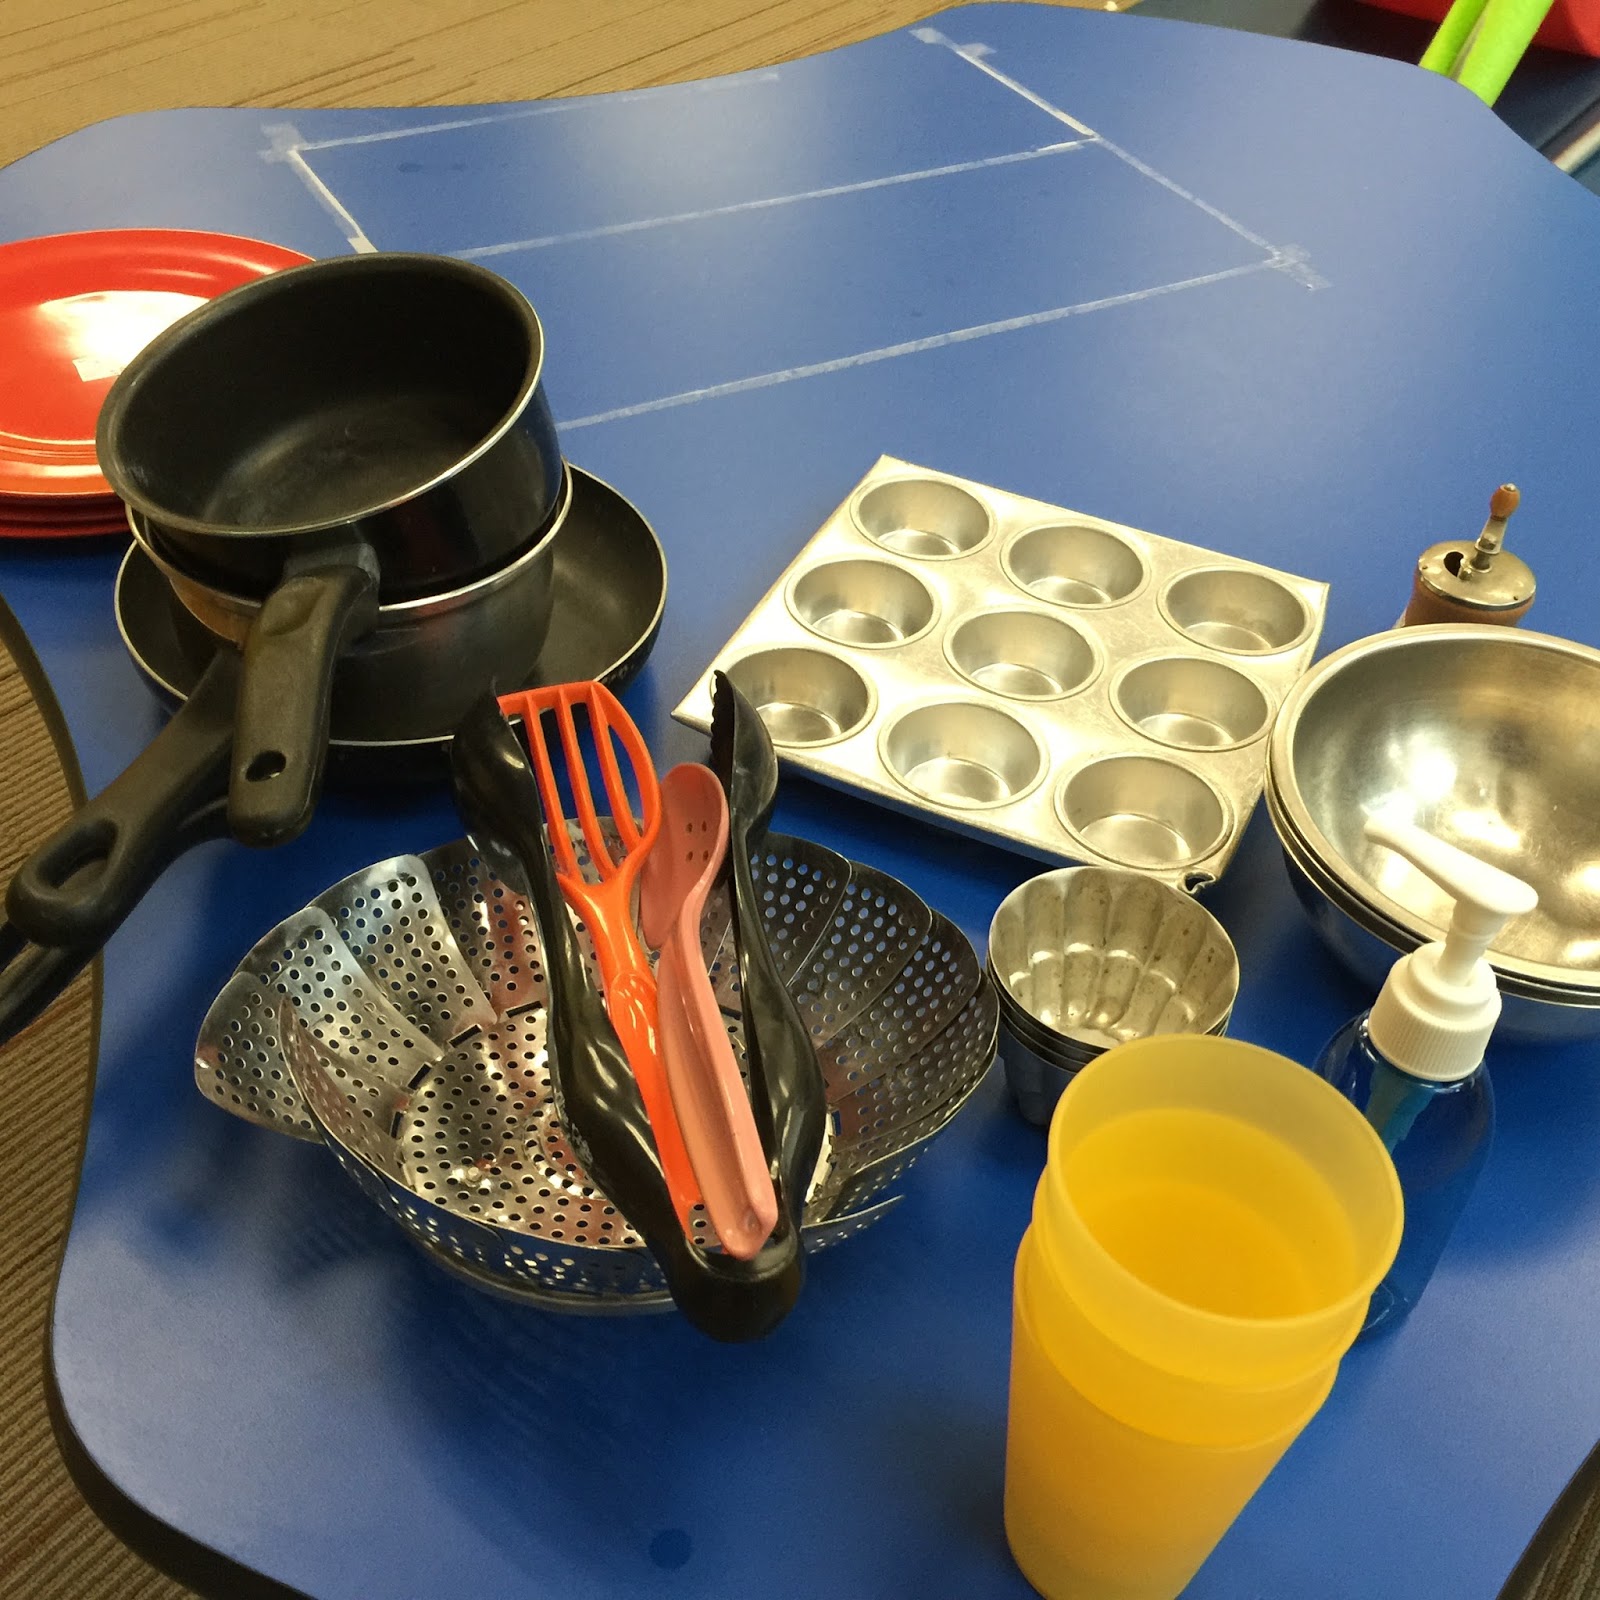
First, head to Goodwill and look though their kitchen section. I actually found most of these at a store called Deseret Industries (DI). Deseret Industries is similar to Goodwill or Savers. I had good luck there. I was able to find all kinds of interesting cooking utensils and tools. Check out the pic below. Note: the items in the picture are small little utensils, pans, etc. They are not full size at all.

I found all kinds of fun metal options. I like the metal because so many things are plastic and this gives some variety. My favorite find was the old school vegetable steamer. How fun to experience concepts like open/closed, empty/full, big/little, cause & effect and water play. I also found this tiny little pepper grinder. It was fun to replace the pepper with something else (i.e. scented sand) and let those little hands turn the crank. The little metal bowels and cupcake pans were fun, too.  Goodwills are also perfect places to find small sauce pans which are perfect for little hands to cook with! You can also find little soap dispensers, cups, slotted spoons and all kinds of options for kitchen fun.  
One of my talented preschool teachers, Annette, gave me a great idea to add to the kitchen: real food! As in boxes of rice, macaroni, etc. or cans of vegetables, soup, etc. Stock your kitchen with real items and then work them in to a lesson when possible! You can find a toaster (and obviously never plug it in!) and "cook" with toast during centers then during another time, cook real toast (or waffles) and eat it! You can also do letters (T for Toast!). 

But now back to the kitchen itself. How about those darn painted on burners? How do you cook on that?! Grab those pipe cleaners and heat up that hot glue gun!! I used some bold color pipe cleaners for my burners. I simply glued on the pipe cleaners (grab a craft stick or something that can help you press on the pipe cleaners. I totally burned my fingers off!). The next thing I did was grab some black pipe cleaners. The problem with this "stove" is that nothing is defined--not the burners, not the cooking space, nothing! This creates a problem when we develop concept development of what a stove actually is. The black pipe cleaners were used to actually make a defined stove top. The other part of our kitchen set that wasn't really defined was the oven. This was an easy fix thanks to my APH Carousel of Textures kit. I grabbed a silver shiny whole piece of paper and hot glued that to make my oven door pop. 

You can add more modifications if you would like but these quick fixes were enough to include all of our kiddos with vision impairments without a lot of hassle. The hot glue is also easy to take off in case your kitchen set needs to go to another teacher.  Let's get cooking!

Play kitchen for a blind kids classroom
Easy textures added to the play kitchen for kids  who are blind or have vision impairments

Thursday, March 26, 2015

Braille Kit for GE Electric Range

Hi friends,
I am going to share this press release that I read today. It's about a Braille kit (label system) that you can apply to the GE Artistry electric range.


Here's the press release:
LOUISVILLE, Ky. — March 19, 2015 — The simplicity of
GE’s Artistry™ Series of appliances—an affordable suite of appliances targeted to first-time homebuyers and Millennials—lends itself to a unique market segment: the visually impaired. Working with students from the Kentucky School for the Blind, GE engineers and designers in Louisville, Ky. developed an accessory kit of braille overlays for the new Artistry electric range controls that helps the visually impaired use its cooktop and oven functions.

According to an American Foundation for the Blind article, stoves are the least accessible class of appliances.1 Many ranges today have smooth, push buttons on a back control panel. The ADA-compliant Artistry range offers front-control knobs that are within reach, and a straightforward design that lends itself to a braille accessory kit for the blind or visually impaired.

“Both my parents taught special education,” says Lee Lagomarcino, a GE product manager who initially championed the project and observed Kentucky School for the Blind students interacting with ranges. “As we developed the Artistry electric range, we knew its simplicity made it more universally appealing and ideal for a braille application.”

The Kentucky School for the Blind helped GE engineers determine that a high, medium and low heat setting was needed for the cooktop.

Student input leads to product concept
Students from the Kentucky School for the Blind helped the GE team determine what was needed—a high, medium and low heat setting for the cooktop, and a low, 350 degree and broil option for the oven. With those readily accessible features to serve as a baseline, the oven can be adjusted to a recipe as needed.

A focus group of students at the school came up with ways to make ranges more user friendly—using puffy paint and brightly contrasting colors to showcase their ideas. GE took those ideas and turned them into the custom-designed Braille kit. Students also tested the initial designs for ease of use.

Kentucky School for the Blind Program Coordinator Paula Penrod said, “Many times, manufacturers will introduce a new product, then seek comments from consumers with disabilities. Consumers who are blind and visually impaired have unique needs when using appliances. By working with GE during the production stage, our students were able to demonstrate the type of Braille modifications that would be most helpful. We appreciate GE for seeking our students’ input on the front end of GE’s Artistry range project.”

As a thank you to the Kentucky School for the Blind and its students for their help, GE donated a full suite of Artistry kitchen appliances to the school’s campus on Frankfurt Avenue in Louisville, Ky.

Pricing and availability
The GE Artistry electric ranges and Braille kits are available in black and white and can be purchased nationwide where GE appliances are sold. For help locating a dealer, go to
www.GEAppliances.com and use the Dealer Locator tool or call the GE Answer Center at 1-800-626-2000. The estimated retail price of the Artistry electric range is $599, and the braille kit is $15.75.* (Retailers - Pub number 4-A034 fits the black Artistry range model ABS45DFBS, and pub number 4-A024 fits the white Artistry range model ABS45DFWS.)

In addition to the braille kits for ranges, GE offers a standard braille kit for common buttons on its microwave ovens. The kit (pub number 4-A212) can be ordered where GE appliances are sold.

GE Appliances
GE Appliances is at the forefront of building innovative, energy-efficient appliances that improve people’s lives. GE Appliances’ products include refrigerators, freezers, cooking products, dishwashers, washers, dryers, air conditioners, water filtration systems and water heaters. General Electric (NYSE: GE) works on things that matter to build a world that works better. For more information on GE Appliances, visit
www.GEAppliances.com.

1. As a group, stoves are the least accessible class of appliances we evaluated. The vast majority have flat, inaccessible oven controls. – American Foundation for the Blind
http://www.afb.org/section.aspx?FolderID=2&SectionID=4&TopicID=380&DocumentID=4218
* Retailers set their own prices.

Categories:
Ranges, Wall Ovens, Cooktops

Tuesday, August 20, 2013

Let's get cooking again: Monkey Bread

My kids and I do a "mom activity" once a week. I found a fun recipe for pizza monkey bread. As we were making it, I realized that this would be a great post for a new Recipe Renovation! I liked it for several reasons--it involves multiple steps for cooking, the feel of different types of textures, nice contrast, utilizes the oven and when using reduced fat cheese, turkey pepperoni and adding in veggies, it's a healthy tasty meal! Thanks to my sweet kids who are the stars of this post! I also repinned the original idea on my Pinterest boad, This works for Blind kids, too!

The ingredients: reduced fat mozzarella cheese, spaghetti sauce, Grands biscuits (we did this again and used smaller, thinner biscuits and it was even more yummy), turkey pepperoni and cut up red and orange peppers. Feel free to add in your ingredients!

We put the dough in the fridge until we were absolutely ready for it. Discuss the feeling of it being cold for younger kiddos. We "thinned out" the dough by pulling on it. 


Build your pizza! We used three ingredients aka a three step sequence (perfect for kiddos that are MIVI/DB). If  your child cannot hold the dough in their hands, grab a plain colored place mat and have them work on it there (or their tray if in a wheelchair). 


Proof that even though it looks pretty on Pinterest doesn't mean it looks so pretty in real life!


Roll ingredients into a pocket. The second time around we experimented by just making it into a ball and that worked too. You just need it to be sealed. This is a good time to work on those pinching fine motor skills. 


I helped place it in the pan. We used a bundt pan to make the "monkey bread" layout but we also experimented with making balls and putting them in a regular glass pan. That worked too!

I sprinkled some cheese and Mrs. Dash on top before we put in the oven. 

It's okay if you have a kiddo that needs a bit of help to do this. Your rule of thumb as parent or teacher is to make sure that you are not doing everything. Remember the 80/20 rule: They do at least 80% of the work (that includes initiating the steps) and you do 20%. My kids' age range is 5-9 so it's a good mix for kids to do. We did this a second time and we had high school students cook with us. It's perfect for any age!!


Tuesday, June 25, 2013

Salad-Tastic!


Hi Friends, I am back from vacation! I went out west to Utah and Jackson Hole and....I....LOVED....it! It was a blast to be back on the west coast! It was also super fun to surprise my mom!! She had no idea that I was stopping by for a visit. She thought she had to sign for a package so imagine her surprise when she hears my not-so-quiet voice booming across her dining hall!

Anyways, I got to thinking that it's been awhile since I have blogged about a good Recipe Renovation. I had an idea while preparing dinner the other night about how fantastic salads are for cooking projects!! Salads come in great varieties, can be big or small and can be customized to fit anyone's kitchen skill repertoire. My other win-win of salad making is that it is a healthy choice and doesn't usually require the use of a stove, microwave or oven.

A few of my fave ideas for salads:
The Waldorf Salad (a great mix of grapes, yogurt, apples and cranberries). Perfect for the "non veggie" salad kind of kid. You can hit up allrecipes.com for some great ideas on Waldorf salads. 

The pasta salad--okay, I know I said no stove but this one is for the more experienced chef. I found tons of super easy pasta salad ideas from kraft.com. Simple recipes that include basic stove skills--great for the  student who needs intro to cooking skills!


Seven Layer Salad Recipe for ChristmasThe Seven Layer salad. I actually thought this one would be fun for kids because I thought they might get a kick out of making the layers. Plus the layered salads can be easy for some students because they are quite prescribed as you need only do one layer at a time. 

Mini fruit salad cornucopia... cute idea for summer parties!I loved this idea! Now, make sure you cut yourself some slack and realize that your kid might not make it this pretty. I just thought the cone idea (maybe even with some yogurt) would be fun for kids. You can also make fruit salad in a bowl. This is also a great idea as an alternative for dessert!

The other fabulous part of salad making is that if you allow your kiddo to go to the grocery store to buy ingredients, it allows them to explore an area that is quite hands on. Salad making utilizes kitchen skills that can go from basic---just mix and serve to using slicing, peeling and mixing skills (even cooking if you prepare pasta or chicken). If you are teaching a life skills class, have the students do a salad taste off and let them prepare then sample a variety of salads (then vote on students favorite). It's a simple skill that can work as a side dish or a main dish. How cool is it if your kid prepares the salad for the next family BBQ? It would be great to see our kids preparing something other than brownies (healthy too!!)