Showing posts with label MIVI/DB. Show all posts

Thursday, May 16, 2019

ECC PTA

a flier with the text: AAC & ME?! with information for the ECC PTA on this topic

Join us for our May ECC PTA on Tuesday, May 21! This month our topic is learning all about augmentative and alternative communication better known as AAC for students with multiple impairments and blindness. This is another free meeting for our parents, related servers and teachers. We are very happy to have Breana Cannon as our special guest presenter. Breana is a speech language pathologist and also serves on our augmentative communication team. She has a fantastic understanding of  students with multiple impairments. Read this post late? No worries! You didn't miss out. You can still access the recorded webinar by registering:  https://docs.google.com/forms/d/e/1FAIpQLSdMdsZtaqYrpVrGtpHxt7uNKSo6aWBIUqw9ozkyR1Z4wkX_dQ/viewform?usp=sf_link

Friday, March 22, 2019

ECC Assessments


Hello friends!
Did you think I quit writing here on The Bee? I didn't!! I've just been busy on my social media accounts, 9MoreThanCore and developing SO many new programs. It's been busy and I have felt awful that I have neglected The Bee. Have no fear, I am here!!

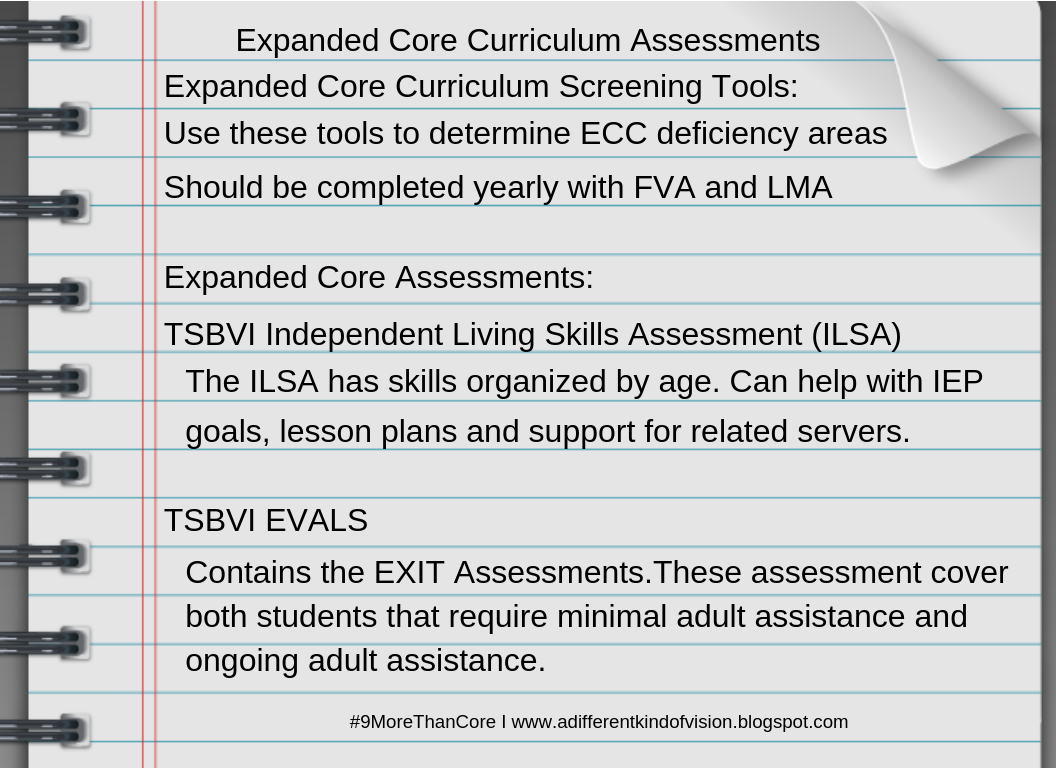
I find that many teachers are unsure about using ECC assessments. I whipped up a little image to help you see what assessments you should be using for the Expanded Core.

First, you need a screening tool. There are a handful of awesome ones that I love.
Here's a few links to some great screening tools:
The first one comes from the site EA Rubrics under the supervision of Dr. Karen Blankenship. Save this link because it has a ton of great resources for teachers of students with vision impairments: http://earubric-001-site1.mysitepanel.net/ecc-needs-assessment/
The other site is another treasure of items. It's Teaching the Visually Impaired by Carmen Willing. She has a really nice organized ECC Screening Tool: https://www.teachingvisuallyimpaired.com/ecc.html. I recommended becoming a member of her site. She has a lot of great resources.

Dr. Karen Blankenship advises all teachers of students with vision impairments to complete all three--FVA, LMA and ECC Screening Tool on a yearly basis. Many teachers are unaware of the resources that we have for ECC Assessments.  Our resources cover birth-21 and include students with additional disabilities. There truly is something for everyone! I encourage all my teachers, both itinerant and classroom to make sure they have access to EVALS. The EVALS kit includes the Independent Living Skills Assessment, Basic Skills Infused Skills Assessment, EXIT Assessment and  the EVALS ECC areas such as pre-Braille.  It can be purchased from TSBVI: https://www.tsbvi.edu/curriculum-a-publications/3/1030-evals-evaluating-visually-impaired-students.

Make sure you are completing the appropriate ECC assessment for your students and utilizing these awesome tools!
Happy ECC-ing!


Friday, December 1, 2017

Teach ECC Using a Daily School Schedule


Hi friends! I wanted to share an easy way to teach the Expanded Core Curriculum: use the daily school schedule! This gem of an idea comes from our talented preschool teacher, Sandra. I was visiting her classroom and saw her fantastic display. I saw her daily schedule and immediately started seeing ECC areas popping out everywhere!
[Picture #1 description: a daily schedule in the formation of two Braille cells. Each dot position has a print and object to represent a part of the day. ]

Check out the close up pictures of the Braille cell formation schedule.  Each dot position has a tactile object, large print and Braille. 


This daily schedule chart is oozing preschool to early elementary ECC concepts! Don't think that this is just a daily schedule. It is an easy way to embed ECC instruction.
 Here's just a quick overview of ECC areas that are covered by this schedule:
compensatory skill areas (more than just the Braille formation, think about concept development, organization, etc.)
career education (following a schedule, the chore chart, etc.)
ILS (time management, responding to the cue with the appropriate action)
orientation & mobility (spatial skills development; knowing the location of the center or activity)
recreation & leisure (following rules--you have to know how to follow rules when playing or participating in a recreation activity)
social interaction skills: the social discussion of what is happening during the day, turn taking)
self-determination (identifying what they can participate in; seeing how they are part of activities)
assistive technology (students can use low tech devices and pre-concept techniques for accessing information)
sensory efficiency (using all senses for concept development. I also want to point out the contrast that Sandra used. It is not a visually complex schedule for students to look at.)


Check out the accompanying chore chart. Chore charts are not unusual in classrooms. This teaches career education. I always want to encourage teachers to use chore charts and assign meaningful chores for students to do. This helps with concept development and foundation career skills. 

I love sharing easy ways where ECC skills occur naturally. That's the key to ECC instruction: find routines where ECC skills naturally occur or are naturally embedded. Hope this makes you think twice about using a daily school schedule!


Saturday, November 25, 2017

CVI Supplies at Dollar Tree Holiday 2017


It is not a secret that now is the time to buy CVI supplies such as Christmas lights, garland, tinsel, ornaments, etc. I have blogged about it myself for years to buy up these hot items (and then go back again at Valentine's Day for more!!). I was at Dollar Tree again and saw the new displays of holiday decorations and thought I would share some sweet buys from this season. I also wanted to share some important tips for using these decorations without overwhelming your student. 
Let's get started:
  • Most important:  how to keep your decorations meaningful for vision. The old saying KISS comes into play here. Keep It Simple for Students. Know your student's what and where vision. This means what can they see (color, shape, 2D vs 3D, etc.) and where can they see it (peripheral, central, left or right/up and or down). 
  • Environment matters: This may be old hat to some of you but if you are new or unfamiliar to CVI, always remember that the environment matters. This means to have contrast (black background always works so that the decoration shows up nice without visual clutter). Other important factors are sound, lighting, etc. Some students simply cannot tolerate a cluttered background (includes sounds, smells and visual items). 
  • Work in items gradually and then just wait and I mean WAIT! Present the decorations and then just let your student see the item.
Every year Dollar Tree puts out awesome holiday items. 
Here's this year's top picks for CVI this year:
(below picture is a rack of garland, ornaments, ribbon and snowman in traditional holiday colors)
The ornaments are good (I prefer going for the shatterproof ones at Michael's or Joann on sale). You can hang them in a variety of ways to catch your student's attention. I really like the garland! It is shiny, has fun movement and has good color. Don't discount the snowman either! They have fun texture, contrast and you can add lights. 


Picture (image description: lots of different holiday ribbons and bows in traditional holiday colors).
These curler ribbons and bows are totally a hit! You can pull at them or lace some bells or other fun toys on them and they are tough to destroy. I like the standard bows and add magnets to them. You can use a cookie sheet (also can be purchased from Dollar Tree) to do fun activities (see my last year post on Christmas/holiday activities: http://adifferentkindofvision.blogspot.com/2016/12/easy-accessible-christmas-activities.html). 

Picture (image description: shiny silver buckets, plates, for food display). 
I included this one because these platters, buckets, etc. are so fun to reflect light or even act as a mirror. Most people usually stick with the traditional holiday color/decorations but miss the silver mirror type objects. They are awesome accessory pieces!


I wanted to include the garland again because it is such a fun hit. All four of these colors: silver, red, gold and green, work together so nicely. The gold and silver provide a nice contrast to the red and green. Red is a fave CVI color but I also want to encourage you to try green. Green has been an increasingly great color with so many of my CVI students. This garland is pretty thick though so if you are thinking of using it to hang other items, keep an eye out. Your object must be larger than the garland. 

A few other items that I like are:
  • the cookie tins (wrap them in shiny wrapping paper and put things inside to shake for sound). 
  • wrapping paper (pick the shiny kind!)
  • holiday leaves and decorations like poinsettia (they are just fun textures--watch for choking). 
I also recommend hitting up the coupons from Joann and Michael's. Joann coupon deals for fabric are top notch. I like to buy velvet or fur (you can get it in black!). I use it as a big mat/blanket for students to lay on or as a background. I have bought a TON of of ribbon in a variety of textures and colors from Michael's. There are so many activities to make with ribbon (both super fat width, normal and a little wide). 

Have some fun holiday fun!! 
Check out my post from last year that has a ton of fun holiday activities: http://adifferentkindofvision.blogspot.com/2016/12/easy-accessible-christmas-activities.html


Sunday, April 30, 2017

Joystick Tactile Object Attachment for Tactile Calendar System


A long time ago I posted about this awesome assistive technology lady, Therese Willkomm, who did this great workshop on easy assistive technology solutions. I only got to see half of her presentation and always wished I could have learned more. As luck would have it, several years later I find myself enrolled in Therese's Assistive Technology Solutions in Minutes class through Perkins e-learning series. I highly recommend this class!
Each week we learn about all kinds of fun things--adhesives, PVC, corrugated plastics, etc and we build and share our new ideas. This past week we learned about instamorph and I am in love! 
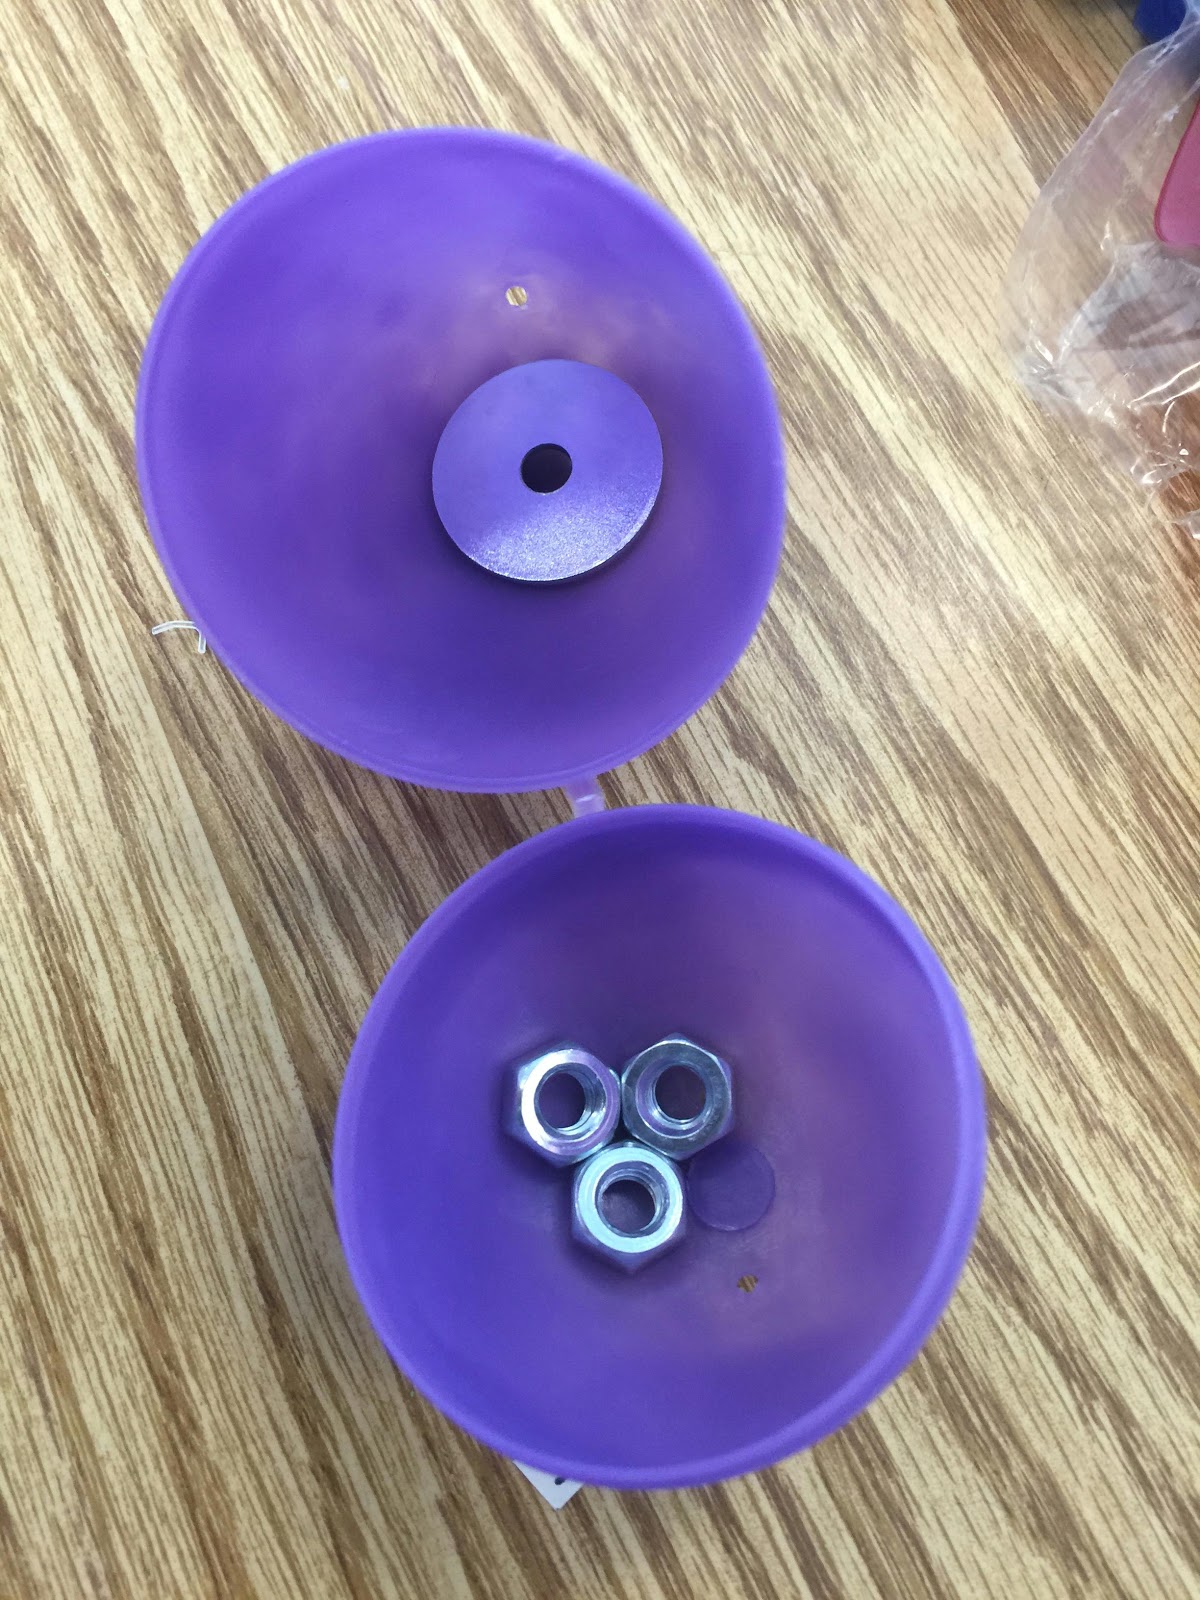
I am excited about this idea that I camp up with (thanks to the class): it's a joystick attachment for calendar object symbols. 
I have several students that have a goal of grasping items in their hands. We have some joystick switches that work with our switch adapted toys. Unfortunately, we haven't been able to expand options for giving our students meaningful ways of grasping things. Many of my students use calendar object systems but they are limited because grasping their objects is difficult. We can use eye gaze but that doesn't work for students who have significant vision loss. 
I wanted to find a way to make a more meaningful joystick for students other than with toys. I combined the joystick with the calendar object system.  I used the APH Tactile Connections Kit for this project.
You can buy Instamorph at several places including Michael's and Amazon. It dries white but you can buy colored pellets to add color to it. You can grab a good size bag for about $20. It's totally reusable (about 6 different times to reuse for best uses) and you can make stuff in a snap. 

Here's the How To:
First, start with your original symbol. This is the music symbol for one of my students. 

 I took apart the symbol, grabbed two strong magnets and got to work with the Instamorph.

 I flipped the symbol foundation (the green thing you see) over and glued the magnet to the bottom.

I used my Instamorph and molded it into a joystick and made sure that I flattened the bottom so that I could Gorilla Glue it to the magnet.


It worked! I hovered the magnet joystick over the symbol (with the magnet on the bottom) and it instantly magnetized. Now my student can practice grasping things in a meaningful way and can make choices using their object calendar system. 

Improvement to be made: I will find thinner magnets for the back side OR make sure I put a piece of foam so that the symbol isn't slanted.
Of course you will have to modify based on your calendar system items. I actually did several more for my students. 
Now I can really work on two different goals with students easier: 1) grasping in a meaningful way and 2) encouraging students to make choices. Remember to go at the students' pace and teach/reinforce/practice a lot so that they get the meaningful piece of this.
Resources for calendar object systems:
Calendar Boxes and Schedule Systems as Literacy Tools
Check back to my other posts on calendar systems because I have posted several times about them in the past. 


Tuesday, November 1, 2016

Braille Sundae


I was hanging in one of our preschool classes with my new fave preschool teacher, Annie, to co-teach with her. She had a fun lesson for dipping apples into different toppings. We did a quick brainstorm and turned her lesson into a Braille lesson with a few quick changes. Next thing we know, we have this fun ECC lesson and are making Braille sundaes. 

Annie's lesson started like this:

And became an Expanded Core Curriculum lesson:
We added an APH tray (any tray will do though) and arrange the toppings into a Braille cell. 
Easy update!
For instruction, we reviewed the Braille cell and the corresponding numbers. 
For example, (look at the picture above), the chocolate chips are "dot one", the caramel sauce is "dot 2", etc.  
Students took turns selecting toppings but had to request it by the number (to teach the number configuration of a Braille cell). It was a success! The students did great requesting using the dot numbers. For example,  "dot 6, sprinkles".We did a quick but direct instruction on the Braille cell to set the students up for success in the lesson. 
This wasn't just a Braille lesson though. We incorporated much of the Expanded Core, too! 
We addressed other areas of the ECC such as:
Independent Living Skills: cooking skills at the preschool level
Orientation & mobility: positional concepts 
Self-determination: making choices, trying new things and making opinions about them
Social skills: turn taking, eating etiquette and conversation.

These were the areas that also received special instruction during this Braille lesson. We had each of these areas in mind during instruction (that's the secret to implementing ECC!). This was a preschool lesson so the whole lesson was about 30-35 minutes. My favorite part: listening to these sweet little preschoolers request their toppings using it as a Braille cell ("dot 2, caramel sauce!"). 


Friday, July 29, 2016

Communication Desk for Students with Multiple Impairments


It's almost time to get back to school! If you are a teacher of a student with a multiple impairment including deafblindness or blindness, you need to read this!!
Communication is at the very top of my priority list when it comes to being a teacher. Our kiddos need consistent opportunities for expressive and receptive communication. The second priority on my instruction list is creating defined spaces. Defined spaces allow our students to be anchored in space/environment/body and then sets the framework for anticipation.  

If you are unsure on how to use a calendar box system, read these articles:

The student communication desk idea follows tactual symbols/calendar box system strategy and using a defines space. The students that use these desks that are pictures are those with multiple impairments or show Autistic like behaviors and have significant vision impairments. All of the students are non-verbal. 

The teacher has done a terrific job of implementing tactual/object symbols for instruction. She was stumped because using a traditional finished box was not working. We needed to find a solution that would help students establish that a concept/lesson/symbol was finished but wouldn't fly away (if thrown) and was unique enough that they could comprehend "finished". 
Solution: The object symbols (routine for the day) are laid out across on top. The blue or red felt area that is perpendicular is the finished area. Notice that it is a defined area that is unique. It is a clearly defined finished area. Students place finished symbols on the felt area. These two areas teach spatial awareness (across and top/bottom), literacy (left to right, reading symbols) and self determination (students make choices and can communicate based on the location of the symbols) and communication. 


The student communication desk also teaches compensatory skills including communication and reading their name by tactually identifying their desk (notice the symbol placed at the bottom right of the desk and on their chair). 

Their academic piece as well as any career ed/work for reward also follows a consistent communication system. Notice the discreet trial training boards (penny boards) that have each students' unique symbol. 

Note: We placed their boards and binders on the desk for the purpose of this picture. All of these items may be on the desk at one time depending on activity. It is important to note that each of these items have a specific and consistent placement for students. 


I can't reiterate enough that knowledge is key for using the communication desk idea. You must have knowledge of calendar box systems, creating tactual symbols and communication strategies. There are some terrific articles out there about incorporating, implementing and standardizing tactual symbols for students with vision impairments. Here is one that I really like from Paths to Literacy.
The tactual symbols pictured were created from the APH Tactile Connections Kit. It's a quality kit that can be purchased on quota funds via APH. Make sure you have a quality hot glue gun and hook & loop (Velcro, too!). Always remember that symbols should be easy to replicate (always save extra fabric or duplicates of object). Symbols can be eaten, slobbered on and tossed in a heartbeat. 


I love this desk idea especially for our nonverbal students that do not use a complex communication system. You can build on these symbols and concepts. I love that this teacher uses consistency for the students. And yes, it does implement Expanded Core Curriculum objectives!!

Friday, March 18, 2016

Sensory Easter Eggs

Have some sensory fun with Easter eggs this year! I ordered beeping Easter eggs and had a fun hunt with my students but I got to thinking about some of my other students that thrive with more sensory input. I bought textures, items for weightand some cellophane to make these fun eggs. My students loved them!  I made sure to leave little tabs on certain eggs like the ones with cellophane so that my students could flick the ends as well. There are so many options!  I also made a few matching eggs so that we could later do a match game. It was also fun to think outside of the box and use other items such as rubber bands to create interesting texture. It was a hit! You can easily use good old standbys like rice and beans to fill eggs. I also used nuts and washers from the tool section for weight. Bells are always fun, too! All of my students really liked making them and it nicely includes my more severe students. Happy Easter!!
Sensory Easter Eggs
different textures that allow blind kids to have a variety of sensory Easter eggs
Sensory Easter eggs
lots of sensory ideas inside the Easter eggs
Easter eggs for kids with Cortical Vision Impairment

Tuesday, February 23, 2016

Communication Symbol System

I was hanging out one day in our school and I found some really old stuff like floppy disk and these diskette binder sheets. I looked at these sheets and inspiration struck!! I didn't have any disks hanging around but I did have some binders. 

I serve on our school augmentative assistive tech team. I love it because I learn so much collaborating with some brilliant minds. A colleague on my augmentative team taught me about using partner assisted scanning-PODD (check out the video about this later in this post). 

I have students that have severe multiple impairments that I want to engage using calendar box systems. They all have wonderful interveners. These students are at the basic level of using symbols. Most of my students in this situation have CVI. I think using the partner assisted scanning system is a great fit for several of them. I came up with this binder symbol idea to help prepare them to use the partner assisted scanning technique and to incorporate  more language (using symbols) into daily routines. Enter the diskette binder sheets!!
**The pictures are from a prototype trial. You could easily use a different color binder. White may not be the right color binder background**

Communication system for blind kids
Here's the "how to":
1. Make symbols using pictures, real symbols or a combination of both. The real object symbols are helpful for basic level students because it allows the tactual feel to the picture. Consult your CVI matrix to help with progressing student to picture only. 
2. I like arranging the pictures landscape. The pictures in this post are portrait because it was a better fit for the particular student. 
3. Place velcro on the front of each pocket (this allows you place the symbol on the outside/front of the pocket). I would discourage your from keeping the pictures inside the pockets because it washes out the symbol. (See both above and below pictures).
4. The goal is to use the binder symbol system to train the student to look at choices and then to make them. They are placed at opposite corners on purpose. The opposite corners are to help with identifying a clear choice for students (if placed too close together, it could potentially be too difficult for the adult to interpret the choice). 
5. Use blank disk sheets for instruction. As you can see from the pictures, it is visually confusing to place choices (in front) with the other symbols in the pockets (see example picture below). I included this picture to point out this confusion. 

Binder communication system for blind kids

Here are some examples of the real object symbols. The top picture is the student's Eagle Eyes symbols. We were lucky to get the actual wiring that is used. The bottom picture is for the weekly music therapy. The black background is an excellent visual choice for the symbols.

communication cards for blind kids

Check out the partner assisted scanning technique. I have watched several YouTube videos on this and this is a great one for our students. If you watch other videos, you can see that this strategy can bring a lot of language to use. The students learn the system and can anticipate where the pictures are. The binder symbol system is a very basic way to pre-teach the skills needed to advance to the partner assisted scanning technique. Students may just keep working at the binder symbol system level as well. 


Thursday, July 23, 2015

Book Ring Object Cards

Are you an intervener or para on the go that struggles with carrying all your object cards? It's tough to be a jack of all trades when you are in these roles. You have to sign or physically prompt, support the student and get the object into position to use. It's a lot of work!

I was visiting one of my classrooms where I saw this great little idea: object cards on book rings. Now I know that isn't anything unusual. Many people put object cards on book rings. But let me share with you why I thought this was a fun idea to share. This idea belongs to an awesome intervener, Angel, who let me take pics and share. She puts her student's cards on her keychain strap thing--can't describe it well (see the black loop in the picture) when they are on the move.  Angel needs two hands when she is working and she needs her object cards quick because attention spans can be like a blink of an eye. 


In case you are new to object cards maintenance, first thing is to laminate your cards first! Drool, dropping them in water, etc. is a likely situation not to mention crumpling, attempts at tearing and just general wear and tear. After lamination, punch a hole in the corner. 


I like the key ring set up that Angel uses (see below). By using the latch (as opposed to a traditional key ring), she can quickly load up her cards for each activity when they are on the move. Plus the latch allows doesn't destroy the card. She also uses book rings as opposed to key rings. Book rings have a quick open-and-shut feature that is also secure. You can purchase book rings from a variety of places such as Staples for about $4-5 a box. The other thing to notice is that she doesn't put all her object cards just on one ring. She has multiple rings so each card gets its on place. That's smart because she can use her cards in isolation or have them ready for a sequence.
 

Below is another view of her on the go object cards: 


Saturday, June 13, 2015

Sensory Bin--Touch & Find Play


How about some summer sensory fun?
 I snagged this idea while I was visiting one of our classrooms for children with multiple impairments. The idea is sweet: it's a simple Rubbermaid bin with lid that has two holes cut into it. Foam padding was added so little arms can't get cut on the edges. Easy peasy to whip up! I got this idea from a colleague, Coy Clawson, who told me that it takes no time to make this. 
 I liked the versatility behind this. He had packing peanuts inside his with items to tactually search out. Can you imagine the possibilities? I also got to thinking that this would be a great activity that was inclusive for siblings, friends, family/church BBQs where our kids could play a game that would be interesting for all. You could see who could find the most objects in one minute. 
You could make this an academic skill by providing the student a tactual/picture list of items to find. They can do some matching to the list. You could easily switch out the different textures to search through as well. I also liked the fact that the visual complexity is reduced. Sometimes when we have sensory bins, our kids look into a large bin of items. The black lid eliminates a lot of the complexity. You could also do a little O&M training by discussing the layout (side to side) or you could flip it vertical to have a top and bottom; other spatial concepts such as inside/outside, top/bottom, empty/full are also in the mix. 

Fill these tubs with whatever you would like! You can do random items (with a match list like I suggested before) or you could do themes (all kitchen items, summer toys, etc.). This is great for our kiddos with multiple impairments and our early childhood little ones. 
I wonder if you could even add a few other holes of different sizes (on a different lid) and use dowels. Reverse the idea of looking for things inside and use it as a giant peg board?  You could make another lid with a Braille cell and have some fun with Braille...
Ooohhh....I like the possibilities! Have fun!!