Showing posts with label Technology. Show all posts

Sunday, June 5, 2016

Disney Movies Anywhere Includes Descriptive Audio Accessibility

Hello accessibility for our kiddos with the Disney Movies Anywhere App! 
This app has a built in feature that allows for audio descriptive service on many of Disney's movies and Pixar, too! 
How cool is that?! I love that major companies such as Disney are thinking about accessibility for our  community. This isn't the first time that Disney has had audio descriptive services. I blogged about this awhile back when I discovered it while watching a Disney movie with my kids. 
I found a few really good articles about this. Check this one out from The Audio Descriptive Project:

In case you are not super tech savvy, I found this great little video posted by Wonderbaby.org on YouTube. It shows how easy the app is to use. 


I want to encourage families, teachers and students to continue to blog, Pin, share, etc. about when companies do these things for our community. Blindness and vision impairment is a small but AWESOME community and people can easily not understand the unique needs of our people. The audio description on these movies is playful and cute---perfect for young ears listening to the movies.  Different people may make these things happen so I definitely support everyone who makes accessibility happen for our community. Let's continue to support and recognize the advancement of accessibility for people with vision impairments!

Thursday, February 27, 2014

Boy Inventor Makes a Braille Embosser Out of Legos

This 12 year old inventor made a Braille embosser (printer) out of Legos! Cool, huh? 

He decided to offer up the directions via YouTube. Check parts one and two out:
Part One: 

Part Two: 

Wednesday, October 2, 2013

Join Me!

This particular post isn't going to be groundbreaking to those of you seasoned TVIs but it was new to me so I thought I would still give it a share. I don't spend a lot of time in the classroom with academic subjects but I am fascinated by the SmartBoard. It's a nice teaching tool but it can be tricky for our kids. Enter the iPad and the Join Me app. The iPad has completely helped our kids access a ton of material and linked with the Join Me app, it allows our kids to access the SmartBoard with ease. The general ed teacher needs to download the app and give the student the passwork/log in information. Join Me allows the iPad to display the SmartBoard display. I spoke to several TVIs and they commented that Join Me is simple to use and several of their students were taking advantage of it. I did look up some articles specific to our kids using it. Here's what I found: http://support.sas.com/misc/accessibility/education/ios/smartboard.html. This article has a one time use of Join Me but from what I understand, you can reuse your password with the teacher. Now is a good time for my personal disclaimer that I am not a guru at AT. But nevertheless, I wanted to post about this cool app that truly does make being in the general ed classroom one step easier.


Tuesday, August 27, 2013

Back to School Blitz: Day Two

Today's post comes from Dennis Gallant, Rehabilitation Technologist, about important tips for technology. He shared with me his "top tech tips" for returning back to school. Thanks Dennis!

Tech tips for going back to school

For those of you who have any electronic equipment, for use at home or school, be sure to turn on all your devices to make sure they all work properly before school starts

For those of you who have electronic notetaker’s, don’t forget to clear out old files from last year and create new folders for this year’s classes

Be sure you know where the power cords are for all your electronic devices and have all your equipment fully charged for your first day of school

Review how to use any important functions of all your equipment, which you may have forgotten about over the summer, so you are ready to go when school begins

Gather together any tech support phone numbers that you might need to assist you if you have trouble with any electronic equipment at the beginning of school

Be prepared to discuss with teachers and students the capabilities of any devices you are using, and if asked, you may wish to demonstrate how you use the device in class to help you meet your educational goals.

Gather together any helpful items such as 20/20 pens, handheld magnifiers, work lights, or extra dark lined paper that you have found useful in the past and might need again this year.

Have your classroom schedule in a form, Braille, large print, or audio that you can easily read to be as independent as possible.

Sunday, August 4, 2013

Amazing iPhone app!


Hey friends, 
Last Friday I got an email from one of my fave TVIs, Kate Katulak, about an amazing iPhone app. Kate is blind herself so she knows first hand about what's gonna work and not work with technology. She sent us this email and as soon as I finished reading it, I immediately asked her if I could blog what she emailed. She said YES and we all benefit!

From Kate:
Hi all,
Over the 12 years I’ve been blind I’ve discovered a handful of accommodations that have been life changing for me to some degree—my cane and guide dog, accessible computers, my iPhone, and now the Tap Tap See application.

Tap Tap See is an iDevice application designed for people with visual impairments that describes (with incredible accuracy and detail) people and objects at the snap of the camera. Since yesterday when I downloaded the app, it has described such things as:

· The menu (with prices) at a restaurant and the amount of my final bill
· The brand name and item title of several products around my home
· The prints, color, style, and shape of much of my wardrobe
· My “black Labrador retriever service animal with harness”

Not impressed yet? Imagine my colleagues surprise when I complimented the “blue and white striped sleeveless shirt with a collar” she was wearing after I took a quick pic of her with the app (it even told me she was female!).

Some of you I’m emailing because you or someone you know might benefit from the application as I have. Others I’m emailing because this is incredibly cool and I think you’ll appreciate hearing about it. J

For more information visit
https://itunes.apple.com/us/app/taptapsee-blind-visually-impaired/id567635020?mt=8
Though I don’t feel this video quite does the application justice, here is a link to watch someone using it
http://www.youtube.com/watch?v=Cd4SPDUfJ-A (Robbin embedded the video to this post).
Enjoy!
Kate

Wednesday, February 6, 2013

News & A little break for this Bee


Hi friends,
I am sorry that I haven't posted this past week. My big news is that I am getting married (tomorrow actually)! Yay me!! That means that this Bee is on vacation for a few days. I couldn't just leave you hanging though. A colleague, Matt, at work sent around information about the Braille Touch app. It has been released and is available in the app store.  The free version is very limited but gives you a good idea of how it feels to use the app. The upgraded version ($14.99) allows you to email, text, tweet or copy and paste what you type. Matt has found the app to be very intuitive and faster than the QUERTY Keyboard. Also, when using the app with Voiceover, you don’t need to double tap the keys. 


One of his Braille reading students tried it out today and loved it. The student even figured out how to type on it almost instantaneously (before hehad even finished explaining it to her). Pretty cool, huh? Thanks Matt for the tip!!

Sunday, October 28, 2012

AT Resource Find

This may be one of several posts since I am off work tomorrow due to the hurricane. I've got lots to catch up on with you--missed you! I was stopped the other day by one of my fab TVI colleagues and she was raving about this AT workshop she attended. She told me that I would have loved the presentation as the  woman was a hoot and had the best little ideas. I want to create a league of us creative ones and come up with our own "Avengers". Wouldn't that be so fun? A resource pool of all of us. Just a side note....

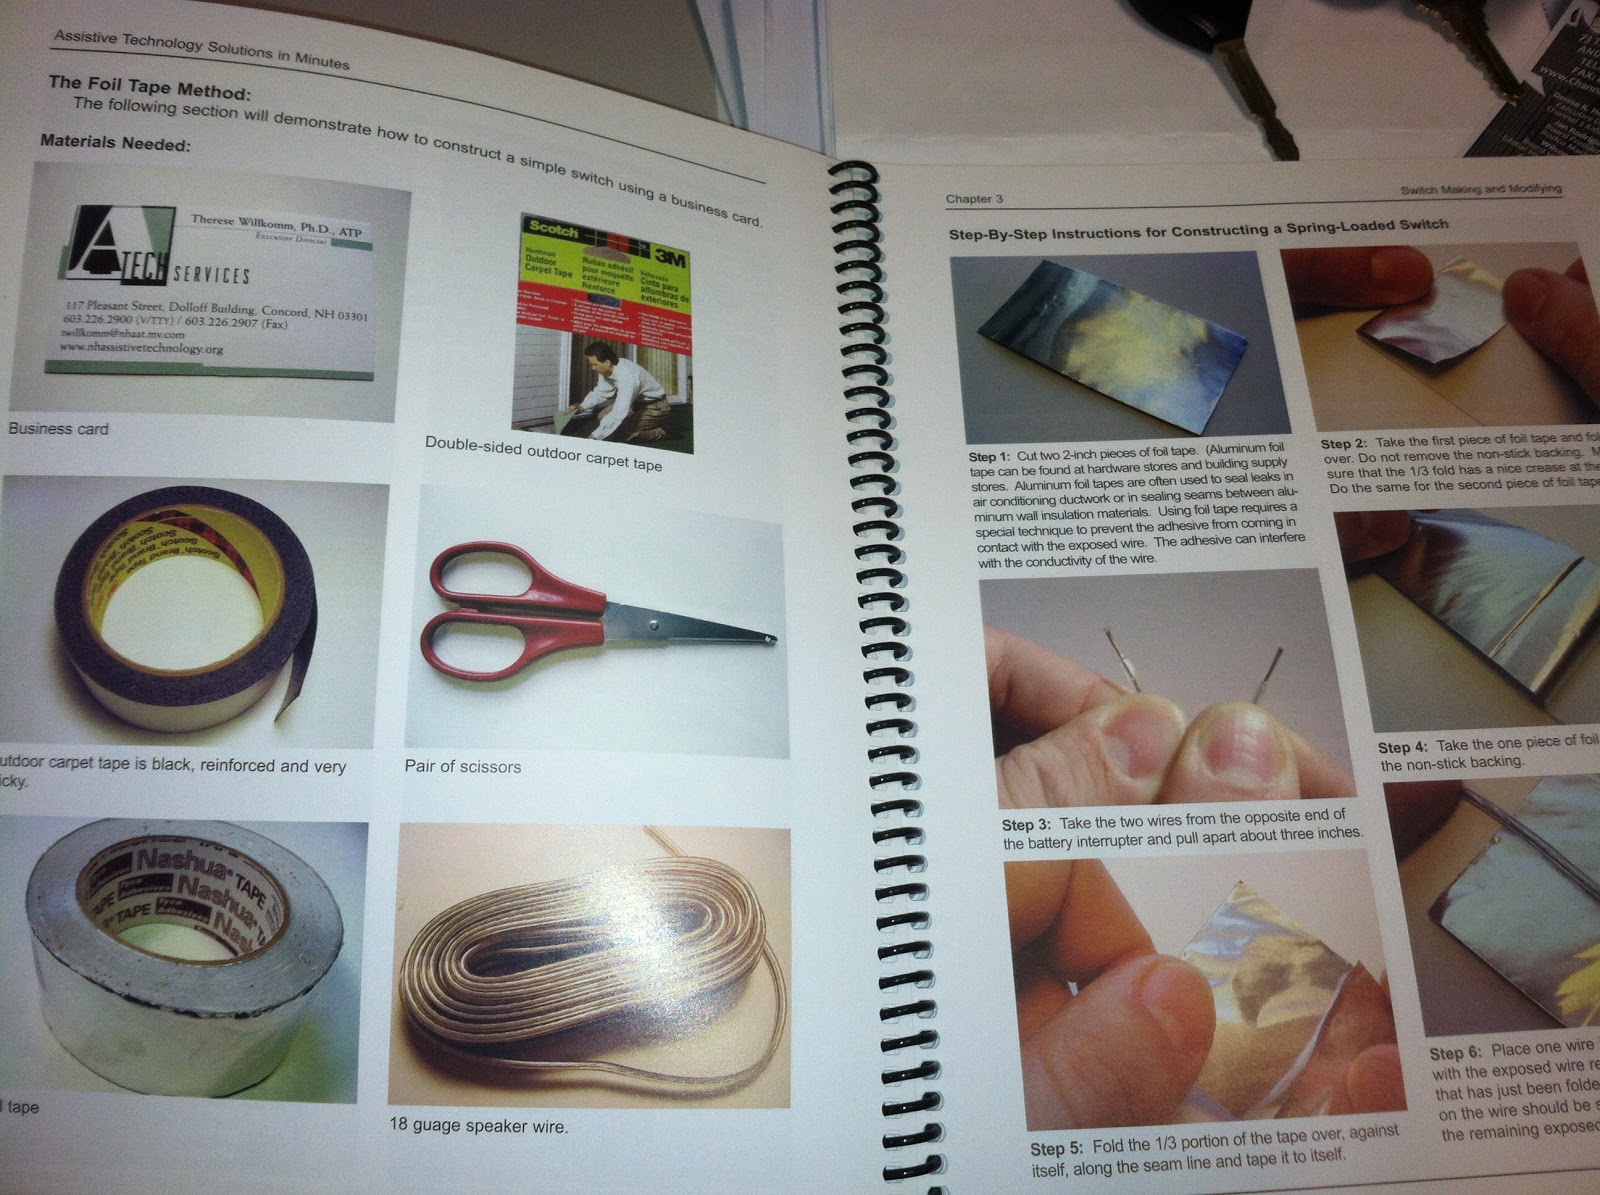
Gail handed me this book and swore I would love it. I perused through and was giddy with excitement when I saw all the resources! I am no true AT expert but love how user friendly this guide is. The solutions are easy peasy and they even provide a shoppers' guide on where to get the goods. I photographed a few pages to give you a feel of the resource including the contact information. From what I read, I think this is a sweet little AT resource for our kiddos with multiple impairments, MIVI/deafblind, ASD/VI, etc.


Wednesday, September 5, 2012

Student Tech Wiz


This week I am happy to blog about one of my students. He has a unique talent for technology and worked at our agency this summer in the Braille Unit.
I spent some quality tech time one afternoon with him and got some tips for acquiring good tech skills for students.
Here's my conversation with John Carnemolla, 16 years old. He was born with ROP with a nystagmus and a little light perception. 
Fast facts about John:
  • He's been into technology since 2006.
  • He got started because he had a computer and just got interested.
  • First piece of technology was a PC, then an MPOWER in 5th grade. He played games and started feeling around. He used the word processing programs, too. 
  • Skills that he has that help be successful: typing, listening, patience and good keyboarding skills--knows the commands like the back of his hand!
  • He reads the programming manuals to learn the operating systems. 
  • He started typing in kindergarten and actually prefers the QWERTY keyboard over a Braille input because it's a similar interface to a computer. 
  • He uses Bookshare a lot on his APEX. He says using Bookshare is awesome because "in 10 minutes you can get 50 books".
  • He plays chess and cards on his APEX.
Programs John likes:
  • He has a Braillenote APEX (He's like a whiz on it!!)
  • He likes the APEX because he says it's easy to use.
  • John prefers JAWS but will also use NVDA (which he taught me about the day I hung out with him). NVDA is an open source program (a freebie!) that works like JAWS-ish but is better than Word.


How do your teachers handle your technology in the classroom? 
John says it's all pretty cool. He comments that it is handy to use the email via WIFI in school and is completely electronic in school.

What skills are a must for tech users?
Keyboarding for sure! Next is good understanding of the computer. 

Got a tech question? John is definitely one of my favorite resources to hit up! He's smart as a whip when it comes to technology. He's helped me do presentations on adaptive technology with community partners. Feel free to email me and I will pass it on to him!

Tuesday, January 31, 2012

Why we love the iPhone

Hello parents,
Has your teenager asked you for the iPhone yet? Have you gasped when you saw the price tag for the 4S? Take a deep breath and keep reading. I have to support my students' requests for the iPhone even the 4S version. IT'S AWESOME! It's so accessible for our students. I've watched my students use Siri and they can do just about anything.  How great is it that our kids can be part of the main group! 
I decided to ask my students why they love the iPhone. Here's a couple of useful (and funny) answers. Plus a good app that another of my students swears by.

Me asking on Facebook: I want to blog about how awesome the iPhone is for you guys. What 

can you tell me about it? Why do you love it? What do you think is most helpful for you guys with 

vision impairments? Thanks for the help!!

Leah Bourassa well For one thing i am getting one because i couldn't see the text on my old 

phone without putting it up to y face.. and the iPhone has a magnification up to 56pt font with is 

wicked big but anywhere from 24 to that I can see perfectly fine and siri can do just about any 

thing for you just by telling her to
Another of my students recommends this app, Voxer. He says it's easy to use and swears by it. You can also get it in the Android market. 

If you end up getting the iPhone request, let me tell you to go for it! Almost everyone of my students has one and they can text, face chat and do almost anything else. That's a pretty nice feeling for our kids :)

Saturday, November 12, 2011

College Life, Part Three--Using Black Board

This post also comes from my recent College Day program. One of my wise TVIs pointed out to me that a lot of our students don't know what Black Board is, how it works, why they need to know about it, etc. I realized this was also something valuable that I could pre-teach about so I hit up our rehab technologist and my good friend who is an adjunct professor at a community college and compiled some resources. I thought I would share with all of you, too!  Below you can read up on what Black Board is and some helpful tips for using it with JAWS. Our rehab technologist, Dennis, didn't write all of this up. Rather, he's been collecting useful tips and what not for using it. He compiled it all in a helpful handout and I asked for permission to share so please note that these tips are from a few different resources. It's a pretty long list of information so this one is one loooooonnnngggg post.... Enjoy :)


Black Board in a Nutshell
by Corina Lopes,
Adjunct Professor, Tunxis Community College
What's Black Board? 
When in college, you might hear your professors talk a lot about it. Basically, it's course content online management system.
Wait, what?
Think of it like your class' online filing cabinet. Some professors use it more than others, but the following are its most common uses:
  • Finding the course policy and syllabus
  • Accessing and submitting homework
  • Participating in and starting discussion threads
  • Accessing your grade
  • Email 
  • Receiving important class announcements
How do I get Black Board?
If your school uses the Black Board system, then you are automatically enrolled in Black Board since you are already enrolled for the course. To access it, check with the IT Help desk of your school (usually found in the computer lab or library). However, you will most likely need to type in your student ID and a password each time you want to log-in to Black Board.

Is it a challenging system to navigate?
No, but like anything else, can take a couple of tries to get a feel for it. The "home page" of Black Board, once you log-in, will populate all the courses for which you are enrolled. You just need to click on a course to access that course's specific Black Board page. For the most part, all course pages will look and feel the same. On the left hand side is a tool bar with labeled tabs. The most important ones for you to know are:
  • Course Documents
  • Announcements
  • Assignments
  • Discussion
  • Homework Dropbox
  • My Grades
  • Email
Is that it?
Yup, as far as the system itself goes. Remember, it is a great tool for academic success. It keeps things neat and organized, plus is a great way for you to take responsibility and be on top of your own academic goals. Check it often, even if your professor doesn't remind you. Many times, I have to change something in an assignment or add something to a lecture that I forgot to mention in class, and I use Black Board as a way to reach my students so they are prepared for the next class meeting. Excuses like, "I forgot to check" or "You didn't say we needed to check" don't work. You know Black Board is part of the course, and so is keeping up with it. Honestly, Black Board is nothing to be afraid of. It gives you more control over your classroom participation, and in the end, that is a very good thing.

Using Blackboard with a Screen Reader
Information compiled by Dennis Gallant
Logging In
To log in to Blackboard, you will need your Blackboard ID and Password. Information about your Blackboard ID and Password are available on the log in page.
Once you log in, it is possible that JAWS may discontinue reading.  This is most likely an indication that you are getting a security warning.  If you hit “Enter” you will be able to go on through, but it will pop up again next time you log in again.  Tabbing twice should get you to a check box that, if reading properly, will say “Always trust content from this publisher.”  If you select that box by hitting enter, then the message should not reappear.
My Blackboard
The first page you come to once you have logged in, is the “My Blackboard” page.  This contains a list of all of your online courses that are in Blackboard.  Using Insert + F7, you should get the list of courses and can choose which course to enter.  You will also get feedback from this page, following each course link, about new content that has been added, but it is not recommended that you utilize this feature in JAWS because the icons read out multiple times and JAWS also reads the HTML code of inactive icons.
Changing Your Blackboard Settings
Certain settings may enhance your experience with JAWS.  You can review your current settings and change them by selecting “My Settings” and then “My Tool Options.”  The changes to the default settings that you may want to consider are:

  • Discussions
    • Mark my own posts as “read”
    • View “threaded”
    • Show “unread only”
  • HTML Creator
    • Make sure “Start the HTML Creator by Default” is unchecked
  • Mail
    • Consider checking the “Forward Messages to Email Address in My Profile” if navigating the Mail Tool is a problem
    • Show “Unread Only”
  • Paging
    • Consider increasing the default number to a higher number (i.e. 30) so that more messages appear on a single page.
  • Who’s online
    • Unless you have spent time learning how to navigate and make sure the chat tool does not interfere with your activity in the course, you may want to consider making your online status “Invisible”.  This prevents other students from sending you messages while you are online.
Reducing Your Channels and Adjusting Layout
You can reduce what appears on the My Blackboard page in order to simplify navigation.  You can always add these items back if you learn that it will be helpful to you in keeping up with course content.  To do this:

  • Select the “Channels” link.
  • Deselect any boxes of items you do not expect to use.
  • Some that might be removed are “To Do List”, “Who’s Online”, and “Personal Bookmarks.”
  • Select the “Save” button at the bottom of the page.
  • Next choose the link called “Layout.”
  • Select the “My Grades” radio button.
  • Select the “Move right” link.
  • Use “B” to move to “Save Button“.  Select “Save“.
  • This will reduce the number of columns and the first thing on the page will be the list of courses.
Adjusting Your JAWS Settings
It is recommended that you change your JAWS settings to ignore inline frames when using Blackboard. To do this:

  • Press Insert +F2, select “Configuration Manager,” and press Enter
  • From the Set Options menu, choose HTML Options
  • Press CTRL+Tab until you move to the Headings and Frames tab
  • Press ALT+N to move to and check the Ignore Inline Frames check box
  • Close Configuration Manager and save your changes
Announcements
Professors are able to choose a setting that causes their announcements to open up in a new window.  This may occur each time you enter the course.  Once you have read the announcements, you can choose “Close this Window” to return to the main screen.  If you lose focus in the announcement window, use Alt + Tab to find it and re-open.  The window’s titled “View Announcements”.  You can read all past and current announcements by selecting the “Announcement” Tool.
Discussions
There are a variety of ways to approach the Discussion Board.  You can select all of the new messages and read through them quickly and determine to which you would like to reply or you can scroll through the posts by title and open only those that are relevant to you.  Directions for both approaches follow.
Reading Multiple Messages in the Discussion Board
Before this tip is helpful, you must first set your Blackboard settings to show only unread items by default.

  • Insert + F7 and then “D” for Discussions (or if that does not work, press “N” for New items Discussion)
  • Select the name of the discussion you would like to enter
  • (Note:  Different courses have different names for the discussions so you may have to read the main content area to become familiar with the discussions that have been started.)
  • Once you enter a specific discussion area, follow these steps for a quick way to catch up on reading and replying to messages.
  • Press F to move to form element that reads  “select all/none check box not checked“
  • Press the Space Bar to select that check box
  • Press Insert + F7 and then press C to go to “Create Printable View“
  • Press the Enter key to open that view in new window
  • Read each message and reply as needed.
Warning:  When you close this window, these messages will all be marked as “read”.  In order to read them again you will have to select “All”.  If you simply minimize that window you can continue to read them as long as you are logged into Blackboard.
Selecting Specific Messages to Read from Discussion Board

  • Press Insert + F7 and then choose “D” for Discussions (or if that does not work, then “N” for New items Discussion)
  • Select the name of the discussion you would like to enter
  • (Note:  Different courses have different names for the discussions so you may have to read the main content area to become familiar with the discussions that have been started.)
  • Once you enter a specific discussion area, make sure your links list is set to read in the order of items on the page.
  • Press Insert + F7 and select “S” to get to “Sorted in descending order click to reverse order“
  • Then when you scroll down in the links list the next item will be the first post on the discussion board
  • From there you can scroll down to hear the titles of all the messages and choose to read the ones you want.
  • When you scroll through you will hear the following for each message:
    • Message title
    • Message author
    • “View People Link Options for this User” (This link allows you to send a message privately to the author of the message.)
  • Once you select message you would like to read, it will open in a new window.
  • You can then use Insert + F7 to choose either:
    • Replay (R)
    • Forward (F): You may only forward this message to people who are listed in the class roster using their Bb identity name.
    • Display complete Thread (D): shows all replies to this message
    • Close this Window (C)
Posting Messages to the Discussion
  • Enter the discussion area where you want to post a message
  • Using Insert + F7, select “Create Message“
  • A Compose Message window will open in a new window.
  • Tab to Subject field and enter forms mode to write your subject
  • Tab again to message body field and type your text
  • Use “B” to navigate to “Post” button and select.
  • Warning: If you use “B” there is a “Preview” button that reads as “Preview” but if you tab, it reads as “Opens in New Window button”
  • Other options available are “Add Attachments”.  To “Add Attachments” follow directions for uploading an assignment below.
Mail Tool
If you are taking more than one course, the easiest way to check your Blackboard mail, may be to use the “Global Mail” tool.  This is available when you first log into Blackboard on the page that has your course list.  Here is a quick way to navigate through your mail from this view:

  • Press Insert + F7 to list links.
  • Press “M” for Mail and space bar to select that item.
  • Press Insert + F7 again for links list.
  • Press “M” again until you find “Mail Account” followed by the course you want to select.
  • Press the space bar to select that item.
  • Press Insert + F7 to hear links again.
  • Press “S” for “Sorted in descending order”
  • Press Alt + M to move to that item.
  • Tab once to the check box for the first mail item.
  • Tab again to the link to the first mail item.  (Warning:  They read exactly the same.)
  • Use Shift + Application Key to open context menu.
  • Select “O” for Open (Opens in new browser window.)
Once in the message, you have lots of options.  Select Insert + F7 and scroll through links to hear all options.  Once you are finished reading this message, it is suggested that you use Insert + F7 and select “N” for Next.  You can move through all of your messages this way while still in this new window.  Once you have read them all, the “Previous” link will no longer be active.
Assignments Tool
Uploading Assignments

  • Once you get into your course, press Insert + F7.
  • Hit “A” until you find “Assignments Assignments”.
  • If that does not come up, try “N” for “New Items Found Assignments Assignments”.
  • Press “H” to navigate to the heading “Assignments”.
  • Tab through the “Submitted”, “Graded”, and “Published” links.
  • The next link will be your first assignment.
  • Hit Enter.  Use “H” to navigate to “Instructions” and “Submission”
  • Once you are ready to submit, tab to the text box that follows “Enable HTML Editor”
  • This is an editable area which is designed to offer a space to enter your assignment.  However, if you prefer to upload your assignment as an attachment, you have that option.
  • You have to type something in the box, such as “Attached is my assignment for module 1″.  Select “Enter” to turn forms mode on.  Type your text.
  • Tab twice to “Add attachments link”.
  • Hit Enter.
  • A new window will open.  Use links list to find “My Computer“.  (Warning:  Do not select “My Files”.)
  • Tab again to “Open File Manager in New Window“
  • Hit Enter.
  • Tab one time and you will be in an editable box where you could type the location of the file on your computer, but if you are like most people you will want to tab again to the “Browse” button.  But they read the same.
  • Hit space bar.
  • The “choose file” dialog window should open
  • Navigate to the file you want to upload.  Tab to the “Open” button and select “enter“
  • There are several of those browse buttons in a row so to save tabbing through all of them, use “Control + End” to go to the bottom of the page, then “shift + tab” until you get to the “OK Button”.  (Warning:  something unexpected occurs when you tab backwards from the end, before getting to the “Cancel” button you will hear a single “Browse” Button.  This is out of the expected order and different from what is visually on the screen.)
  • Select “Enter” and that window should close.
  • It should read out your file as a link on the page you were on before.
  • Tab until you get to the “Submit” Button.
  • Select enter.
  • A dialog button should opening asking you if you are sure you want to submit it.
  • Select “OK“
  • You will be directed to a page that lets you know that you have submitted the assignment successfully.
  • If you return to the assignments page, you can now go to the “Submitted” link and it should list your assignment there.
Using the Quiz Tool
  • Quizzes and exams are posted in under Assessments, so using links list type A or N for Assessments or New Items Added Assessments.
  • The numbers for each question are set up as Level 2 Headings, so you can use “H” key to move from question to question or to find your place if you lose focus.
  • You have the option to save answers as you go, or to “save all” at the end of the quiz.  It is recommended that you save as you go since crashes do occur on occasion.
  • Students using screen reader or magnification software can request extended time ( up to double the normal time) on timed quizzes.
    • Your professor will be the one to make this adjustment. 
  • Each time you complete a question, the focus changes to another frame briefly and then moves back to the quiz frame.  If you try to go quickly through the questions, JAWS may lose focus.
    • The “Finish” link is positioned before the “save all” link so it would be easy to select “finish” and expect that the quiz was completed successfully.  So users should make sure that they either save answers as they go, or tab past the finish link and select “Save All” before choosing “Finish”.