Showing posts with label Assistive Technology. Show all posts

Monday, July 1, 2019

Teach the ECC at a Home Improvement Store

Text with three pictures of students touching appliances at The Home Depot

Hello friends! I am finally getting around to blogging about one of my favorite places in the community for Expanded Core instruction: a home improvement store! Yep, like Lowe's or The Home Depot. These stores a treasure box of skills, experiences and learning opportunities. There are many options for doing community based instruction (CBI) at a home improvement store. I recommend doing it as a series. This means you come back several times and break up the store into smaller parts. I like this option because there is more opportunity for students to have a stronger connection to the concepts. After all, there's much to learn, see, touch and do at a big home improvement store. The pictures from this post are part of a two part series I did. We did some work in the classroom and then put it together at the store. Part one was dedicated to learning about tools and basic home improvement around the house. Students learned a lot from the difference between a flathead and a Phillips screwdriver to how to plunge a toilet! Note: I always buy a new plunger and label it so students can touch it and explore it without it being gross! I feel that students should know basics of their home. These areas often get overlooked but it is a valuable skillset. Plan time for this. It's easy to just do a "show and tell" lesson. That's not effective ECC instruction. Use the "I do. We do. Y'all Do. You do." approach for this one! It's okay to break it up into a series of learning as well! 

A male young adult examines a stove dial appliance close up

A male teenager examines a refridgerator at the home depot.

A home improvement store is also great for a variety of age groups. I brought younger students to high school students for this outing. My younger students had a bonus lesson: they went and explored different textures! There were so many textures for younger hands to find and discuss. We also did a scavenger hunt of shapes, textures, measurement and comparing/contrasting sizes with their group. 

A young adult male and an elementary age male touch a display of small rugs

A group of young students tactually explore a wall of carpet samples.
 Plan a few hours for an ECC CBI--even if you are breaking it up in a series. There are many departments that have lots of hands on exploration even for older students. Check out the picture below with all the different faucets! We had lots of discussions about student's preferences, uses and locations of just faucets!
a photo of a wall display of faucets at The Home Depot.

a group of teenagers hold up flooring samples and smile for a picture
 I brought a medium sized group of students for this outing. I broke them up into small groups and gave them an "educational scavenger hunt" (aka a creative list of things I want them to learn about). Each group had time to go about the store at their own pace. They had to check out major departments and apply their new "tool knowledge" to each department. Can you see all the possibilities?? We spent almost an entire day on our home improvement unit.
a group of students listen to a male teacher as he points out items on a heating system
 There's another reason why I like doing ECC lessons at a home improvement store: the appliance section! Many students haven't had the opportunity to check out a variety of appliances. Their knowledge is usually just their own home appliances. I like to do a whole lesson about accessible appliances. I like to review what makes an appliance accessible. I give the students a checklist of accessible options to consider and tell them to find these options on appliances. I encourage them to learn about their own accessibility needs. Then look for appliances that match their needs. Note: I don't rush this lesson. We go appliance by appliance---we do laundry first, then kitchen, etc. I let students discover features of appliances.
A female student explores a washing machine

a male young adult smiles next to a washing machine.

Don't forget to talk about the money! We also discuss prices and budgets. I kind of like to play "The Price is Right" for this. I have students take a guess at how much appliances cost including their dream accessible appliances. Fortunately, many of the most accessible appliances are the most basic ones. We compare and contrast pricier models with basic. We discuss all the bells and whistles. It's such a great ECC lesson!! 

a close up of a basic dial on washing machine
 Make sure you go during off hours if possible. It makes it easier to have "department to yourself". You can do a lot more instruction without everyone staring at you. The workers are usually awesome to work with. Many employees will take extra time and really help out where possible.
a male young adult turns the knobs on a stove as he checks it out.
 I have students pack their assistive technology (that includes their phones) for this CBI. I like them to use their AT when determining what accessibility they need. Feel free to invite an orientation & mobility instructor as well for this one. There's so much to gain on this ECC adventure!
a male young adult checks out the knob on a stove.

Thursday, May 16, 2019

ECC PTA

a flier with the text: AAC & ME?! with information for the ECC PTA on this topic

Join us for our May ECC PTA on Tuesday, May 21! This month our topic is learning all about augmentative and alternative communication better known as AAC for students with multiple impairments and blindness. This is another free meeting for our parents, related servers and teachers. We are very happy to have Breana Cannon as our special guest presenter. Breana is a speech language pathologist and also serves on our augmentative communication team. She has a fantastic understanding of  students with multiple impairments. Read this post late? No worries! You didn't miss out. You can still access the recorded webinar by registering:  https://docs.google.com/forms/d/e/1FAIpQLSdMdsZtaqYrpVrGtpHxt7uNKSo6aWBIUqw9ozkyR1Z4wkX_dQ/viewform?usp=sf_link

Monday, August 20, 2018

Teach STEM & The ECC Using Kibo Robots


Blog graphic that says "Teach STEM & The Expanded Core Curriculum Using Kibo Robots with a pciture of a Kibo robot.
 Happy back to school everyone! I apologize for the big delay but I have been a very busy bee these past few months. I am just settling back in for regular blog posts. I have so much to share! I am always on the lookout for opportunities for our students and I stumbled upon the Kibo robots at STEM Fest last year. I immediately jumped at it because the accessibility would be so easy. Kibo robots are originally designed for early childhood but I find that I can use them for older students, too. I like how I can create simple concept development to pave a good foundation for robotics, engineering and programming. Plus, you can add the A and make it STEAM! They have lots of fun addition parts to be creative. I have used them several times with students and most recently at our Survivor on STEM Camp Island residential camp.
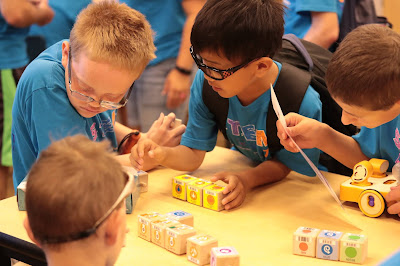
  Elementary age male students writing a program using the Kibo program blocks.
Elementary age male students writing a program using the Kibo program blocks. 
It's not just STEM that we can teach with the Kibo robots. It's about connecting it to the real world and that's where the ECC comes in. I infuse a lot of ECC concepts as I do my pre-teach with the robots such as asking the students how robots work in the real world or creating concept development about what robotics really is. Check out a video about the Kibo robots:
 
A Kibo robot with all four sensors: light, eye, telescope and listening
I have taught with the Kibo robots for students of all ages and visual abilities. My students who are totally blind can use them as can my low vision students. It didn't take much for accessibility either. We did make Braille labels for the programming blocks. The classroom kit comes with a game called Kibo Says. The game has "large print" cards which is what I use with the students who cannot easily see the blocks. You can still scan on them and they totally work. Plus they come with the kit--no enlargement necessary. I also pull out our handy Visolux (see picture below) just for quick magnification and to incorporate use of assistive technology (an ECC area!).
  A Visolux magnifier magnifies the program blocks on the screen.
A Visolux magnifier magnifies the program blocks on the screen. 
The Kibo robots lend themselves well to building concept development--meaning that there isn't a lot of abstract to make tangible. I start my lessons with new students by going piece by piece of the robot and they will build it together so they know each piece. We discuss the wheels and how to lock them in and discuss the function of each sensor. I also specifically discuss how the scanner works (and then discuss where else these scanners exist---a grocery store is a great example as well as a connection to the real world ECC).
A student hand is reaching to work on a Kibo robot.
A student hand is reaching to work on a Kibo robot. 
There are lots of games such as bowling. My students have loved just creating with it. Here is a list of examples of activities: http://resources.kinderlabrobotics.com/activities/. You have to begin each program with a start and an end which is really nice. It is easy to have defined and tangible concepts for students that have no vision. All of the students that I have introduced them to (from grades 3-12) have really liked them.

                                         Kibo Says cards in full size (8.5x11)
                                   Kibo Says cards in full size (8.5x11)


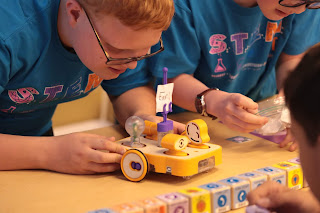
Male middle school student works on a Kibo robot. He is scanning the program blocks to the robot.
Male middle school student works on a Kibo robot. He is scanning the program blocks to the robot. 
You can infuse so much Expanded Core into your Kibo lesson! Think about spatial awareness and directionality (orientation and mobility skills), working with a team (social interaction skills), problem solving, self awareness and making choices (self-determination), all the jobs in the STEM field, following simple and complex directions, cleaning up the Kibo, etc (career education). Those are just a few examples of skills and concepts you can specifically target in your Kibo session. The only accessible thing we did was add Braille labels to the program blocks. Everything else was pretty much accessible. The direction cards did need Braille and LP copies but that wasn't hard at all to do! I've had a great experience working with the company since I purchased these for our school. Give them a call and tell them you heard about it from me!

Sunday, April 30, 2017

Joystick Tactile Object Attachment for Tactile Calendar System


A long time ago I posted about this awesome assistive technology lady, Therese Willkomm, who did this great workshop on easy assistive technology solutions. I only got to see half of her presentation and always wished I could have learned more. As luck would have it, several years later I find myself enrolled in Therese's Assistive Technology Solutions in Minutes class through Perkins e-learning series. I highly recommend this class!
Each week we learn about all kinds of fun things--adhesives, PVC, corrugated plastics, etc and we build and share our new ideas. This past week we learned about instamorph and I am in love! 
I am excited about this idea that I camp up with (thanks to the class): it's a joystick attachment for calendar object symbols. 
I have several students that have a goal of grasping items in their hands. We have some joystick switches that work with our switch adapted toys. Unfortunately, we haven't been able to expand options for giving our students meaningful ways of grasping things. Many of my students use calendar object systems but they are limited because grasping their objects is difficult. We can use eye gaze but that doesn't work for students who have significant vision loss. 
I wanted to find a way to make a more meaningful joystick for students other than with toys. I combined the joystick with the calendar object system.  I used the APH Tactile Connections Kit for this project.
You can buy Instamorph at several places including Michael's and Amazon. It dries white but you can buy colored pellets to add color to it. You can grab a good size bag for about $20. It's totally reusable (about 6 different times to reuse for best uses) and you can make stuff in a snap. 

Here's the How To:
First, start with your original symbol. This is the music symbol for one of my students. 

 I took apart the symbol, grabbed two strong magnets and got to work with the Instamorph.

 I flipped the symbol foundation (the green thing you see) over and glued the magnet to the bottom.

I used my Instamorph and molded it into a joystick and made sure that I flattened the bottom so that I could Gorilla Glue it to the magnet.


It worked! I hovered the magnet joystick over the symbol (with the magnet on the bottom) and it instantly magnetized. Now my student can practice grasping things in a meaningful way and can make choices using their object calendar system. 

Improvement to be made: I will find thinner magnets for the back side OR make sure I put a piece of foam so that the symbol isn't slanted.
Of course you will have to modify based on your calendar system items. I actually did several more for my students. 
Now I can really work on two different goals with students easier: 1) grasping in a meaningful way and 2) encouraging students to make choices. Remember to go at the students' pace and teach/reinforce/practice a lot so that they get the meaningful piece of this.
Resources for calendar object systems:
Calendar Boxes and Schedule Systems as Literacy Tools
Check back to my other posts on calendar systems because I have posted several times about them in the past.