Wednesday, December 26, 2012

Snow Play

Happy Christmas friends! Hope everyone is enjoying the holiday week. I found this idea (in yes, again Family Fun magazine, smile from me) and forgot about it until this evening when it finally snowed here in New England. This original idea is for amping up a snow angel but I am sharing it because the idea is actually a nice little vision modification for our kids! Snow play is fun but it can be really frustrating, visually fatiguing and an orientation and mobility nightmare for our kids. The harsh glare of the snow on our kids is like kryptonite! Plus, it's all white!! No contrast at all. Have no fear this winter my friends! Let's use these three simple ideas to make snow play fun for our kids! 
Idea #1--using the spray bottle and food coloring: genius! You 
can use this a few ways but here's my first idea: you can create borders (aka a defined work space) to help our kids know where to play or what's happened. Remember to be generous with food coloring as we want the strongest color possible (are you thinking red, too?). Let your kiddo use the spray bottle too! (a great OT activity). You could also create a target for our kids to aim (tracking skills) or tic-tac-toe (which is just plain fun). Hey, you could even write in Braille! 
Idea #2--Sprinkle bird seed on for a design. Bird seed is still a bit small for most of our kiddos to see but that's just your tip off idea. You can also find some pine needles, pine cones, etc. that could also help. This idea really does help with dressing up a snow angel. 
Idea #3--See above comments. 
Another idea that could be helpful is using some of those plow marker-stick-type things and paint them in an easy to see color and put them special places that can be hard to detect when playing out in the snow. This way, even though you can't see that tree stump, you've marked the yard with "hazard sticks" to alert our kids of potential blunders. 


Lastly, while we are discussing the fun of snow, I hope you parents aren't afraid to let your little ones go out in the snow. Yes, there are the above mentioned setbacks but there are also some fun pros. In a nice back yard, our kids can go set out on a backyard trek and explore! Snow is quite forgiving to jump, run, walk into, etc. with. All you need is the right snow gear and winter sports are fun and is a nice fit for our kids. Remember that skiing is an excellent and quite popular sport for kiddos with vision impairments. I started taking my Student Advisory Council students on an annual ski trip. There are lots of places that will be guides, instructors, etc. for our kids to ski. I spent some time tonight and just did a plain old Google search on adaptive skiing for blind children. I found lots of great resources! One tip that stuck out to me came from disabled-world.com which pointed out that guides for blind people are usually regarded as "equipment" and are generally no extra charge. If you are in the New England area, check out STRIDE adaptive sports, http://www.stride.org. We used their adaptive ski instructors at Ski Sundown last year and it was amazing! They were excellent instructors. You will just have to check on costs. I am sure there are other resources since this is a Paralympic sport and quite popular. It would be a great family fun adventure and a life long sport.So grab your ski pants and hit the slopes!
My student Chris, Braille reader, coming down with his guides from STRIDE. 

Wednesday, December 19, 2012

Last of the Christmas-ish ideas...These could still be good over winter break too!

Countdown to Christmas! It's just around the corner and sweet nibblets, I can't believe I put off Christmas shopping!! I just got it done this past Tuesday. Luckily for me I am firm to the three presents per child rule. This year the spirit of making homemade gifts just filled me up. My fiancee and I made tie quilts for each of our kids and we made art buckets. In between all the crafting, I still thumbed through some magazines and found some fun ideas. These ones are keepers not just for the actual holiday of Christmas but are super fantastic for the whole winter holiday. Here's my last three recipe/craft/projects. I LOVED these pie in a jar ideas!! I thought they were just perfect for our kids. I photographed every detail of these. I am going to try them after Christmas over winter break. I'll post them when I do them. 


I loved this next idea as well but let's face it, it's never gonna look this pretty with little hands and hand under hand work so rest assure that it might not look the same as this pretty picture. Nevertheless, I still think this is a great idea and something fun to hand out to neighbors, family, church members, etc. Remember to still work the connected teaching experience by letting our kiddos go to the store to buy the items. I think it works because our kids like to eat chocolate chip cookies so there's a little motivation there. 


Lastly, peppermint bark! I know I use this every year. It's such a good kid recipe (tweens to teens, too!!).  There are so many version of bark but here's just another one that I found. Making peppermint bark is also super fantastic for kids who are MIVI/DB and ASDVI. They really can't mess it up! Plus most of these special kiddos like to hammer the peppermint. I also like to add Heath toffee chips to mine as well as swirling the milk chocolate and white chocolate chips. Peppermint is also a strong smell that most of our kids dig as well. Feel free to sprinkle peppermint sprinkles or red sprinkles too!

 And remember to go to Target the days after Christmas for your
 CVI stock up bonanza!! 
Happy holidays my friends! I'll blog again soon after the holiday and while I am on winter break with my sweet little kids. 

Wednesday, December 12, 2012

CVI Buys

photo from flickriver.com
     Okay, I can't remind everyone enough: This is the time to stock up on your CVI supplies!! Shiny red ornaments, paper,ribbon, curlies, etc. are EVERYWHERE!! Buy now, use later!! I was worried that my little post about this got flushed to the bottom because I have a ton of holiday postings.  Buy some clear bins, label them with what your CVI supplies are and keep them in your closet.
      Not sure why? Because red shiny objects get trickier to find as the holiday closes. We get one little last chance at Valentine's Day (but it's slim pickings by that point usually). Another good reason is because you may not need any more shiny things at home but have you thought about creating a resource stash for your therapists, teachers, church meetings, play groups, grandparents? etc.? You don't want to bring your only CVI toys everywhere---what if you lose them? They get destroyed? The teachers love it and want more? Parents, get proactive and make yourself a little resource stash! 
     We are lucky that here in CT we have a fabulous CVI team with lots of great resources and materials but if you live somewhere far out with not much in the resource department, you've got to get proactive! Buy yourself a little clear bin and make yourself a resource stash that you can pull from. Wouldn't it be great if you had CVI modifications already at the places you frequent the most--church? play groups? grandparents? etc. Since a majority of our kiddos with CVI also have multiple impairments anything we can do to make packing to go easier definitely helps so hit up the Dollar Tree, go to Target after Christmas, use your JoAnn Fabric coupons and start stocking up :)

Glittering Shards Project with Braille!

We recently had our first ever Girls Weekend and it was a HUGE success (pics, posts & ideas to come don't worry!). I found this idea on Pinterest and realized I could add a little Braille to this. It's a great holiday project that kids can do on their own (like we did at Girls Weekend) or with a little help for our young school age kiddos.

First, here's the original idea:

You can use clear and colored stones for this project. Here's our Braille modification: Use the colored stones to write in Braille! I loved this because although this is a hands-on tactual project, adding the Braille piece is something our Braille readers can knock out of the park. It does take a little pre-planning but is totally doable.
 Put the "Braille stones" on FIRST and then fill in with the colored stones. 

Here are more pics of the craft and the link to the blog that I found this one. We bought  most of our supplies at Dollar Tree (stones and glass jars). The glue we purchased at JoAnn Fabrics. 


Check out the blog that has full directions and tips:

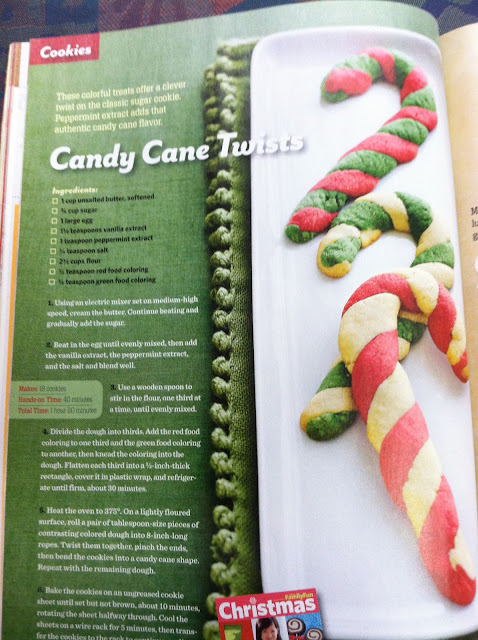
Candy Cane Twists Recipe

You can make these into candy canes or wreaths! If you are going to do candy canes, think about expanding the lesson and buy some actual candy canes and eat them! Have your child hang candy canes on the tree! Let them smell the peppermint and discuss what other things smell like peppermint during the holiday! I can go on and on but I hope you are picking up what I am putting down here about connecting your recipe to other concepts around this holiday especially for younger children. There is even a little OT-type work in this one with the twisting (a little fine motor, hand coordination, etc.). I found this recipe in Family Fun (my never ending idea box of fun). You can also make wreaths, hearts and star shapes :)


Holiday Posts Extravaganza!!

photo from blog.thekneadforbread.com
It's time for my annual blogging of great holiday ideas! This time of year is filled with ideas, recipes and activities for our kids. Remember to stock up on bright shiny red paper for our CVI kiddos. I have found a few holiday recipe ideas that I think are top notch for our kids. Remember when looking over recipes for our students (especially our MIVI & ASD/VI kids) look for easier recipes for them--recipes that can be a 3 step sequence works best for MIVI. You don't want to be the one doing all the work while they just hand you a spoon. You also want to think about using peppermint and vanilla extracts for sweet smells. Our kids dig that! I have found a couple simple ideas and one slightly more complicated (probably best for tweens to teens typically developing). No matter what you celebrate this season, there truly is a lot for kids to enjoy. Happy Hannukah, Merry Christmas & Seasons Greetings!!

Thursday, December 6, 2012

Happy Hanukkah!

I was sitting in the doctor's office yesterday perusing a new Family Fun magazine (which I have come to believe is one of the true secret sources of all awesome kid ideas...) and came across this Hanukkah idea. I thought the tactual pieces plus the craft of it would allow our kids to participate nicely. Then as I was organizing my calendar I realized that Hanukkah is this weekend! So here's my post right away! Happy Hanukkah my Jewish friends!


Wednesday, December 5, 2012

Rock Paper Scissors Tag

Hi!! I am sorry that I didn't post last week. I started but never got to final post. I left to visit my family in Florida for a new holiday I like to call Thanks'Ristmas. It was great. I was lounging on Cocoa Beach at 80 degree weather....now back to business in CT! I've got lots of fun things to blog about so I hope I get them all posted. Keep checking back. This coming weekend we are having our first ever GIRLS SPORTS & MORE weekend! It's a superfusion of sports & rec, ILS, social skills and sparkle!! I am SO pumped for this one!!
Okay, okay but enough about coming events. I want to blog about what fun little discovery I uncovered last month. Rock, paper, scissors tag!! This fun game comes our way thanks to our good PE friend, Lauren Andersen.
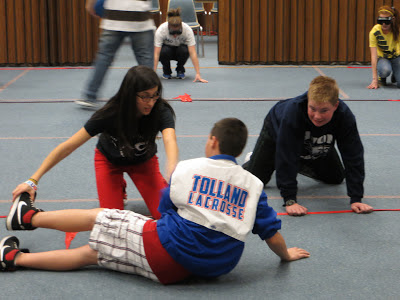
Know how to play Rock Paper Scissors? Take that concept and use your whole body to show it! This is a PE game that is pretty popular around the gym. I love when we teach general ed PE games because we help give our kids a nice little pre-teach to the game. 
First, learn the poses.
Here's paper, starring our friend Jimmy:
Now learn Scissors...
And last is another student showing ROCK...
Now that you know the poses, it's time to divide up into two teams and come to the  'shooting line'. You need to divide up into two teams. The caller (Lauren, girl with blonde hair at bottom of picture). Each team huddles up and chooses either rock, paper or scissors. The caller yells "Rock, paper, scissors, SHOOT!". Each team then shoots their pose. See below....both teams tied! In that event, each team has a 'backup move'. The caller calls "rock, paper, scissors, SHOOT!" again. 
The winning side chases down the losing side. Each tagged player joins the winning side. The goal is for one team to tag all of the opposing players until they are all one winning team. Make sense? 
We needed to provide some guide support and the students all knew the layout of the room that we were playing in pretty well. You will need to make sure your kids feel comfortable with the layout of the room. I loved this game because it worked on body in space positioning which can be a real tough cookie for our kids. Try it out!! It's a super fun game!! We played it all weekend :)

Tuesday, November 20, 2012

DIY Tactual Books


Tactual Book Project

Book One: Graduated Pages Book
Materials
5 different types of (texture) fabric (smooth, soft, rough, silky, etc.)
Hot glue & glue gun
Sewing machine
Folder/sturdy book back for each book

How to assemble the graduated pages book:
Take each of the 5 different sizes and cut them to size:
10x10 square, 8x10, 6x10, 4x10, 3x10
Assemble fabric (with 10x10 on the bottom, stacking each size up so that smallest is on top).
Sew up the left edge (“spine” of the book).
Place inside folder with hot glue at the spine.


 graduated pages book

 book making fun


Book Two: Fabric Squares Board
Materials
5 different types of (texture) fabric (smooth, soft, rough, silky, etc.)
Sturdy foam board cut into a large square (18x18)
Cut fabric into 9 equal pieces (like a Tic-Tac-Toe board)
Glue fabric onto foam board (like a Tic-Tac-Toe board)


Book Three: Giant Square Book 
Materials 
5 different types of (texture) fabric (smooth, soft, rough, silky, etc.)
Foam board
Large rings
Exacto knife
scissors
How to assemble this book:
Cut fabric to 11x14. All uniform cut. No frayed edges. Edges can be sewn or burned for finish.
Cut foam board to 11 ½ x14 ½
Cut two holes at the top of fabric. Fabric should lay horizontal with holes punched at top (See picture).
Punch two holes at the top of the foam board. Punch holes in the exact same places as in the fabric so that both foam board holes and fabric holes line up.


all of the squares cut, then assembled and hot glued to foam board

Tips to remember:

  • Patterns count so be watchful for aggressive patterns.
  • Shiny red sequins (that are sturdy) are always a good find
  • Put contrasting fabric types together. Although I always say you can't understand blindness by simply closing your eyes, for this one close your eyes. Feel for strong contrasts like burlap and silk.

A New Level of Service

 Wow, on November 10, 2012 my students took service to a whole new level! As many of you know I am part of a group of teachers that are advisers for a group of my students called Student Advisory Council (aka SAC). We did a community service project for over 70 youth and welcomed them into the vision impairment community. In addition to my stellar students rocking the house, we also had Fidelco guide dog school and Silver Lining Technology come and round out the cast. We spent almost 6 hours welcoming our new friends into our community and the results were awesome! The morning was spent dividing up the youth into three groups: orientation & mobility, assistive technology and Braille. We shuttled our youth into these groups and had them do sighted guide technique, make some edible Braille and have some hands-on time with AT devices.

My super awesome students!!
I am blogging about this because not only am I super proud of my students but this was an amazing experience for the community. I also want to empower other students to do the same thing! This was great for the community. What I loved the most was watching the youth "get it" about our kids. They saw our students for who they really are. Each group was led by one of our fab teacher advisers. We have two mobility instructors, two TVIs and me! We all split up and headed a group. 

My family and our friend learning about guide dogs with Fidelco.

My tech loving students presenting with Stephen Deltatto of Silver Lining Technology
  The other treat to our community outreach project was that we all worked together and made tactual books for our preschool and special services division. We made three different types of books. You can also do this too!The directions and pictures are in a separate post.
Service project work!!
Michelle and other SACker Gannon instructing goalball

My students, Jose and Michelle, teaching goalball


Youth Mackenzie doing edible Braille

Jimmy also came out as a junior SAC member and taught about Braille

Our teacher advisers leading the discussion on Braille
 It truly was a great community outreach event. The youth leaders of The Church of Jesus Christ of Latter-Day Saints supplied the materials for our tactual books and worked with me on setting up the dates and other details.  I still get positive feedback from the youth about this outreach service project. I had a handful of my super stellar students work this. They worked their butts off and changed the way over 70 youth view students with vision impairments. I call that a success! Yeah, another great day for me as a teacher. I look forward to a million more with my students for sure!
My student Kacper and his new friends :)
Everyone took home their name in Braille

Fabric and table set up for the service project

Thursday, November 8, 2012

See you at NE/AER!

Hey New England professional friends--
I will be presenting at the pre-conference for NE/AER this year with the fabulous Betsy Bixler (from Perkins). Betsy is presenting a really good presentation on self-determination and I am presenting on recreation & leisure. Both presentations are for children with multiple impairments/deafblind. I am super excited to present with Betsy. If you are at the conference, please come over and say hi!

Winter Cane Swag

Hi friends,
Again, week's post comes from something new and cool that floated around my agency. I am always thankful for the generosity of my colleagues to let me blog about fun finds, resources and our latest new cool thing. This week I am sharing something that was made by a parent and shipped over to us.

Hello cane swag! Check it out!
 Thanks to Gail J (preschool teacher) for modeling in the storage room :)


I don't know why I couldn't rotate this one.
 I did it like 5x and it STILL wouldn't rotate--sorry for the sideways reading!!


Now I know to a teenage cane user this might not come off as the coolest looking thing ever. HOWEVER, I get super cold hands quite easily so I would do just about anything to keep my hands warm!! This might not be for every kid but I thought it was a pretty nifty idea and I give total snaps to the Interfaith Stitchers for this idea. See picture above for credit info. 

We just got snow yesterday (which inspired this post) as I was outside shoveling off my car. These came in a variety of colors so I am sure you could get a coordinating one for your little one too! Stay warm!!


Tuesday, October 30, 2012

Tray table covers

Hi Friends,
Happy Halloween eve! I have another find to share with everyone. Thanks again to my preschool pal Gail for this one. We were at a preschool meeting discussing tactile books for our preschool kiddos as well something for our kiddos in wheelchairs. Gail remembered a nice little tray cover  and shared it with me.
It is available via Abilitations for a pretty decent price. If you are also looking at this picture and feeling inspired, I bet you could make some pretty sweet variations yourself. In the mean time, here's the info to order these little tray table covers.
Website: http://store.schoolspecialty.com/OA_HTML/ibeCCtpItmDspRte.jsp?minisite=10021&item=2000787
If the link doesn't work, go to store.schoolspecialty.com. Abilitations is a subserve of School Specialty. It took me a few attempts to find from the link that Gail gave me so be patient. Finally when I entered "Feelyz tray covers", I found it.

Product Details from the Abilitations website:
Fits Right Over Your WheelChair Tray. These tactile, colorful, touchable tray covers were designed by the mother of two special needs children with vision and hearing loss. FeelyzTrayCovers will awaken a child's senses but is especially appealing to children who rely on their sense of touch to understand their world. Each cover is brightly colored with constrasting balck, red and white colors and is made of soft, tactile and auditory and manipulative blocks of material. Cover measures 20" (51cm) across, 20" (51cm) from edge to elbow rest and 15" (38cm) from edge to center curve. Features elastic backing to secure onto your existing tray. Surface clean. Two to a set. Abilitations.

Sensory Solutions / Tactile / Pressure Solution
Sold as Set of 2
Designed by experts, perfect for use at home or the classroom
From the award winning Abilitations line of Special Needs Solutions
Short Name: Cover Feelyz Tray Set Of 2


Additional Information
Item #1327590
SHORT NAME: COVER FEELYZ TRAY SET OF 2
BRAND NAME: ABILITATIONS
NIGP CODE 78500000
SHIP METHOD: Parcel
SELLING UOM
SET OF 2
UNSPSC
4219150200
CATALOG NUMBERS
91327590825; 91327590977; 91327590167; 91327590; 1327590; 1327590167