Hi friends! I am excited to share another DIY project: a sensory light bridge!
This is another easy peasy project that you can make in about an hour (thanks again to my awesome husband for making the frame).
The original idea came because of the wedge mats (do you see them in the background--they are yellow and black). Many of the students in this class require a lot of physical support. The teacher and I were brainstorming about different ways we could provide instruction especially when the students are placed on the floor.
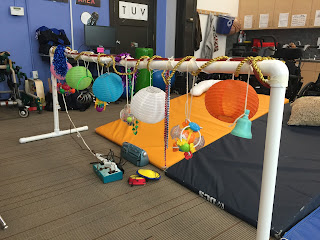
A light bulb went off for me and thought about having a PVC "bridge" that could hang items above students when they are on the floor. Check out how the idea turned out!
 |
| Different toys that create a sensory activity for kids with blindness. Use assistive technology to add light for kids with Cortical Vision Impairment |
I hit up Lowe's and bought some PVC pipes. We bought the 2 inch pipes and caps. My hubby designed this to be broken down to two pieces (in the middle there is a T cap that connects them). The legs are a simple T stand. It took about 15 minutes to assemble (including cutting PVC pipe).
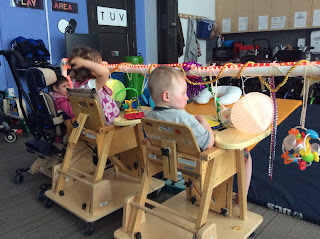
Now comes the fun part! Thanks to the teacher for taking this idea and making it awesome!! She added rope lights, garland, hanging toys that make sound, beads and paper lanterns. The lights and the CD player (it's on the ground) are hooked up to a switch (it's the big yellow button on the floor).
 |
| Blind students can sit in their Rifton chairs to access sensory activity in a preschool classroom |
As always, I will point out that these activities help provide Expanded Core Curriculum instruction. Can you see how? You can easily list assistive tech, orientation and mobility and sensory efficiency skills when students engage with the sensory bridge. Other areas such as self-determination (making choices and choosing to engage) and recreation and leisure (playing with items for fun) are also areas. Keep in mind to be on the lookout for visual or auditory clutter! Know your students and know what overwhelms them. Think about slowly integrating items. Watch for students to "see" items. All in all, this project will cost you about $7 and is a great item for early childhood. Have fun!


No comments :
Post a Comment